


 本文详细介绍了Java中的IO流概念、基本操作,包括FileInputStream、FileOutputStream等类的使用方法,并探讨了序列化与反序列化的实现过程。
一.基本概念及特点
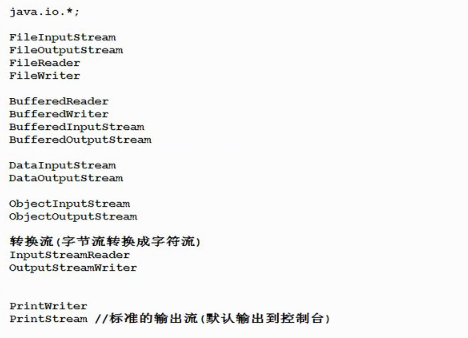
1.概念-常用流
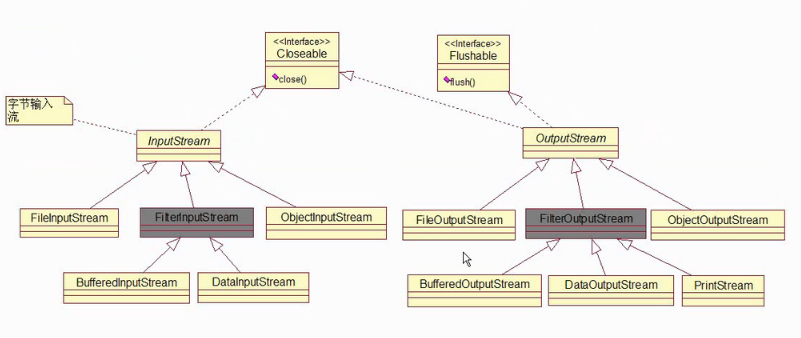
2.Input_OutputStream继承结构图
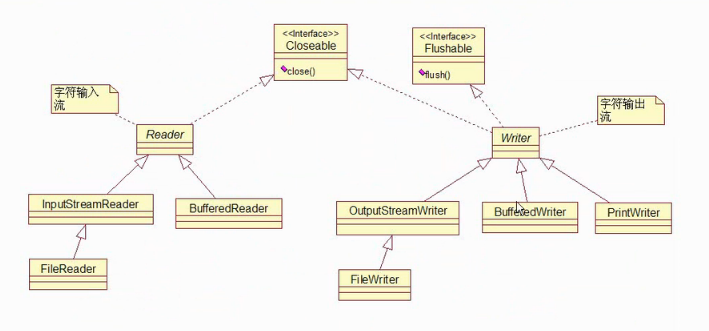
3.Reader_Writer继承结构图
二.基本操作
1.基本读操作- read()方法
例1.1:


 1 /*
 2    java.io.InputStream
 3        java.io.FileInputStream
 4        按照字节方式读取
 5 */
 6 import java.io.*;
 7 class  FileInputStreamtest
 8 {
 9     public static void main(String[] args)
10     {
11         FileInputStream fis = null;
12         try{
13             //文件路径
14          //String filePath="text1.txt";//相对路径,在当前路径下
15         // String filePath="D:\\Sourcecode\\Editplus\\java\\file\\text1.txt";
16          String filePath="D:/Sourcecode/Editplus/java/file/text1.txt";
17          fis = new FileInputStream(filePath);
18          //读
19          int i1 = fis.read();//以字节方式读,只能读取一个字母
20          System.out.println(i1);//输出字母对应的ASSICK值
21
22         }catch(FileNotFoundException e){
23            e.printStackTrace();
24         }catch(IOException e){
25            e.printStackTrace();
26         }finally{
27         //保证流一定释放,使用try..catch语句
28         if(fis!=null){
29            try{
30              fis.close();
31            }catch(IOException e){
32              e.printStackTrace();
33            }
34         }
35
36         }
37     }
38 }
例1.2:
 1 import java.io.*;
 2 class FileInputStreamtest02
 3 {
 4     public static void main(String[] args) throws Exception
 5     {
 6         FileInputStream fis = new FileInputStream("text1.txt");
 7         int temp =0;
 8         while((temp=fis.read())!=-1){
 9            System.out.println(temp);
10         }
11         fis.close();
12     }
13 }
例2.1:
 1 /*
 2    int read(byte[] bytes)
 3    读取之前在内存中准备一个byte数组,每次读取多个字节存储到byte数组中,一次读取多个字节。
 4    效率高
 5    text1.txt文件中的内容为abcdefg
 6 */
 7 import java.io.*;
 8 class FileInputStreamtest03
 9 {
10     public static void main(String[] args) throws Exception
11     {
12         FileInputStream fis = new FileInputStream("text1.txt");
13         byte[] bytes = new byte[3];//每次读3个字节
14
15         int i1 = fis.read(bytes);
16         System.out.println(new String(bytes));//abc
17         int i2 = fis.read(bytes);
18         System.out.println(new String(bytes));//def
19         int i3 = fis.read(bytes);
20         System.out.println(new String(bytes));//gef
21         System.out.println(new String(bytes,0,i3));//g
22         int i4 = fis.read(bytes);
23
24       //int类型的i表示每次读取的字节数
25         System.out.println(i1);//3
26         System.out.println(i2);//3
27         System.out.println(i3);//1
28         System.out.println(i4);//-1
29
30
31
32     }
33 }
例2.2:
 1 /*
 2   循环读取
 3   text1.txt文件中的内容为abcdefg
 4 */
 5 import java.io.*;
 6 class FileInputStreamtest04
 7 {
 8     public static void main(String[] args) throws Exception
 9     {
10         FileInputStream fis = new FileInputStream("text1.txt");
11         byte[] bytes = new byte[1024];//每次读3个字节
12          int temp =0;
13          while((temp=fis.read(bytes))!=-1){
14            System.out.print(new String(bytes,0,temp));
15          }
16          fis.close();
17     }
18 }
2.available()方法和skip()方法
例:
 1 import java.io.*;
 2 /*
 3   available()方法:返回流中剩余的字节数
 4   skip(n)方法:跳过n个字节不读取
 5    text1.txt文件中的内容为abcdefg
 6 */
 7 class FileInputStreamtest05
 8 {
 9     public static void main(String[] args) throws Exception
10     {
11         FileInputStream fis = new FileInputStream("text1.txt");
12         System.out.println(fis.available());//7
13         System.out.println(fis.read());//97
14         System.out.println(fis.available());//6
15         fis.skip(2);//跳过两个字节不读取
16          System.out.println(fis.read());//100
17         fis.close();
18
19     }
20 }
3.写入数据的方法
例:FileOutputStream
 1 /*
 2   java.io.OutputStream
 3     java.io.FileOutputStream;文件字节输出流
 4     将计算机内存中的数据写入硬盘文件中
 5 */
 6 import java.io.*;
 7 class  FileOutputStreamtest01
 8 {
 9     public static void main(String[] args)
10     {
11          FileOutputStream fos=null;
12         try{
13            //fos= new FileOutputStream("text2.txt");//多次运行,会覆盖源文件内容
14            fos= new FileOutputStream("text2.txt",true);//追加写入
15           //写入
16           String msg = "Hello World";
17           //将String转换成byte数组
18           byte[] bytes = msg.getBytes();
19           fos.flush();//强制写入,保证数据完全写入硬盘,与、需要刷新
20           //fos.write(bytes);//强制写入,写入全部
21           fos.write(bytes,0,3);//写入3个,将byte数组部分写入
22
23         }catch(Exception e){
24           e.printStackTrace();
25         }finally{
26             if(fos!=null){
27                try{
28                  fos.close();
29                }catch(Exception e){
30                  e.printStackTrace();
31                }
32             }
33
34         }
35     }
36 }
4.文件的复制粘贴
例4.1:FileInputStream FileOutputStream
 1 /*
 2    文件的复制粘贴
 3 */
 4 import java.io.*;
 5 class Copy01
 6 {
 7     public static void main(String[] args) throws Exception
 8     {
 9         FileInputStream fis = new FileInputStream("text1.txt");
10         FileOutputStream fos = new FileOutputStream("text2.txt");
11         //读,写
12         byte[] bytes = new byte[1024];
13         int temp = 0;
14         while((temp=fis.read(bytes))!=-1){
15           fos.write(bytes,0,temp);
16         }
17         fis.close();
18         fos.close();
19
20     }
21 }
例4.2-fileReader,FileWriter
 1 /*
 2  文件复制,只能复制纯文本文件
 3 */
 4 import java.io.*;
 5 class  Copy02
 6 {
 7     public static void main(String[] args) throws Exception
 8     {
 9         FileReader fr = new FileReader("text1.txt");//一个已经存在的文件
10         FileWriter fw = new FileWriter("text4.txt");//运行后复制出一个文件
11         char [] chars = new char[1024];
12         int temp =0;
13         while((temp=fr.read(chars)) != -1){
14           fw.write(chars,0,temp);
15         }
16         fw.flush();
17         fr.close();
18         fw.close();
19     }
20 }
5.FileWriter()方法写入文件
例:
 1 /*
 2     java.io.Writer;
 3       java.io.OutputStream;转换流
 4         java.io.FileWriter文件字符输出流
 5 */
 6 import java.io.*;
 7 class FileWritertest01
 8 {
 9     public static void main(String[] args) throws Exception
10     {
11         FileWriter fw = new FileWriter("text3.txt",true);
12          fw.write("写入文件");//直接写入字符串
13          char [] chars = {'写','入','文','件','{','。','、',};
14          fw.write(chars,0,6);
15          fw.flush();
16         fw.close();
17     }
18 }
19 /*
20 运行结果:
21 写入文件写入文件{。
22 */
6.BufferedReader带有缓冲区的字符输入流
例6.1
 1 /*
 2   readLine() 方法一次读取一行文本
 3 */
 4 import java.io.*;
 5 class  BufferedReadertest01
 6 {
 7     public static void main(String[] args) throws Exception
 8     {
 9         BufferedReader br = new BufferedReader(new FileReader("BufferedReadertest01.java"));
10         String temp = null;
11         while((temp=br.readLine())!=null){
12           System.out.println(temp);
13         }
14         br.close();
15     }
16 }
例6.2
 1 /*
 2   readLine() 方法一次读取一行文本
 3 */
 4 import java.io.*;
 5 class  BufferedReadertest02
 6 {
 7     public static void main(String[] args) throws Exception
 8     {
 9         FileInputStream fis = new FileInputStream("BufferedReadertest01.java");//文件字节输入流
10         InputStreamReader brs = new InputStreamReader(fis); //将字节流转换成字符流
11         BufferedReader br = new BufferedReader(brs);//brs是字符流
12        //将上面的语句合并
13      //  BufferedReader br = new BufferedReader(new InputStreamReader(new FileInputStream("BufferedReadertest01.java")));
14         String temp = null;
15         while((temp=br.readLine())!=null){
16           System.out.println(temp);
17         }
18         br.close();
19     }
20 }
三.序列化和反序列化-对象流
1.序列化-ObjectOutputStream
序列化就是将堆中的Java对象存入到硬盘中。
例3.1.1:
 1 import java.io.Serializable;//可序列化的,没有任何方法的标识接口
 2 class  User implements Serializable
 3 {
 4     String name;
 5     User(String name){
 6       this.name = name;
 7     }
 8     public String toString(){
 9       return "User[name="+name+"]";
10     }
11 }
注: User 实现了 Serializable 接口, JVM会给该类添加自动一个属性:序列化版本号。(可以自定义一个序列化版本号,则系统不会再成序列化版本号,
也不会出现版本号不相同的情况)
例:自定义序列化版本号
static final long seriaVersionUID="xxxxxxxxx";
如果不让某个属性参与序列化,可以使用transient关键字修饰;
如:
transient String name;
例3.1.2:
 1 /*
 2    java.io.ObjectOutputStream;序列化Java对象到硬盘
 3    java.io.ObjectInputStream;将硬盘中的数据反序列化到jvm内存
 4 */
 5 import java.io.*;
 6 class  ObjectOutputStreamtest01
 7 {
 8     public static void main(String[] args) throws Exception
 9     {
10         //创建Java对象
11         User u1 = new User("Java对象");
12         //创建输出流(序列化流)jvm中的java对象状态保存到硬盘中
13         ObjectOutputStream oos = new ObjectOutputStream(new FileOutputStream("text6.txt"));
14         //写
15         oos.writeObject(u1);
16         oos.flush();
17         oos.close();
18     }
19 }
2.反序列化-ObjectInputStream
反序列化就是将硬盘中的对象恢复到内存中。
例:
 1 /*
 2    反序列化
 3 */
 4 import java.io.*;
 5 class  ObjectInputStreamtest01
 6 {
 7     public static void main(String[] args) throws Exception
 8     {
 9         //创建反序列化流
10         ObjectInputStream ois = new ObjectInputStream(new FileInputStream("text6.txt"));
11         //反序列化
12         Object o = ois.readObject();
13         System.out.println(o);
14         ois.close();
15     }
16 }
17 /*
18 User[name=Java对象]
19 请按任意键继续. . .
20 */
四.File
1.特点:
Java.io.File;File类和流无关,不能通过该类完成文件的读和写,File是文件和目录路径名的抽象表示形式,File代表的是硬盘上的文件夹和文件名。
2.常用方法:
例4.2.1:
 1 import java.io.*;
 2 /*
 3    判断指定路径或文件是否存在,不存在则创建
 4 */
 5 class Filetest01
 6 {
 7     public static void main(String[] args) throws Exception
 8     {
 9         //相对路径
10         File f1 = new File("text1.txt");
11         //绝对路径
12         File f2 = new File("D:\\Sourcecode\\Editplus\\java");
13
14         System.out.println(f1.exists());//true
15         System.out.println(f2.exists());//true
16
17         File f3 = new File("D:\\Sourcecode\\Editplus\\java\\AA");
18         System.out.println(f3.exists());//false
19        //如果不存在则创建
20        if(!f3.exists()){
21          //创建目录
22          //f3.mkdir();
23          //创建文件
24          f3.createNewFile();
25        }
26        File f4 = new File("D:/a/b/c");
27        if(!f4.exists()){
28          //创建多重目录
29          f4.mkdirs();
30        }
31     }
32 }
.


 10万+
10万+

 被折叠的 条评论
为什么被折叠?
被折叠的 条评论
为什么被折叠?
 到【灌水乐园】发言


