1. Download the file in blue box from website http://www.springsource.com/, then execute the exe file to install it
2. Create a sample porject called DataAccess in C# console program
3. Add C:\Program Files\Spring.NET 1.3.2\bin\net\2.0\release\Spring.Core.dll (2.0 means framework 2)
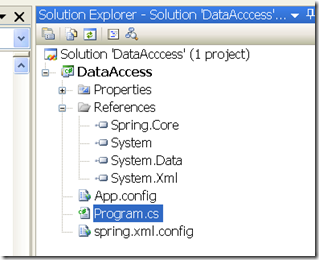
The solution file is like
The code is like below
Program.cs
1: using System;
2: using System.Collections.Generic;
3: using System.Text;
4: using Spring.Context;
5: using Spring.Context.Support;
6: namespace DataAccess
7: {
8: class MainApp
9: {
10: static void Main()
11: {
12: DataAccessObject daoCategories = new Categories();
13: daoCategories.Run();
14:
15: DataAccessObject daoProducts = new Products();
16: daoProducts.Run();
17:
18: IApplicationContext context = ContextRegistry.GetContext();
19: DataAccessObject DAO = (DataAccessObject)context.GetObject("DataAccessObject");
20: DAO.Run();
21:
22: // Wait for user
23: Console.ReadKey();
24: }
25: }
26:
27: abstract class DataAccessObject
28: {
29: protected string connectionString;
30:
31: public virtual void Connect()
32: {
33: Console.WriteLine("Connect '" + connectionString + "'");
34: }
35:
36: public abstract void Select();
37: public abstract void Process();
38:
39: public virtual void Disconnect()
40: {
41: Console.WriteLine("Discount\r\n");
42: }
43:
44: // The 'Template Method'
45: public void Run()
46: {
47: Connect();
48: Select();
49: Process();
50: Disconnect();
51: }
52: }
53:
54: class Categories : DataAccessObject
55: {
56: public override void Select()
57: {
58: Console.WriteLine("Get Categories");
59: }
60:
61: public override void Process()
62: {
63: Console.WriteLine("Process Categories");
64: }
65: }
66:
67: class Products : DataAccessObject
68: {
69: public override void Select()
70: {
71: Console.WriteLine("Get Products");
72: }
73:
74: public override void Process()
75: {
76: Console.WriteLine("Process Products");
77: }
78: }
79: }
App.config
<?xml version="1.0" encoding="utf-8" ?>
<configuration>
  <configSections>
    <sectionGroup name="spring">
      <section name="context" type="Spring.Context.Support.ContextHandler, Spring.Core"/>
    </sectionGroup>
  </configSections>
  <spring>
    <context>
      <resource uri="spring.xml.config"/>
    </context>
  </spring>
</configuration>
spring.xml.config
<?xml version="1.0" encoding="utf-8" ?>
<objects xmlns="http://www.springframework.net">
  <object id="DataAccessObject" type="DataAccess.Products">
    <property name="connectionString" value="C:\db\northwind.mdb"/>
  </object>
</objects>
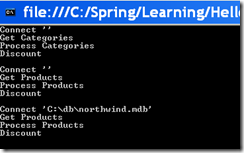
Running the application, the output is like
Now modify the spring.xml.config as below, only change “Products” to “Categories”
<?xml version="1.0" encoding="utf-8" ?>
<objects xmlns="http://www.springframework.net">
  <object id="DataAccessObject" type="DataAccess.Categories">
    <property name="connectionString" value="C:\db\northwind.mdb"/>
  </object>
</objects>
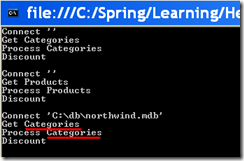
The output will be changed to
See the red highlight, it has changed the program direction without recompile the exe.


 本文详细介绍如何在C#环境中利用Spring.NET框架进行依赖注入,包括安装、创建项目、配置和运行示例代码。通过修改配置文件,可以灵活地切换不同的数据访问对象,无需重新编译应用程序。


 380
380

 被折叠的 条评论
为什么被折叠?


