


 本文详细介绍了如何使用 Spring Cloud 配置中心实现服务端和客户端的配置管理。包括配置中心服务端的搭建、客户端的接入流程以及必要的依赖配置。通过实际案例,展示了如何在 Spring Boot 项目中应用配置中心,实现服务的动态配置和刷新。

因为,我的配置中心的服务,是在之前的服务基础上面进行的,所有,现在需要的,就是修改对应的客户端的配置。
1.增加配置中心的pom配置
<?xml version="1.0" encoding="UTF-8"?>
<project xmlns="http://maven.apache.org/POM/4.0.0" xmlns:xsi="http://www.w3.org/2001/XMLSchema-instance"
   xsi:schemaLocation="http://maven.apache.org/POM/4.0.0 http://maven.apache.org/xsd/maven-4.0.0.xsd">
   <modelVersion>4.0.0</modelVersion>
   <parent>
      <groupId>org.springframework.boot</groupId>
      <artifactId>spring-boot-starter-parent</artifactId>
      <version>2.1.4.RELEASE</version>
      <relativePath/> <!-- lookup parent from repository -->
   </parent>
   <groupId>com.example</groupId>
   <artifactId>democloudserver</artifactId>
   <version>0.0.1-SNAPSHOT</version>
   <name>democloudserver</name>
   <description>Demo project for Spring Boot</description>

   <properties>
      <java.version>1.8</java.version>
      <spring-cloud.version>Greenwich.SR1</spring-cloud.version>
   </properties>

   <dependencies>
      <dependency>
         <groupId>org.springframework.cloud</groupId>
         <artifactId>spring-cloud-starter-netflix-eureka-server</artifactId>
      </dependency>

      <!--Springclud 的配置中心-->
      <dependency>
         <groupId>org.springframework.cloud</groupId>
         <artifactId>spring-cloud-config-server</artifactId>
      </dependency>

      <dependency>
         <groupId>org.projectlombok</groupId>
         <artifactId>lombok</artifactId>
         <optional>true</optional>
      </dependency>
      <dependency>
         <groupId>org.springframework.boot</groupId>
         <artifactId>spring-boot-starter-test</artifactId>
         <scope>test</scope>
      </dependency>
   </dependencies>

   <dependencyManagement>
      <dependencies>
         <dependency>
            <groupId>org.springframework.cloud</groupId>
            <artifactId>spring-cloud-dependencies</artifactId>
            <version>${spring-cloud.version}</version>
            <type>pom</type>
            <scope>import</scope>
         </dependency>
      </dependencies>
   </dependencyManagement>

   <build>
      <plugins>
         <plugin>
            <groupId>org.springframework.boot</groupId>
            <artifactId>spring-boot-maven-plugin</artifactId>
         </plugin>
      </plugins>
   </build>

</project>
2.
###############注册eureka服务##############
spring.application.name=spring-cloud-producer
server.port=9011
eureka.client.serviceUrl.defaultZone=http://localhost:8000/eureka/


##############集成SpringClud的配置中心##########
spring.cloud.config.server.git.uri=https://gitee.com/strongFan/individualProject/
#spring.cloud.config.server.git.uri=https://gitee.com/strongFan/individualProject.git   这里获取的不是git的地址,请参考进行对比


#配置文件的文件夹名称
spring.cloud.config.server.git.searchPaths=config-repo
spring.cloud.config.server.git.username=xxxxxx
spring.cloud.config.server.git.password=xxxxxx
#开启git的pull功能
spring.cloud.config.server.git.force-pull=true
3.启动项的配置注解
package com.example.democloudserver;

import org.springframework.boot.SpringApplication;
import org.springframework.boot.autoconfigure.SpringBootApplication;
import org.springframework.cloud.client.discovery.EnableDiscoveryClient;
import org.springframework.cloud.config.server.EnableConfigServer;

@EnableConfigServer  //开启SpringClud的配置中心
@SpringBootApplication
@EnableDiscoveryClient//启用服务注册与发现
public class DemocloudserverApplication {

   public static void main(String[] args) {
      SpringApplication.run(DemocloudserverApplication.class, args);
   }

}
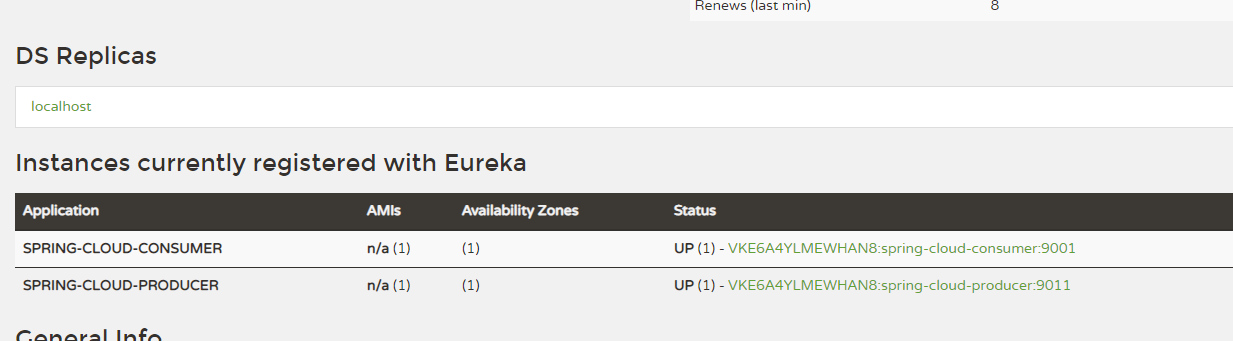
启动该服务,在服务中心查看,已经显示该服务
客户端进行服务化,注册进入配置中心
1.pom增加配置中心客户端依赖
<?xml version="1.0" encoding="UTF-8"?>
<project xmlns="http://maven.apache.org/POM/4.0.0" xmlns:xsi="http://www.w3.org/2001/XMLSchema-instance"
   xsi:schemaLocation="http://maven.apache.org/POM/4.0.0 http://maven.apache.org/xsd/maven-4.0.0.xsd">
   <modelVersion>4.0.0</modelVersion>
   <parent>
      <groupId>org.springframework.boot</groupId>
      <artifactId>spring-boot-starter-parent</artifactId>
      <version>2.1.4.RELEASE</version>
      <relativePath/> <!-- lookup parent from repository -->
   </parent>
   <groupId>com.example</groupId>
   <artifactId>service-feign</artifactId>
   <version>0.0.1-SNAPSHOT</version>
   <name>service-feign</name>
   <description>Demo project for Spring Boot</description>

   <properties>
      <java.version>1.8</java.version>
      <spring-cloud.version>Greenwich.SR1</spring-cloud.version>
   </properties>

   <dependencies>
      <dependency>
         <groupId>org.springframework.cloud</groupId>
         <artifactId>spring-cloud-starter-netflix-eureka-server</artifactId>
      </dependency>

      <dependency>
         <groupId>org.springframework.cloud</groupId>
         <artifactId>spring-cloud-starter-openfeign</artifactId>
      </dependency>

      <dependency>
         <groupId>org.projectlombok</groupId>
         <artifactId>lombok</artifactId>
         <optional>true</optional>
      </dependency>
      <dependency>
         <groupId>org.springframework.boot</groupId>
         <artifactId>spring-boot-starter-test</artifactId>
         <scope>test</scope>
      </dependency>

      <!--熔断器视图监控依赖Hystrix Dashboard-->
      <dependency>
         <groupId>org.springframework.cloud</groupId>
         <artifactId>spring-cloud-starter-hystrix</artifactId>
      </dependency>
      <dependency>
         <groupId>org.springframework.cloud</groupId>
         <artifactId>spring-cloud-starter-hystrix-dashboard</artifactId>
      </dependency>
      <dependency>
         <groupId>org.springframework.boot</groupId>
         <artifactId>spring-boot-starter-actuator</artifactId>
      </dependency>
      <!--配置中心客户端-->
      <dependency>
         <groupId>org.springframework.cloud</groupId>
         <artifactId>spring-cloud-starter-config</artifactId>
      </dependency>
      <!--开启更新机制,使客户端动态请求配置中心-->
      <dependency>
         <groupId>org.springframework.boot</groupId>
         <artifactId>spring-boot-starter-actuator</artifactId>
      </dependency>

   </dependencies>

   <dependencyManagement>
      <dependencies>
         <dependency>
            <groupId>org.springframework.cloud</groupId>
            <artifactId>spring-cloud-dependencies</artifactId>
            <version>${spring-cloud.version}</version>
            <type>pom</type>
            <scope>import</scope>
         </dependency>
      </dependencies>
   </dependencyManagement>

   <build>
      <plugins>
         <plugin>
            <groupId>org.springframework.boot</groupId>
            <artifactId>spring-boot-maven-plugin</artifactId>
         </plugin>
      </plugins>
   </build>

</project>
2.和上次一样,不同的是,bootstrap.properties 里面,新增几个配置
##########配置中心服务端获取############
spring.cloud.config.name=neo-config-dev
spring.cloud.config.profile=dev
#spring.cloud.config.uri=http://localhost:9011/
spring.cloud.config.label=master

############将其修改为调用配置服务###########
#开启Config服务发现支持
spring.cloud.config.discovery.enabled=true
#指定server端的name,也就是server端spring.application.name的值
spring.cloud.config.discovery.serviceId=spring-cloud-producer
#指向注册中心的地址
eureka.client.serviceUrl.defaultZone=http://localhost:8000/eureka/

#上面这些与spring-cloud相关的属性必须配置在bootstrap.properties中,config部分内容才能被正确加载。
#因为config的相关配置会先于application.properties,而bootstrap.properties的加载也是先于application.properties。
3. 项目启动项
package com.example.servicefeign;

import org.springframework.boot.SpringApplication;
import org.springframework.boot.autoconfigure.SpringBootApplication;
import org.springframework.cloud.client.discovery.EnableDiscoveryClient;
import org.springframework.cloud.openfeign.EnableFeignClients;

@SpringBootApplication
@EnableDiscoveryClient//启用服务注册与发现
@EnableFeignClients//启用feign进行远程调用
public class ServiceFeignApplication {

   public static void main(String[] args) {
      SpringApplication.run(ServiceFeignApplication.class, args);
   }

}
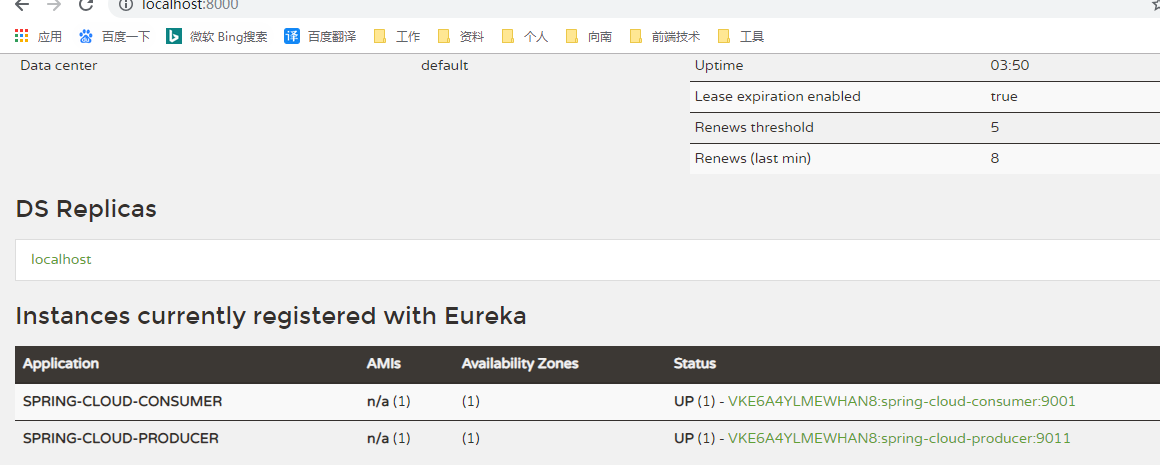
启动,查看服务中心,已经成功了。
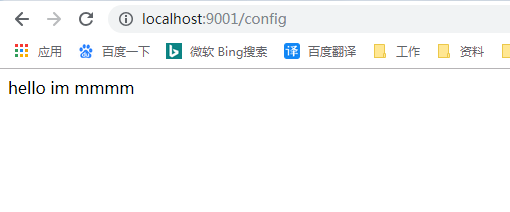
再次请求客户端的方法
本来,还准备配置配置中心的refresh 但是,配置了没生效,捣鼓了半天,就没管,先看后面的了。 后面看的时候,在关注下


 被折叠的 条评论
为什么被折叠?
被折叠的 条评论
为什么被折叠?
 到【灌水乐园】发言


