


 本文介绍了jQuery中的各种选择器,如ID、Class、标签及组合选择器等,并通过实例展示了如何使用这些选择器进行DOM操作,包括全选、反选、左侧菜单展开等功能。
1.选择器
1.1.id选择器
$('#id')1.2.class选择器
$('.cl')1.3.标签选择器
<div></div>

$('div')
1.4组合选择器
<div id="i1">
    <div class="c1">
        <a>1</a>
        <a>2</a>
        <a>3</a>
    </div>
</div>

$('#i1,.c1,a ')   #i1和.c1和a的所有标签
1.5.层级选择器
<div id="i1">
    <div class="c1">
        <a>1</a>
        <a>2</a>
        <a>3</a>
    </div>
</div>

$('#i1 .c1 a ')  #i1下的.c1下的所有a标签(包括子孙后代)
$('#i1.c1>a ')  #i1下的.c1下的所有a标签(只有儿子代)
1.6.基本
:first   $('#i1 .c1 a:first') #i1下的.c1下的第一个a标签
:last   $('#i1 .c1 a:last') #i1下的.c1下的最后一个a标签
:eq()  $('#i1 .c1 a:eq(1)') #i1下的.c1下的最后一个a标签
1.7.属性
$('[name]')       具有name属性的所有标签
$('[name="user"]') name属性等于user的标签
1.8.筛选器
<ul>
    <li></li><li></li><li id="i1"></li><li></li>
</ul>
$('i1').next()       #下一个
$('i1').prev()      #上一个
$('i1').parent()  #父标签
$('i1').children()#子标签
$('i1').siblings()#兄弟标签
2.操作实例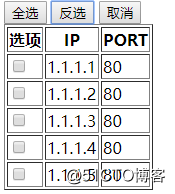
<body>
<input type="button" value="全选" onclick="selectAll();"/>
<input type="button" value="反选" onclick="reverseAll();"/>
<input type="button" value="取消" onclick="cancleAll();"/>
<table border="1">
    <thead>
    <tr>
        <th>选项</th>
        <th>IP</th>
        <th>PORT</th>
    </tr>
    <tbody>
    <tr>
        <td><input type="checkbox" /></td>
        <td>1.1.1.1</td>
        <td>80</td>
    </tr>
    <tr>
        <td><input type="checkbox" /></td>
        <td>1.1.1.2</td>
        <td>80</td>
    </tr>
    <tr>
        <td><input type="checkbox" /></td>
        <td>1.1.1.3</td>
        <td>80</td>
    </tr>
    <tr>
        <td><input type="checkbox" /></td>
        <td>1.1.1.4</td>
        <td>80</td>
    </tr>
    <tr>
        <td><input type="checkbox" /></td>
        <td>1.1.1.5</td>
        <td>80</td>
    </tr>
    </tbody>
    </thead>
</table>
<script src="jquery-1.12.4.js"></script>
<script>
    //全选
    function selectAll() {
        //prop() 方法设置或返回被选元素的属性和值
        $(':checkbox').prop('checked',true);
    }
    //取消
    function cancleAll() {
        $(':checkbox').prop('checked',false);
    }
    //反选
    function reverseAll() {
        //each() 方法规定为每个匹配元素规定运行的函数
        $(':checkbox').each(function () {
            //三元运算var v = 条件? 真值:假值
            var v=$(this).prop('checked')?false:true;
            $(this).prop('checked',v);
        })
    }

</script>
</body>
3.左侧菜单展开实例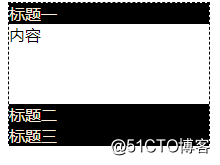
<head>
    <meta charset="UTF-8">
    <title>Title</title>
    <style type="text/css">
        .left_menu{
            height: 140px;
            width: 200px;
            border: 1px dashed #000000;
        }
        .item .head{
            background-color: #000000;
            color: antiquewhite;
        }
        .item .content{
            min-height:80px;
        }
        .hide{
            display: none;
        }
    </style>
</head>
<body>
    <div class="left_menu">
        <div class="item">
            <div class="head">标题一</div>
            <div class="content">内容</div>
        </div>
        <div class="item">
            <div class="head">标题二</div>
            <div class="content hide">内容</div>
        </div>
        <div class="item">
            <div class="head">标题三</div>
            <div class="content hide">内容</div>
        </div>
    </div>
    <script src="jquery-1.12.4.js"></script>
    <script>
        //当点击.head类标签时触发函数
        $('.head').click(function () {
            //从当前点击的标签的下一个标签移除hide类属性
            $(this).next().removeClass('hide');
            //从当前点击的标签的父级标签的兄弟标签中找到包含.content类的标签并添加hide类属性
            $(this).parent().siblings().find('.content').addClass('hide');
        })
    </script>
</body>
4.自动添加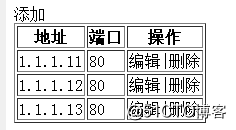
<head>
<meta charset="UTF-8">
<title>Title</title>
<style>
.hide{
display: none;
}
.model{
position: fixed;
top: 50%;
left: 50%;
width: 500px;
height: 350px;
margin-top: -200px;
margin-left: -250px;
background-color: aliceblue;
z-index: 10;
}
.model p,h2{
text-align: center;
}
.model p input[type="text"]{
width: 300px;
height: 28px;
}
.model p input[type="button"]{
width: 150px;
height: 35px;
}
.shadow{
position: fixed;
top: 0;
left: 0;
bottom: 0;
right: 0;
background-color: black;
opacity: 0.6;
z-index: 9;
}
</style>
</head>
<body>
<a onclick="addModel();">添加</a>
<table border="1">
<thead>
<tr>
<th>地址</th>
<th>端口</th>
<th>操作</th>
</tr>
</thead>
<tbody>
<tr>
<td>1.1.1.11</td>
<td>80</td>
<td><a class="edit">编辑</a>|<a>删除</a></td>
</tr>
<tr>
<td>1.1.1.12</td>
<td>80</td>
<td><a class="edit">编辑</a>|<a>删除</a></td>
</tr>
<tr>
<td>1.1.1.13</td>
<td>80</td>
<td><a class="edit">编辑</a>|<a>删除</a></td>
</tr>
</tbody>
</table>
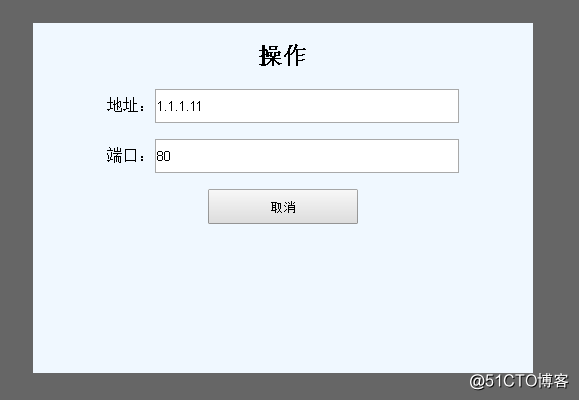
<div class="model hide">
<p><h2>操作</h2></p>
<p>地址:<input type="text" name="host"/></p>
<p>端口:<input type="text" name="port"/></p>
<p><input type="button" value="取消" onclick="removeModel();"/></p>
</div>
<div class="shadow hide"></div>
<script src="jquery-1.12.4.js"></script>
<script>
//打开添加框
function addModel() {
$('.model,.shadow').removeClass('hide');
$('.model p input[type="text"]').val('');
}
//关闭添加框
function removeModel() {
$('.model,.shadow').addClass('hide');
}
//点击编辑时执行函数
$('.edit').click(function () {
$('.model,.shadow').removeClass('hide');
//获取当前点击元素的父级标签的所有兄弟标签
var tds=$(this).parent().prevAll();
//取得标签中的值,既innerText
var port=$(tds[0]).text();
var host=$(tds[1]).text();
//给model赋值
$('.model p input[name="port"]').val(port);
$('.model p input[name="host"]').val(host);
})
</script>
</body>5.开关toggleClass
<head>
    <meta charset="UTF-8">
    <title>Title</title>
    <style>
        .hide{
            display: none;
        }
    </style>
</head>
<body>
    <input type="button" id="button1" value="按钮"/>
    <div class="c1">dsajadw</div>
    <script src="jquery-1.12.4.js"></script>
    <script>
        //点击#button1时触发函数
        $('#button1').click(function () {
            //调用toggleClass开关属性
            $('.c1').toggleClass('hide')
        })
    </script>
</body>
转载于:https://blog.51cto.com/13803166/2149222


 666
666

 被折叠的 条评论
为什么被折叠?
被折叠的 条评论
为什么被折叠?
 到【灌水乐园】发言


