初次接触spring mvc,被网上一些文档误导,花费了很多时间。经过一番努力,现已跑通,遂记录之,以备日后所查及初学网友参考。
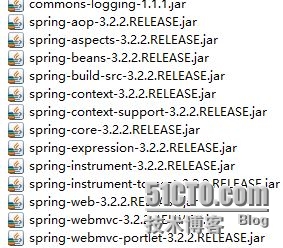
1.首先引入相关jar包,本人使用的jar包如下(有些暂时用不到):
2.web.xml中加入spring配置文件
<?xml version="1.0" encoding="UTF-8"?>
<web-app version="2.5"
    xmlns="http://java.sun.com/xml/ns/javaee"
    xmlns:xsi="http://www.w3.org/2001/XMLSchema-instance"
    xsi:schemaLocation="http://java.sun.com/xml/ns/javaee
    http://java.sun.com/xml/ns/javaee/web-app_2_5.xsd">
  <welcome-file-list>
    <welcome-file>index.jsp</welcome-file>
  </welcome-file-list>

  <listener>
    <listener-class>org.springframework.web.context.ContextLoaderListener</listener-class>
    </listener>
      <context-param>
    <param-name>contextConfigLocation</param-name>
    <param-value>/WEB-INF/applicationContext.xml</param-value>
    </context-param>

  <servlet>
        <servlet-name>spring</servlet-name>
        <servlet-class>org.springframework.web.servlet.DispatcherServlet</servlet-class>
        <load-on-startup>1</load-on-startup>
    </servlet>
    <servlet-mapping>
        <servlet-name>spring</servlet-name>
        <url-pattern>*.do</url-pattern>
    </servlet-mapping>


</web-app>
3.在WEB-INF目录下新建spring-servlet.xml,编辑内容如下:
<?xml version="1.0" encoding="UTF-8"?>
<beans xmlns="http://www.springframework.org/schema/beans"
    xmlns:xsi="http://www.w3.org/2001/XMLSchema-instance"
    xmlns:p="http://www.springframework.org/schema/p"
    xmlns:context="http://wwww.springframework.org/schema/context"
    xmlns:mvc="http://www.springframework.org/schema/context"
    xsi:schemaLocation="http://www.springframework.org/schema/beans
    http://www.springframework.org/schema/beans/spring-beans-3.0.xsd
    http://www.springframework.org/schema/mvc
    http://www.springframework.org/schema/mvc/spring-mvc-3.1.xsd
    http://www.springframework.org/schema/context
    http://www.springframework.org/schema/context/spring-context-3.2.xsd">
<bean class="org.springframework.web.servlet.view.InternalResourceViewResolver">
    <property name="prefix">
        <value>/view/</value>
    </property>
    <property name="suffix">
        <value>.jsp</value>
    </property>
</bean>
    <mvc:component-scan base-package="com.myspring.action"></mvc:component-scan>
</beans>
4.新建表单页面:index.jsp
  <form action="hellomvc/register.do"  method="post">
username: <input type="text" name="userName" value="username"/>
password: <input type="text" name="password" value="password"/>
<input type="submit" value="注册"/>
</form>
5.完成控制器:com.myspring.action.LoginController
package com.myspring.action;
import javax.servlet.http.HttpServletRequest;
import org.springframework.stereotype.Controller;
import org.springframework.ui.Model;
import org.springframework.web.bind.annotation.ModelAttribute;
import org.springframework.web.bind.annotation.RequestMapping;
import org.springframework.web.bind.annotation.RequestParam;
import org.springframework.web.servlet.ModelAndView;
import com.myspring.entity.User;
@Controller
@RequestMapping("/hellomvc")
public class LoginController {
 @RequestMapping("/register")
   public ModelAndView register(@ModelAttribute("user") User user)
    {

        System.out.println(user.getUserName());
        System.out.println(user.getPassword());
        return new ModelAndView("success","user",user);

    }
}
6.com.myspring.entity.User
package com.myspring.entity;
public class User {
    public String getUserName() {
        return userName;
    }
    public void setUserName(String userName) {
        this.userName = userName;
    }
    public String getPassword() {
        return password;
    }
    public void setPassword(String password) {
        this.password = password;
    }
    private String userName;
    private String password;

}
7.新建WebRoot\view\success.jsp
<h1>success! </h1>
<h1>您的用户名:${user.userName}密码:${user.password }</h1>
至此,一个简单的spring mvc实例就完成了,在index.jsp输入相应的username和password并提交,控制台可打印出提交的内容并跳转到"success.jsp"页面中。
8.效果如下:
点击"注册"后:
转载于:https://blog.51cto.com/wxhhbdx/1338035


 本文详细介绍了一个简单的SpringMVC应用实例,从环境搭建到运行测试全流程解析,包括配置web.xml、spring-servlet.xml,创建JSP页面、控制器及实体类等步骤。


 被折叠的 条评论
为什么被折叠?


