


 本文指导如何在本地环境中安装Apache Spark,并配置IPython Notebook与Spark进行集成,包括下载、解压Spark、设置环境变量、下载Anaconda Python、安装Anaconda及创建PySpark配置文件等步骤。
from http://jmdvinodjmd.blogspot.in/2015/08/installing-ipython-notebook-with-apache.html
1. First of all download Apache Spark from here.
Select the pre built version like spark-1.4.1-bin-hadoop2.6.tgz otherwise you may need to build the source files.

2. Now extract Spark form the downloaded zip file. And place at desired location(I placed it in C drive)
3. Create an Environment variable named ‘SPARK_HOME’ with value equal to path upto folder containing Apache Spark. (I placed Spark inside C drive so I set SPARK_HOME equal to ‘C:\spark-1.4.1-bin-hadoop2.6′).
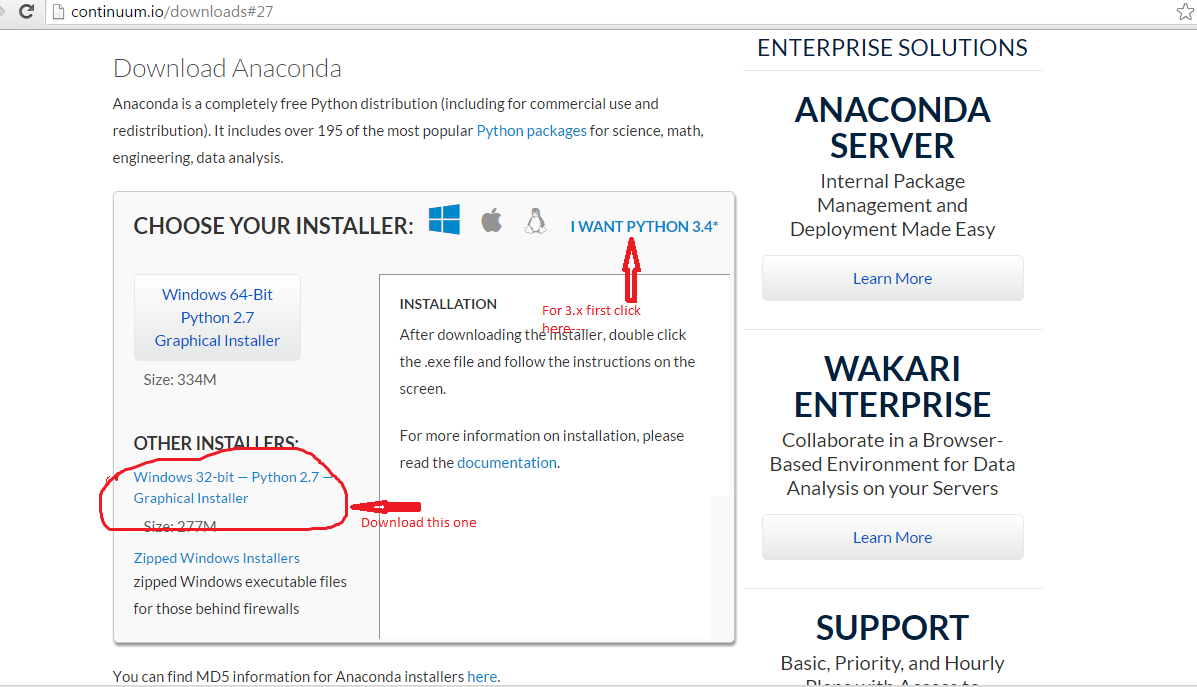
4. Download Anaconda Python distribution from here.
We can download either 2.x or 3.x versions. I suggest you to download 2.x since the higher versions may not be supported by Apache Spark. I downloaded Windows 32-bit — Python 2.7 — Graphical Installer.
5. Install Anaconda. This would install Python 2.7, IPython and other necessary libraries for Python. Moreover this should set some environment variable for you which are required to access python.
6. Open command prompt and enter command-
ipython profile create pyspark
This should create a pyspark profile where we need to make some changes.
Now we need to make changes in two configuration files. ipython_notebook_config.py and 00-pyspark-setup.py
6. Locate ipython_notebook_config.py file at C:\Users\here_your_user_name_which_is_currently_logged_in\.ipython\profile_pyspark\ipython_notebook_config.py and add following lines of code to it-
c = get_config()
c.NotebookApp.ip = ‘*’
c.NotebookApp.open_browser = True
c.NotebookApp.port = 8880 # or whatever you want; be aware of conflicts with CDH
7. Now create file named 00-pyspark-setup.pyin C:\Users\Vinod\.ipython\profile_pyspark\startup
(Note-Here path contains ‘Vinod’ which is user name so you need to replace it with your user name for currently logged in user in windows.)
Add following contents to 00-pyspark-setup.py
import os
import sys
spark_home = os.environ.get(‘SPARK_HOME’, None)
if not spark_home:
raise ValueError(‘SPARK_HOME environment variable is not set’)
sys.path.insert(0, os.path.join(spark_home, ‘python’))
sys.path.insert(0, os.path.join(spark_home, ‘python/lib/py4j-0.8.2.1-src.zip’))
execfile(os.path.join(spark_home, ‘python/pyspark/shell.py’))
Note:-All lines should remain same except the second last line. It contains location of ‘py4j’. So inside Spark folder go to python\lib folder and check the version of your py4j library and make changes into second last line accordingly.
8. Now open the command prompt and type following command to run the IPython notebook-
ipython notebook –profile=pyspark
This should launch ipython notebook in a browser.
9. Create one notebook and type ‘sc’ command in one cell and run it. You should get
<pyspark.context.SparkContext at 0x4f4a490>
This indicates your IPython notebook and Spark are successfully integrated. Otherwise if you get ' ' after running then that means integration is unsuccessful.

NOTE: If we install IPython notebook separately instead of Anaconda +Spark then we might get following exception-
Java gateway process exited before sending the driver its port number.


 5601
5601

 被折叠的 条评论
为什么被折叠?
被折叠的 条评论
为什么被折叠?
 到【灌水乐园】发言


