


 本文通过实战演示如何搭建 Spring Boot 应用,包括项目结构搭建、依赖引入、启动类编写等,并介绍了如何创建实体类、服务层和服务实现,以及 RESTful 控制器的设计。此外还涉及 Thymeleaf 模板引擎的集成。

首先回顾下前几篇的内容:springboot 入门教程(1),springboot 入门教程-Thymeleaf(2), springboot 入门教程(3)-运行原理、关键注解和配置
这篇呢就直接进入主题撸代码。(项目使用了maven,大家最好也用maven进行管理哦,要不然很麻烦的)
为方便大家快速学习和理解,补充源码下载地址:http://pan.baidu.com/s/1eSGPyDW
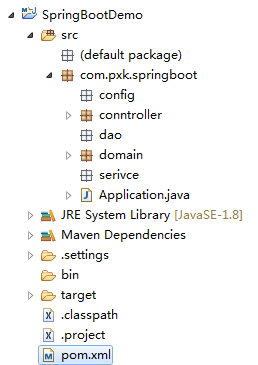
1、新建项目,建好目录结构
我们重新建一个maven web项目,然后命名好自己的包,我的目录结构如图:
2、引入springboot和springboot web的包
  <dependencies>
  	<dependency>
  		<groupId>org.springframework.boot</groupId>
  		<artifactId>spring-boot-starter</artifactId>
  		<version>1.5.6.RELEASE</version>
  	</dependency>
  	<dependency>
  		<groupId>org.springframework.boot</groupId>
  		<artifactId>spring-boot-starter-web</artifactId>
  		<version>1.5.6.RELEASE</version>
  	</dependency>
  </dependencies>
3、编写启动类
package com.pxk.springboot;

import org.springframework.boot.SpringApplication;
import org.springframework.boot.autoconfigure.SpringBootApplication;

@SpringBootApplication
public class Application {
	public static void main(String[] args) {
		SpringApplication.run(Application.class, args);
	}
}
到这一步我们就可以启动一个web项目了,但是启动后是一个空的项目(启动的web容器是spring-boot-starter-web中的自动配置的tomcat端口是8080,当然可以根据需要修改成其他容器)。
4、我们要写自己的bean,然后托管到spring容器中
这个的用法其实很普通的spring项目没太大区别,普通spring项目中我们想托管bean,那可以用xml配置也可以用注解(@Repository,@Component,@Service、@Controller、@Bean)配置然后启动注解扫描即可。springboot也一样只不过不需要手动开启注解扫描,默认会扫描项目src/java/main下面的所有类。
例: 我们在domain目录下建一个User实体类(暂且只有id和name),然后在service目录中新建一个UserService接口和UserServiceImpl的实现类,类中实现接口的一个方法
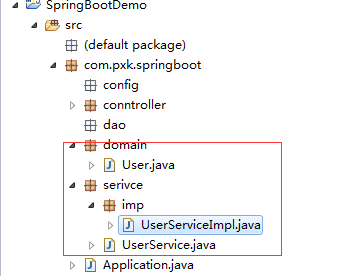
UserServiceImpl
package com.pxk.springboot.serivce.imp;

import org.springframework.stereotype.Service;

import com.pxk.springboot.domain.User;
import com.pxk.springboot.serivce.UserService;
@Service//注入成service
public class UserServiceImpl implements UserService {

	@Override
	public User getUser(String name) {
		return new User(name);
	}
}
5、编写一个conntroller
采用@RestController注入为一个控制器,然后调用service的业务方法
package com.pxk.springboot.conntroller;

import org.springframework.beans.factory.annotation.Autowired;
import org.springframework.stereotype.Controller;
import org.springframework.ui.Model;
import org.springframework.web.bind.annotation.PathVariable;
import org.springframework.web.bind.annotation.RequestMapping;
import org.springframework.web.bind.annotation.ResponseBody;
import org.springframework.web.bind.annotation.RestController;
import org.springframework.web.servlet.ModelAndView;

import com.pxk.springboot.domain.User;
import com.pxk.springboot.serivce.UserService;

@Controller
@RequestMapping("/user")
public class UserController {
	@Autowired//依赖注入service
	UserService userService;

	@RequestMapping("/getUser/{name}")//定义requestMapping rest风格
	@ResponseBody//返回json格式数据
	protected User getUser(@PathVariable(value="name") String name){
		return userService.getUser(name);
	}

	@RequestMapping("/getUserByName/{name}")//定义requestMapping rest风格
	protected String getUserByName(@PathVariable(value="name") String name,Model model){
		User user= userService.getUser(name);
		model.addAttribute(user);
		return "user";
	}
}
getUser返回的是json格式呼叫 因为加了@ResponseBody注解,如果你这个conntroller都返回json可以在类注解上加入@RestConntroller
getUserByName是返回到视图解析器,视图名称为user,user.html模板默认位置在src/main/resources下。
以上注解都是spring 和spring mvc的注解,如果你有一个已有的spring项目你应该知道怎么把他迁移为springboot的项目了吧,移植完以后你会发现没有那么多繁琐的xml配置文件真的是一件很爽的事情。
6、集成Thymeleaf模板引擎
完成参考springboot 入门教程-Thymeleaf(2)进行集成
7、将后台准备好的数据加载到模板中
编写模板页面html
<!DOCTYPE HTML>
<html xmlns:th="http://www.thymeleaf.org">
<head>
<title>userList</title>
<meta http-equiv="Content-Type" content="text/html; charset=UTF-8" />
</head>
<body>
<!--/*@thymesVar id="name" type="java.lang.String"*/-->
<p th:text="'my name is:' + ${user.name} + '!'">姓名</p>
</body>
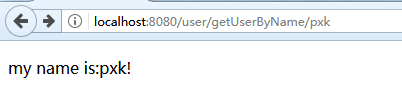
</html>8、启动并放
run APPlication ,访问http://localhost:8080/user/getUserByName/pxk
效果如下图:
基本和第一篇文章有点类似,这篇只是补充说明了和spring 以及spring mvc的整合。
大家没有看到一个xml文件吧,是不是很简单啊。
下一篇springboot 入门教程(5) 基于ssm框架的crud操作(后台部分-附源码)


 3127
3127

 被折叠的 条评论
为什么被折叠?
被折叠的 条评论
为什么被折叠?
 到【灌水乐园】发言


