(读完此系列WPF和Silverlight的数据绑定问题你就轻松搞定 )
)
1 Binding to List Data
前面都是绑定到一个对象,下面我们学习绑定到对象列表的方法。
我们还是先组织要绑定的数据,对象所对应的类还是Person,但新增了一个新类People,该类用来组织Person的列表.代码如下:
using System;
            using System.Collections.Generic;
            using System.ComponentModel;//INotifyPropertyChanged
            namespace SimpleDataBinding
            {
            class Person : INotifyPropertyChanged
            {
            public event PropertyChangedEventHandler PropertyChanged;
            protected void Notify(string PropName)
            {
            if (this.PropertyChanged != null)
            {
            PropertyChanged(this, new PropertyChangedEventArgs(PropName));
            }
            }
            public Person()
            {
            _Age = 0;
            _name = "Null";
            this.CurrentDate = DateTime.Now;
            }
            private string _name;
            public string Name
            {
            get { return _name; }
            set
            {
            if (value == _name)
            { return; }
            _name = value;//注意:不能用this.Name来赋值,如果这样形成循环调用,栈溢出
            Notify("Name");
            }
            }
            private int _Age;
            public int Age
            {
            get { return _Age; }
            set
            {
            if (value == _Age) return;
            _Age = value;
            Notify("Age");
            }
            }
            public DateTime CurrentDate { get; set; }
            }
             //People类 class People : List<Person> { }
            }
|
注意在同一命名空间下的代码最后添加了Perople类。
我们在UI里显示的XAML如下:
<Window x:Class="ListDataBinding.BindListDataTest"
            xmlns="http://schemas.microsoft.com/winfx/2006/xaml/presentation"
            xmlns:x="http://schemas.microsoft.com/winfx/2006/xaml"
              xmlns:src="clr-namespace:ListDataBinding"
            Title="BindListDataTest" Height="113" Width="300">
            <Window.Resources>
             <src:People x:Key="Family">
            <src:Person Name="Jack" Age="18"/>
            <src:Person Name="Tom" Age="30"/>
            <src:Person Name="Jone" Age="14"/>
            <src:Person Name="Rose" Age="17"/>
            <src:Person Name="Mike" Age="13"/>
            </src:People>
            </Window.Resources>
            <Grid DataContext="{StaticResource Family}">
            <Grid.RowDefinitions>
            <RowDefinition/>
            <RowDefinition/>
            </Grid.RowDefinitions>
            <Grid.ColumnDefinitions>
            <ColumnDefinition Width="80"/>
            <ColumnDefinition Width="*"/>
            </Grid.ColumnDefinitions>
            <TextBlock Grid.Row="0" Grid.Column="0" Text="Name" TextAlignment="Center" VerticalAlignment="Center"/>
            <TextBlock Grid.Row="1" Grid.Column="0" Text="Age" TextAlignment="Center" VerticalAlignment="Center"/>
            <TextBox Grid.Row="0" Grid.Column="1" Name="txtName" Text="{Binding Path=Name}" />
            <TextBox Grid.Row="1" Grid.Column="1" Name="txtAge" Text="{Binding Path=Age}"/>
            </Grid>
            </Window>
|
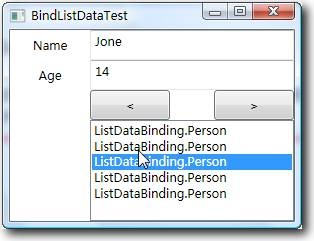
我们发现这样的UI只能显示第一个数据项目,也就是说列表的当前项为0,至于其他的就无法显示出来了。
如果要显示其他的只有可通过如下代码的方式来取(注意:书中代码似乎有问题):
private void btnNext_Click(object sender, RoutedEventArgs e)
            {
            People people = (People)this.FindResource("Family");
            txtName.Text = people[1].Name;
            txtAge.Text = people[1].Age.ToString();
            }
|
1.1当前项Current Item
取得当前项
可以通过上面的方法取得当前项,当然我们更专业的做法还是使用Collection View
还是代码说明比较简洁:
People people = (People)this.FindResource("Family");
            ICollectionView view = CollectionViewSource.GetDefaultView(people);
            Person peron = (Person)view.CurrentItem;
|
注意:ICollectionView在System.ComponentModel命名空间里。
导航当前项
还是代码来说明更合适点:
      private ICollectionView GetView()
            {
            People people = (People)this.FindResource("Family");
            ICollectionView view = CollectionViewSource.GetDefaultView(people);
            return view;
            }
            private void btnNext_Click(object sender, RoutedEventArgs e)
            {
            ICollectionView view = GetView();
            view.MoveCurrentToNext();
            if (view.IsCurrentAfterLast)
            {
            view.MoveCurrentToLast();
            }
            }
            private void btnPrior_Click(object sender, RoutedEventArgs e)
            {
            ICollectionView view = GetView();
            view.MoveCurrentToPrevious();
            if (view.IsCurrentBeforeFirst)
            {
            view.MoveCurrentToFirst();
            }
            }
|
1.2 List Data Targets
我们将列表数据绑定到类似TextBox这样的控件难以很好地展现列表数据。我们考虑ListBox控件来列举多个数据信息。
<ListBox ItemsSource="{Binding}" IsSynchronizedWithCurrentItem="True"/>
这时的效果如下:列表确实显示了所有对象的信息,因为我们没有设置Path属性,所以采用默认的Convertation来处理,显示对象类型。同时一定要注意使用IsSynchronizatizedWithCurrentItem=True,这样才能列表信息与其他信息同步。但究竟如何才能更好地表达我们需要的信息呢,请参看下一节:

1.3 Display Members, Value Members, and Look-Up Bindings
代码示例也许更易理解:
<ListBox Grid.Row="3" Grid.Column="1" Name="lstbox" ItemsSource="{Binding}"
            DisplayMemberPath="Name" SelectedValuePath="Age" IsSynchronizedWithCurrentItem="True"/>
            <Button Grid.Row="4" Grid.Column="0" Name="btnShowValue" Content="ShowValue" Click="btnShowValue_Click" />
|
private void btnShowValue_Click(object sender, RoutedEventArgs e)
            {
            MessageBox.Show(lstbox.SelectedValue.ToString());
            }
|
1.4数据模板Data Templates
这是利用ListBox控件有一个ItemTemplate属性下面,他可以接受一个DataTemplate类实例,
该模板可以重复绑定到ListBox的每一个项目元素,注意DataTemplate只能指定一个孩子节点,所以一般使用容器控件来组织下面的布局。
<ListBox Grid.Row="3" Grid.Column="1" Name="lstbox" ItemsSource="{Binding}">
            <ListBox.ItemTemplate>
            <DataTemplate>
            <TextBlock Text="{Binding Path=Name}">
            的年龄是<TextBlock Text="{Binding Path=Age}"></TextBlock>
            </TextBlock>
            </DataTemplate>
            </ListBox.ItemTemplate>
            </ListBox>
我本人不赞同书中这样的做法,添加一个StackPanel更舒服点。
|
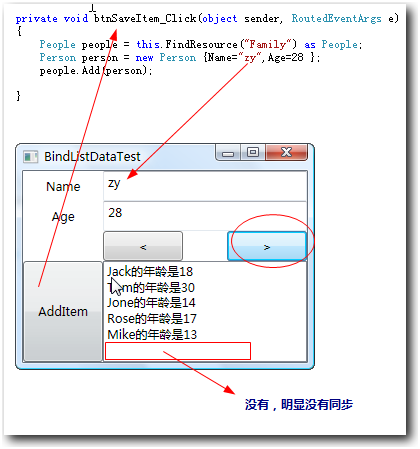
1.5 列表改变List Changes
当我们改变列表的数据的时候,却出现如下现象:

只是因为我们需要绑定的列表需要实现INotifyCollectionChanged接口:
namespace System.Collections.Specialized
            {
            public interface INotifyCollectionChanged
            {
            event NotifyCollectionChangedEventHandler CollectionChanged;
            }
            }
|
namespace System.Collections.ObjectModel
            {
            public class ObservableCollection<T> : Collection<T>, INotifyCollectionChanged, INotifyPropertyChanged
            {
            ...
            }
            }
|
欢呼雀跃吧,我们改变上面例题的代码,一切如我们想象的美好。
所有的一切就如此简单,简单代码改动:
//People类
            class People : ObservableCollection<Person>
            {
            }
|
![clip_image002[4]](http://static.oschina.net/uploads/img/201409/24135705_I62V.jpg)
1.6 排序Sorting
简单的代码还是足以繁杂的文字,让我们看如下方法:
       private void btnSort_Click(object sender, RoutedEventArgs e)
            {
            ICollectionView view = GetView();
            if (view.SortDescriptions.Count == 0)
            {
            view.SortDescriptions.Add(new SortDescription("Name", ListSortDirection.Ascending));
            view.SortDescriptions.Add(new SortDescription("Age", ListSortDirection.Descending));
            }
            else
            {
            view.SortDescriptions.Clear();
            }
            }
|
当然我们还可以自定义排序方式:
    class PersonSorter:IComparer
            {
            public int Compare(object x, object y)
            {
            Person lhs = (Person)x;
            Person rhs = (Person)y;
            // Sort Name ascending and Age descending
            int nameCompare = lhs.Name.CompareTo(rhs.Name);
            if (nameCompare != 0) return nameCompare;
            return rhs.Age - lhs.Age;
            }
            }
|
注意:WPF不使用System.Collection.Generic命名空间的泛型IComparer接口,而是使用System.Collection的。呵呵。
使用代码如下:
       private void btnSort_Click(object sender, RoutedEventArgs e)
            {
            ListCollectionView view = (ListCollectionView)GetView();
            if (view.CustomSort == null)
            {
            view.CustomSort = new PersonSorter();
            }
            else
            {
            view.CustomSort = null;
            }
            }
|
注意:ListCollectionView支持自定义和排序,其他的不支持。
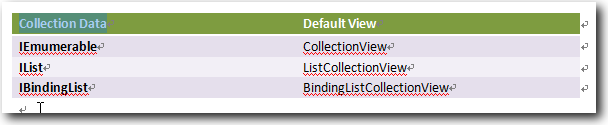
1.7 集合缺省视图类型Default Collection View

1.8 过滤 Filter
依然是我熟悉的表达方式:代码:
       private void btnFilter_Click(object sender, RoutedEventArgs e)
            {
            ListCollectionView view = (ListCollectionView)GetView();
            if (view.Filter == null)
            {
            view.Filter = delegate(object item)
            {
            return ((Person)item).Age > 17;
            };
            }
            else
            {
            view.Filter = null;
            }
            }
|
1.9 分组Grouping
分组的意思大家很明白就是按照某一个或几个关键属性进行分类。
进行分组很简单和sort类似,只需要以下几行代码:
          ICollectionView view = GetView();
            if (view.GroupDescriptions.Count == 0)
            {
            view.GroupDescriptions.Add(new PropertyGroupDescription("Age"));
            }
            else
            {
            view.GroupDescriptions.Clear();
            }
|
但这在UI层面并没有任何影响,这需要我们对ItemsControl类的控件(例如ListBox)设置GroupStyle属性,GroupStyle类缺省地提供了一个静态的属性实现,我们可以如下设置:
      <ListBox Grid.Row="3" Grid.Column="1" Name="lstbox" ItemsSource="{Binding}"  IsSynchronizedWithCurrentItem="True">
            <ListBox.GroupStyle> <x:Static Member="GroupStyle.Default"/> </ListBox.GroupStyle>
            <ListBox.ItemTemplate>
            <DataTemplate>
            <TextBlock Text="{Binding Path=Name}">
            的年龄是<TextBlock Text="{Binding Path=Age}"></TextBlock>
            </TextBlock>
            </DataTemplate>
            </ListBox.ItemTemplate>
            </ListBox>
|
但也许这并不是我们所喜欢的界面,简单得让人生厌,还好微软提供了这个对象的一个属性:HeaderTemplate用于定义分组的栏目的外观,微软总是为大家想得那么周到,养活那么多天才是需要钱的,希望大家不要老是讲微软的坏话。
           <ListBox.GroupStyle>
            <GroupStyle>
            <GroupStyle.HeaderTemplate>
            <DataTemplate>
            <StackPanel Background="Green"  Orientation="Horizontal">
            <TextBlock Text="{Binding Name}"/>
            <TextBlock Text="("/>
            <TextBlock Text="{Binding ItemCount}"/>
            <TextBlock Text=")"/>
            </StackPanel>
            </DataTemplate>
            </GroupStyle.HeaderTemplate>
            </GroupStyle>
            </ListBox.GroupStyle>
|
有这模板属性一切由你发挥,真是好也,然而即使这样解决了UI问题,但是如果我们还希望更进一步,能否实现范围内分组呢?呵呵,然也:
这时我们不需要去想着如何继承GroupStyle类,而是采用围魏救赵的方式,定义一个IValueConverter,
   public class AgeRangeConvert : IValueConverter
            {
            public object Convert(object value, Type targetType, object parameter, CultureInfo culture)
            {
            int _value = (int)value;
            if (_value <= 10)
            return "10岁以下";
            else if (_value <= 20)
            return "20岁以下";
            else
            return "20岁以上";
            }
            public object ConvertBack(object value, Type targetType, object parameter, CultureInfo culture)
            {
            throw new NotImplementedException();
            }
            }
|
简单调整前面分组代码:
           ICollectionView view = GetView();
            if (view.GroupDescriptions.Count == 0)
            {
            view.GroupDescriptions.Add(new PropertyGroupDescription("Age",new  AgeRangeConvert()));
            }
            else
            {
            view.GroupDescriptions.Clear();
            }
|
一切搞定,享受成果吧:
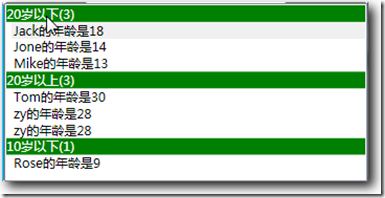
既然GroupDescripions是个集合类型,我们不妨看下面代码究竟是什么效果:
            ICollectionView view = GetView();
            if (view.GroupDescriptions.Count == 0)
            {
            view.GroupDescriptions.Add(new PropertyGroupDescription("Age",new  AgeRangeConvert()));
            view.GroupDescriptions.Add(new PropertyGroupDescription("Age"));
            }
            else
            {
            view.GroupDescriptions.Clear();
            }
|
运行如下:
![clip_image002[1]](http://static.oschina.net/uploads/img/201409/24135705_UT7D.jpg)
呵呵,这不正是有时你需要的效果吗?至于界面如何优化,模板如何定义更好看我们以后话题再


 本文详细介绍了WPF中数据绑定的基础知识,特别是针对列表数据的绑定技巧。从基本的列表绑定开始,逐步深入讲解了如何使用CollectionView进行导航、排序、过滤等高级操作,并展示了如何通过数据模板定制列表项的展示样式。

![clip_image002[4]](http://images.cnblogs.com/cnblogs_com/NineFlowers/WindowsLiveWriter/BindingtoListData_1312D/clip_image002%5B4%5D.jpg)

![clip_image002[1]](http://images.cnblogs.com/cnblogs_com/NineFlowers/WindowsLiveWriter/BindingtoListData_1312D/clip_image002%5B1%5D.jpg)


 1514
1514

 被折叠的 条评论
为什么被折叠?
被折叠的 条评论
为什么被折叠?
 到【灌水乐园】发言


