 Vue.js 实战


https://segmentfault.com/a/1190000006776243?utm_source=tuicool&utm_medium=referral
感觉需要改善的地方有:
-
(更新代码)
livingInfo数组和anchorInfo数组可以通过 computed 属性计算合成一个大的数组,那么很多的过滤器还有forEach遍历就可以省略掉了 -
可以把整个
ul下的部分做成一个组件 -
文章可能描述的很啰嗦
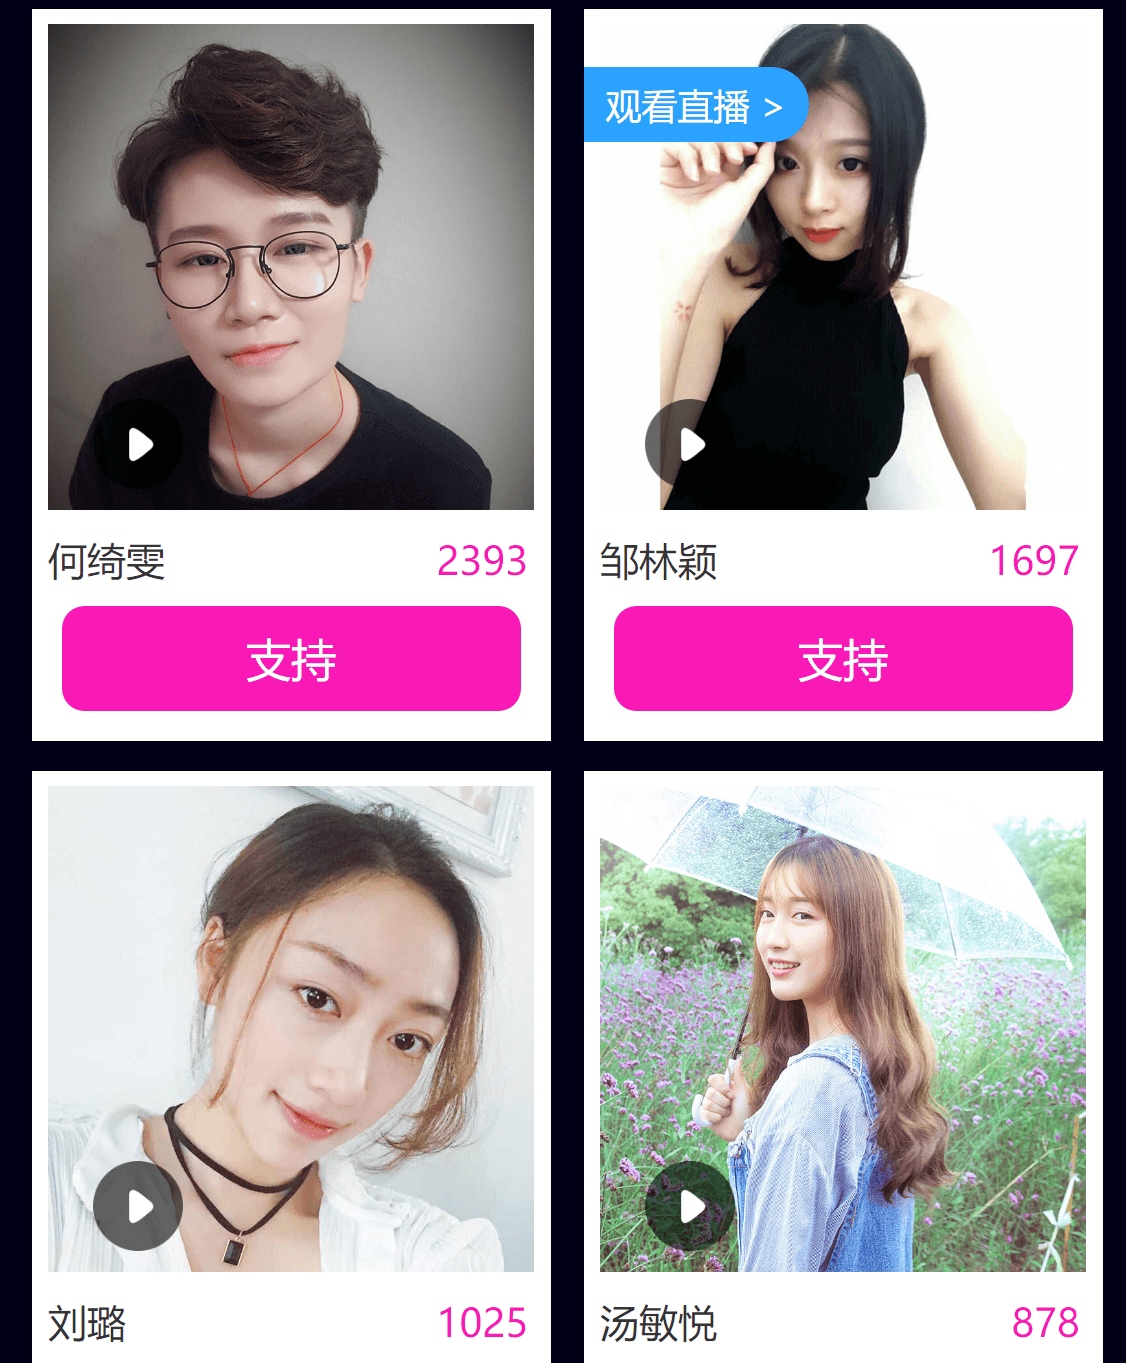
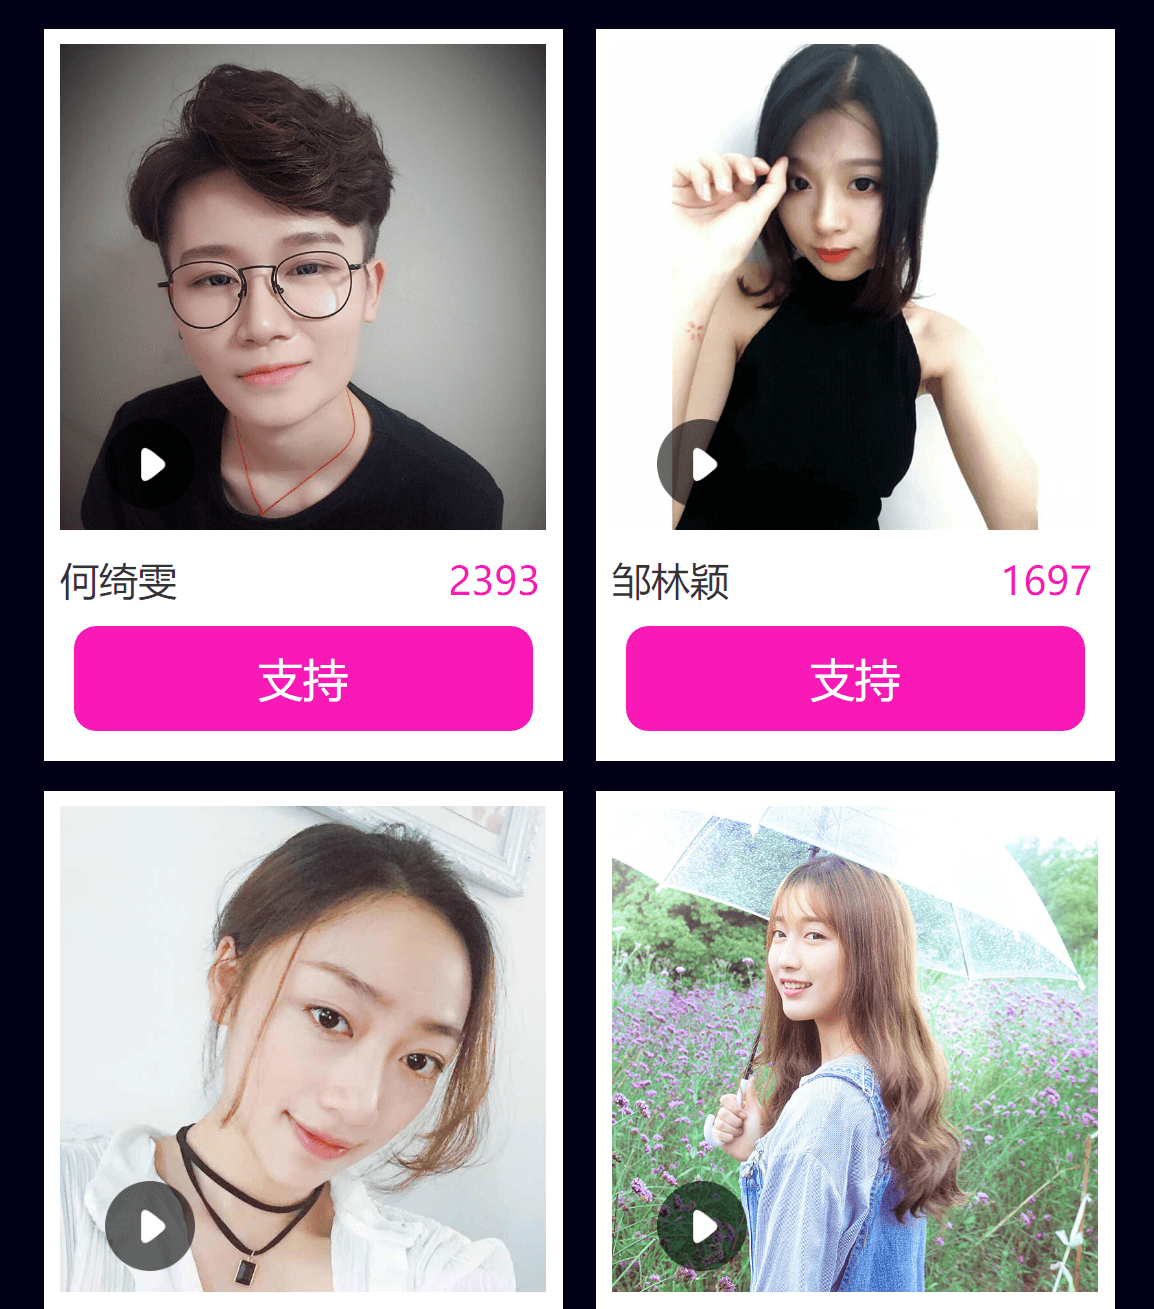
公司有一个项目,其中一部分的截图如下:
主要需求如下:
-
需要拉取十个人的信息,包括封面图,名字,票数,以及对应用户是否进行了投票等信息,以及根据票数排序
-
正在直播的人在右上角会有一个提示
-
点击支持的时候,需要反馈给后台,并且前端这边会有+1的动画,之后重新拉取人物信息以及是否正在直播的状态
-
每隔一段时间,拉取人物信息以及是否正在直播的状态
这里就想到了使用下 vue.js 来构建,因为
-
人物信息都是后台拉取的json数据,前端需要展示,如果使用jquery来拼错DOM结构,或者使用模板来写,比如BaiduTemplate,都非常繁琐。使用vue.js的v-for指令可以简单的完成这个任务
-
一开始想要前端这边进行排序,那么vue.js的orderBy指令也可以很简单的完成排序功能,而不需要额外的代码判断(不过后来排序都通过后台进行了,相应代码会给出。)
-
拉取数据,进行前后台交互,可以使用比较成熟的vue-resource代替jquery的$.ajax来操作。
-
数据会经常进行变化,使用vue.js这样的MVVM框架,可以把重点放在数据的操作上,因为数据的更新也会让DOM保持实时更新
这里不会讲太多vue.js的基础,因为官网文档 Getting Started 已经非常完善了。下面开始我们这个简单的vue实践吧。
<div class="container" id="app">
</div>

var app = new Vue({ el: '#app' });
上面是最简单的 vue 实例初始化。
接下来我们继续构建我们的应用
在未使用 vue.js 之前,我们简单地使用HTML和CSS重构我们的项目:
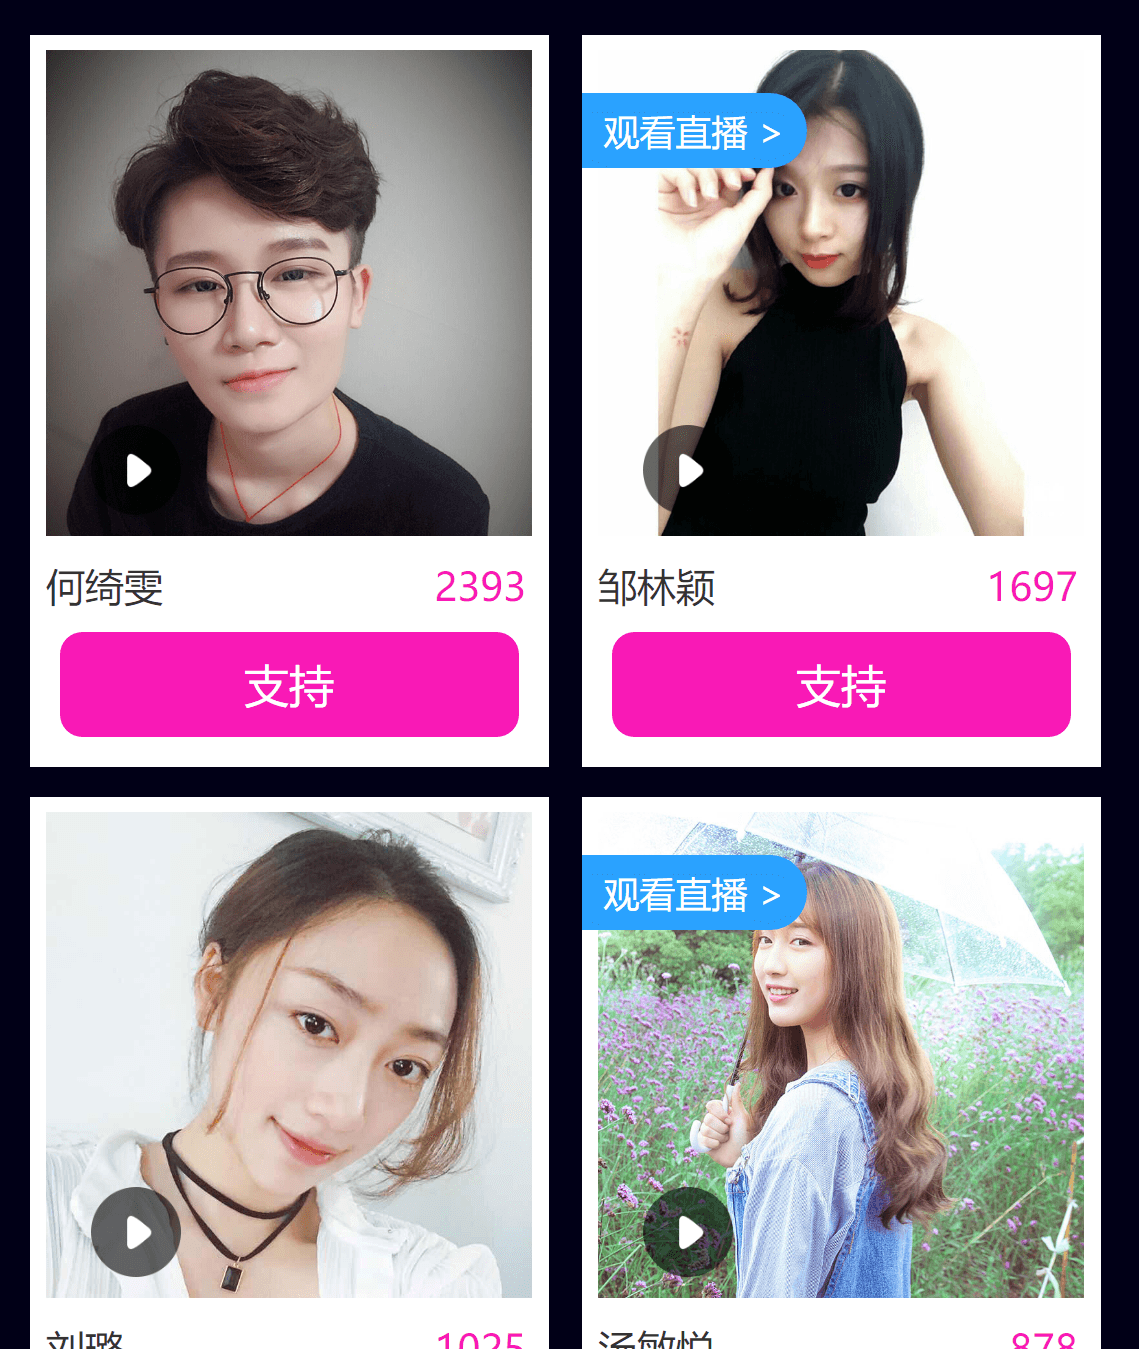
<div class="container" id="app"> <div class="radio-wrapper"> <ul class="list clearfix"> <li> <a class="link"> <div class="live"> <p>观看直播 ></p> </div> <img src="http://a.impingo.me/static/activity/singer/resource/1616312.jpg" class="user"> <img src="./images/play.png" class="play"> <p class="add">+1</p> </a> <div class="user-wrapper"> <div class="name">凌兒</div> <div class="num">3280</div> </div> <div class="do-btn"> <p>支持</p> </div> </li> <li> <a class="link"> <div class="live"> <p>观看直播 ></p> </div> <img src="http://a.impingo.me/static/activity/singer/resource/1616312.jpg" class="user"> <img src="./images/play.png" class="play"> <p class="add">+1</p> </a> <div class="user-wrapper"> <div class="name">凌兒</div> <div class="num">3280</div> </div> <div class="do-btn"> <p>支持</p> </div> </li> </ul> </div> </div> 大体上的HTML结构就是这样,配合CSS样式,可以得到下面的输出结果:
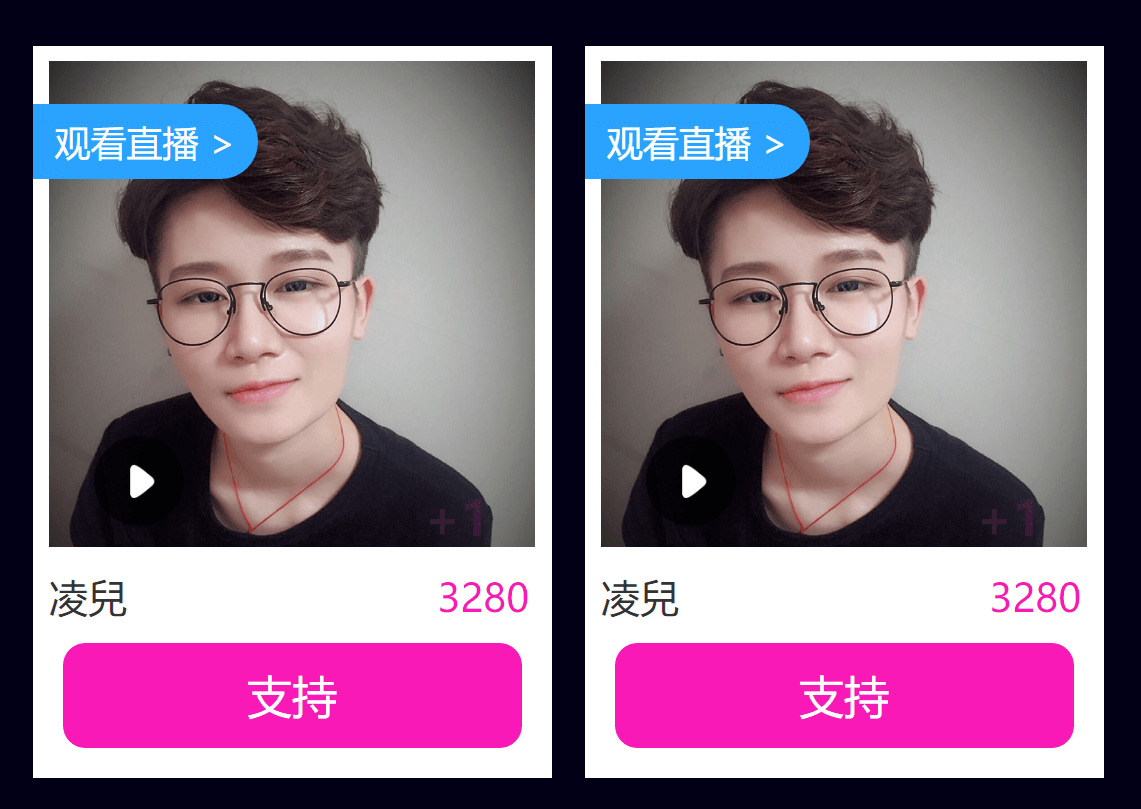
当然现在还都是静态数据。
在 ul 里面的 li ,就需要我们使用 v-for 指令来进行循环输出了。下面再继续说明。
首先来看看我们一开始的 js 部分的代码:
var lib = {
    urlParams: function(url) {
        var urlParamsList = {}; var params = url.search.replace(/^\?/, "").split('&'); //分开成各个不同的对像,去掉'&' for (var i = 0; i < params.length; i++) { var param = params[i]; var temp = param.split("="); urlParamsList[temp[0]] = decodeURI(temp[1]); } return urlParamsList; } }; window.onload = function() { var attachFastClick = Origami.fastclick; attachFastClick(document.body); var windowLocation = window.location, selfUserID = lib.urlParams(windowLocation)['userID'], selfSessionID = lib.urlParams(windowLocation)['sessionID'], selfSessionToken = lib.urlParams(windowLocation)['sessionToken'], selfPeerID = lib.urlParams(windowLocation)['peerID']; var app = new Vue({ el: '#app', data: { anchorInfo: [], getAnchorInfoUrl: "http://a.impingo.me/activity/getAnchorInfo", }, ready: function() { this.getAnchorInfo(); }, methods: { getAnchorInfo: function() { this.$http.jsonp(this.getAnchorInfoUrl) .then(function(res) { var rtnData = res.data; if (rtnData.rtn == 0) { this.$set('anchorInfo', rtnData.data); } }) .catch(function(res) { console.info('网络失败'); }); } } }) }
lib 对象主要放着一些基础的方法或者变量,在这里只有一个解析页面地址参数的函数 urlParams ,因为后面我们需要通过页面地址url获取投票用户的userID,即后面看到的
selfUserID = lib.urlParams(windowLocation)['userID'];
selfSessionID,selfSessionToken,selfPeerID不用在意太多,到时候url没有传入这几个也没关系。
而 window.onload 开头的这段:
var attachFastClick = Origami.fastclick;
    attachFastClick(document.body);
引入了 fastclick,消除手机上点击的300ms延时。
之后就是我们上面提到的vue实例了。
我们给实例添加了新的属性 data ,它是一个对象,这里是vue实例存放数据的地方。初始化用户信息 anchorInfo 为空数组,以及用户信息的接口地址 getAnchorInfoUrl 的值为 http://a.impingo.me/activity/getAnchorInfo 。
然后就是添加了新的属性 ready ,它是一个函数,在vue实例初始化完成的时候会调用这个方法。我们看看这个方法下的代码:
this.getAnchorInfo();
this 指向vue实例,调用 getAnchorInfo() 方法。
接着往下看,我们看到一个新的属性 methods ,它是一个对象,放着我们vue实例的所有方法。在这之下我们定义了 getAnchorInfo() 方法。
getAnchorInfo: function() {
    this.$http.jsonp(this.getAnchorInfoUrl) .then(function(res) { var rtnData = res.data; if (rtnData.rtn == 0) { this.$set('anchorInfo', rtnData.data); } }) .catch(function(res) { console.info('网络失败'); }); }
vue-resource 的使用可以看看这里,我们在这里使用 jsonp 方法请求了 getAnchorInfoUrl 地址的接口,如果请求成功的话,then(function(res)){} ,我们看看 res 的数据结构
(补充)vue-resource 的 jsonp 基本写法是(可以参看官方文档 HTTP Requests/Response):
this.$http.jsonp(url,{
        params: {
                'someKey': someValue
        }
    })
    // this 是 vue 实例
    // url是请求的地址 params是请求的附带参数
    .then(function(res){ // 后台成功返回数据的时候 // res 是返回的数据 }) .catch(function(res){ // 后台响应出错的时候 });
res.data 会装载后台返回给我们的数据
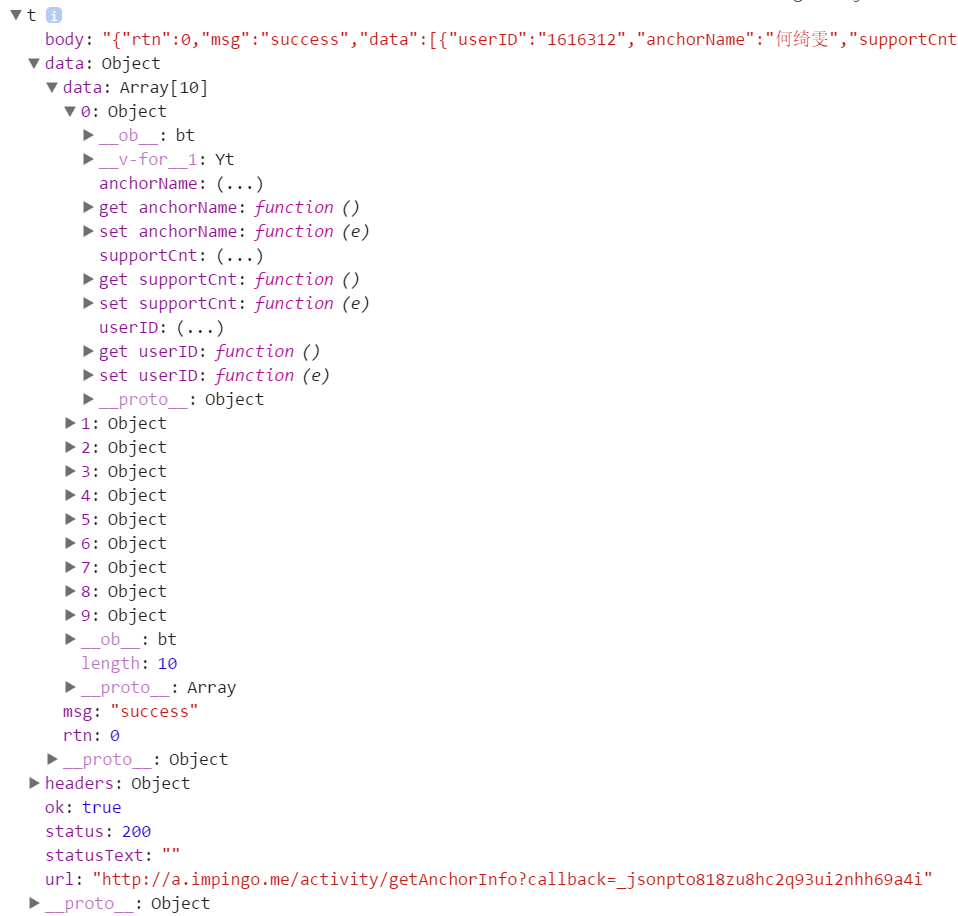
可以看到一些返回的信息,而我们想要的数据在 res.data 里面,返回的格式是和后台协商好的。
看下图。res.data.rtn 是一个状态,这里 0 代表着返回成功。而res.data.data 是一个对象数组,长度为10,放着十个用户的信息。每个对象里面有属性 userID,anchorName,supportCnt 分别代表着用户的ID,用户的名字以及它的支持度。
在res.data.rtn为0代表成功的情况下,我们调用vue的 $set 方法,设置anchorInfo的值,把res.data.data赋给它。在这里使用$set方法才能保证anchorInfo变量的值在vue里面是响应式能实时更新的。

接下来我们修改前面提到的HTML结构吧。我们从 ul 标签开始修改。
<ul class="list clearfix" v-cloak> <li v-for="anchor in anchorInfo"> </li> </ul> 在这里我们可以看到给 ul 标签加了一个v-cloak,这个是vue实例的DOM结构渲染完成以后,会去掉的一个类。因为我们经常在vue实例还没渲染完成的时候会看到一些比如 {{someStr}} 这样的绑定属性,我们在CSS里面添加
[v-cloak] {
    display: none; }
那么在vue实例的DOM还没渲染完成的时候,就会被隐藏起来了。
接下来我们看到了 li 标签里面有vue指令 v-for,在这里它会循环遍历vue实例的数据 anchorInfo 数组,每次遍历的变量别名为 anchor。
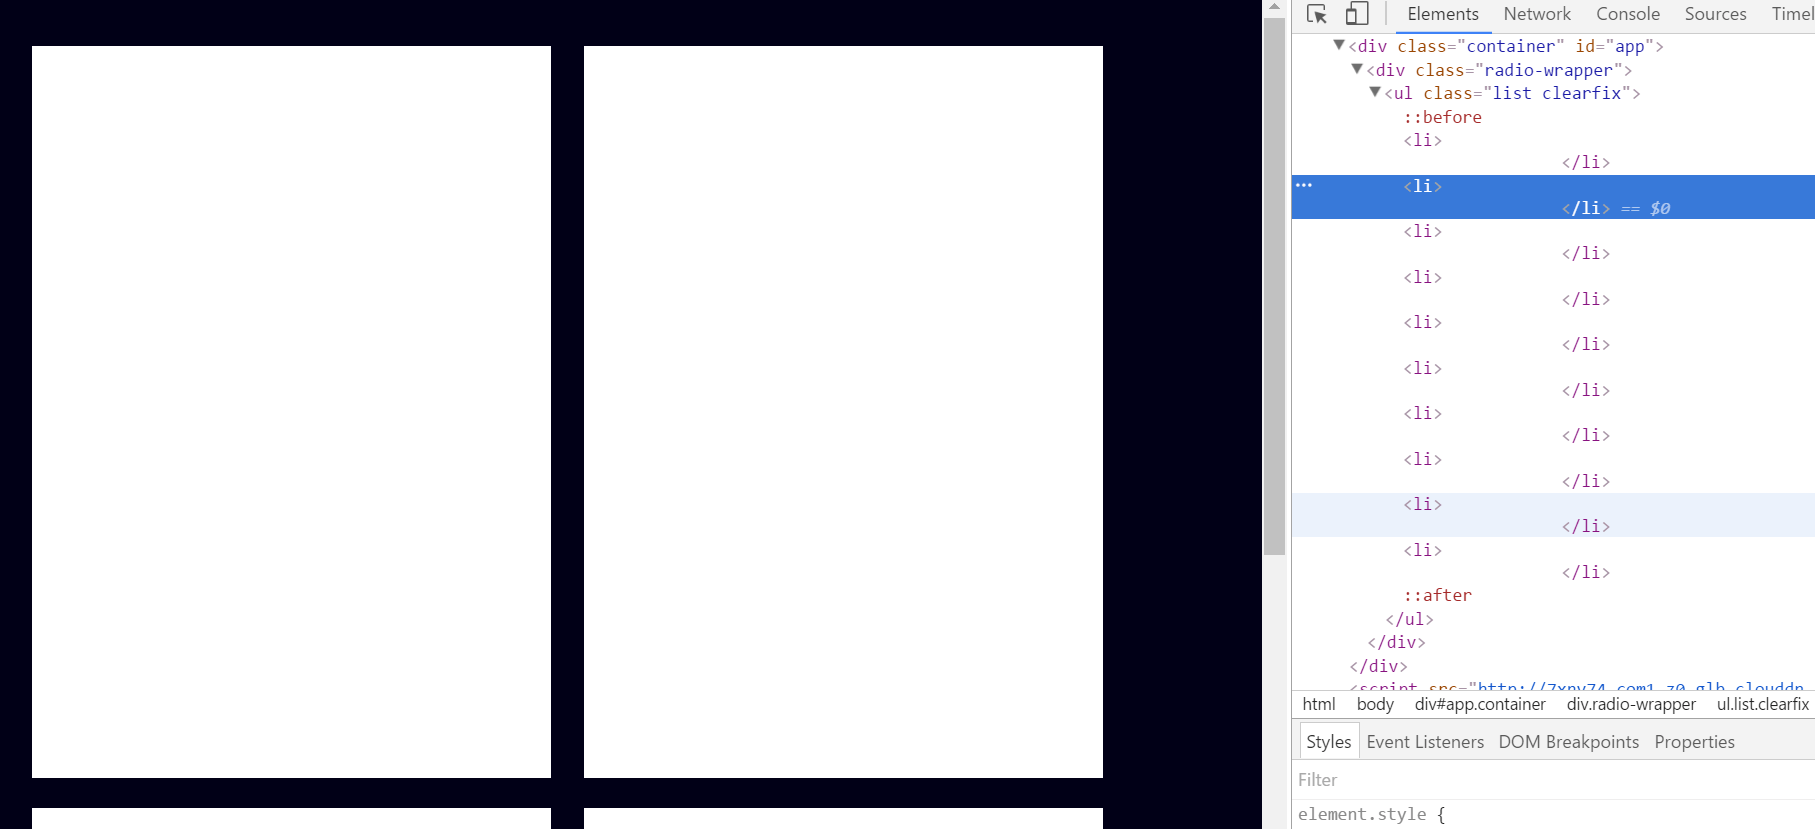
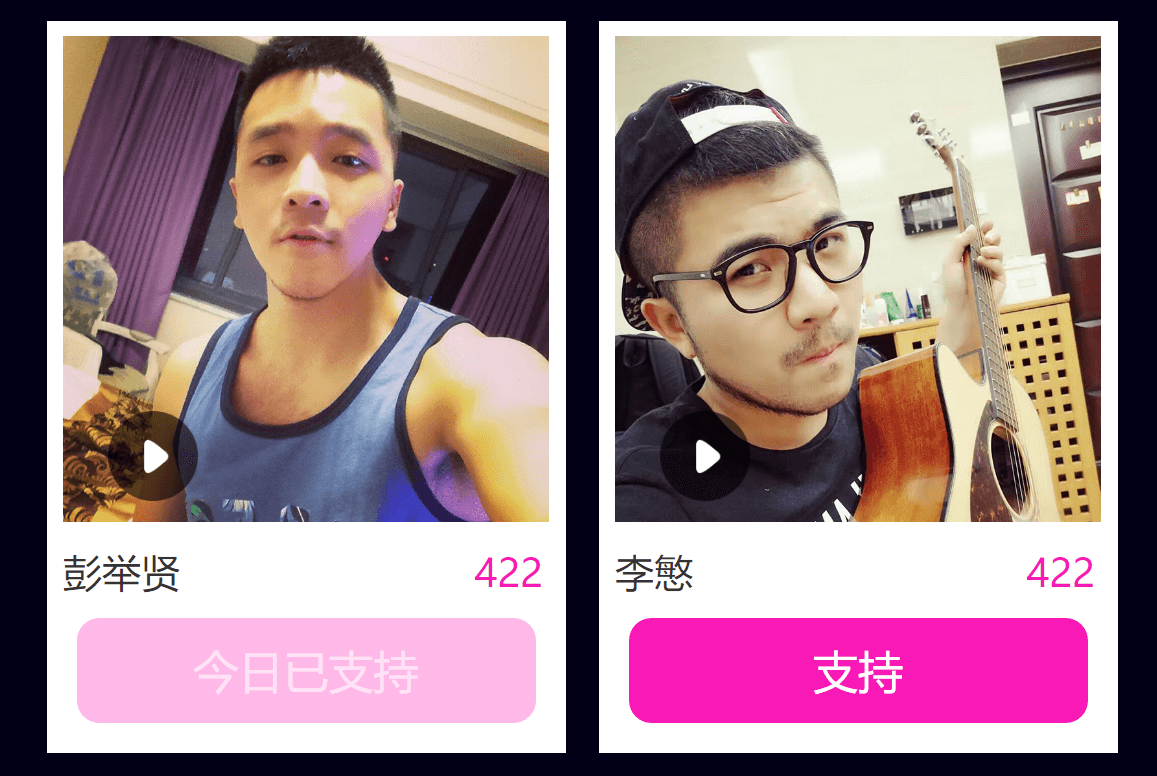
在上图可以看到, ul 标签下面生成了十个li标签,正好是我们 anchorInfo 数组的长度。我们接着给 li 标签里面添加内容。
<li v-for="anchor in anchorInfo">
    <a class="link"> <div class="live"> <p>观看直播 ></p> </div> <img :src="anchor.userID | getUserImg" class="user"> <img src="./images/play.png" class="play"> <p class="add">+1</p> </a> </li>
(补充)这里给出vue的排序指令代码:
li 标签改成这样:
<li v-for="anchor in anchorInfo | orderBy supportCntFn">
在vue实例里面的 method 对象添加:
supportCntFn: function(a, b) {
return (parseInt(b.supportCnt, 10) - parseInt(a.supportCnt, 10) >= 0); }, 这里通过parseInt的原因是后台传回来的是字符串类型,如果直接排序的话 2 会比 10 排在前面,显然不符合我们的要求。后面继续。
是否正在直播的DOM元素 .live 和点击投票的+1动画的DOM元素 add 我们暂时不考虑它们,在CSS里面都默认设置了 display:none。这里主要看的是用户的封面图 .user:
<img :src="anchor.userID | getUserImg" class="user">
这里使用了过滤器 getUserImg (注意这里是 :src属性绑定)。所以我们会在vue实例里面添加一个新的属性 filters以及 getUserImg过滤器定义:
filters: {
    getUserImg: function(val) {
        return 'http://a.impingo.me/static/activity/singer/resource/' + val + '.jpg' }, },
而我们当初在和后台协商的时候,图片的地址是 domain+userID+.jpg,所以在 getUserImg 过滤器里面的参数 val 就是我们传入的用户的ID,之后再进行拼凑,返回就好了。
之后在 li 标签继续加入下面的部分:
<div class="user-wrapper">
    <div class="name" v-text="anchor.anchorName"></div> <div class="num" v-text="anchor.supportCnt"></div> </div>
这里应该很明显就能明白,是输出了用户的名字和投票数了。
<template v-if="voteStatus | getVoteStatus anchor">
    <div class="had-btn"> <p>今日已支持</p> </div> </template> <template v-else> <div class="do-btn"> <p>支持</p> </div> </template>
我们继续在 li 标签里面添加了这样的代码,template 可以配合 vue的指令 v-if 一同使用。在这里你可能稍微讲解下 v-if="voteStatus | getVoteStatus anchor" 是来判断用户是否已经投票了,已经投票的话显示 .had-btn 元素,否则显示 .do-btn元素,在后面会补充上。
可以看到我们大部分的UI界面已经完成了。看看其实寥寥几十段代码而已,就把通过jquery来拼错DOM的繁杂方法完成了。
接下来我们主要考虑交互的部分了,在这之前我们先来获取用户是否在直播的状态吧。
var app = new Vue({
    el: '#app',
    data: {
        ...
        livingInfo: [],
        getLiveStatusUrl: "http://a.impingo.me/activity/getLiveStatus",
        ...
    },
ready: function() { ... this.getLiveStatus(); ... }, methods: { ... getLiveStatus: function() { this.$http.jsonp(this.getLiveStatusUrl) .then(function(res) { var that = this; var rtnData = res.data; if (rtnData.rtn == 0) { this.$set('livingInfo', rtnData.data); } }) .catch(function(res) { console.info('网络失败'); }); }, ... }, }) 我们添加了上面的代码,data里面的直播信息数组livingInfo和直播信息接口地址getLiveStatusUrl。在ready方法里面添加了一个新的函数调用this.getLiveStatus();对应的函数定义在methods对象里面。核心部分在
this.$set('livingInfo', rtnData.data);
我们和上面一样,把返回的数组 res.data.rtn代表成功的情况下,给livingInfo数组赋值res.data.data。

看看我们返回的jsonp数据。我们主要关注 state 变量,只有值为 1 的时候代表正在直播,所以我们现在修改一些HTML结构:
<div class="live" v-show="living | getLiving anchor"> <p>观看直播 ></p> </div> 给 .live 增加vue指令v-show,只有 living 为 true 的时候,它才会显示出来。我们在下面定义 getLiving 过滤器
getLiving: function(val, anchor) {
    var curUserID = anchor.userID,
isLiving = false; this.livingInfo.forEach(function(living) { if (living.createUserID === curUserID) { if (living.state == "1") { isLiving = true; } } }); return isLiving; }, 过滤器接收两个变量,需要过滤的值以及anchor,即对应的用户。
我们把用户的ID赋值给 curUserID 变量,初始化代表是否在直播的变量 isLiving 的值为false,默认不显示。
然后我们使用forEach方法遍历 livingInfo 数组,并且判断此刻 living.createUserID 和 curUserID 相等的时候,看看它的 state 的属性,如果为1的话,isLiving 设置为真。否则其他情况返回 false。(这里可以不用 forEach 方法,因为在找到对应的 living 的时候, forEach 并不能退出循环。)
如上图,现在正在直播的用户就能显示出观看直播这个标签了。
接下来我们来获取是否可以投票的信息。
var app = new Vue({
    el: '#app',
    data: {
        ...
        queryVoteStatusUrl: "http://a.impingo.me/activity/queryVoteStatus",
        anchorUserID: '', todayHadVote: false ... }, ready: function() { ... this.queryVoteStatus(); ... }, methods: { ... queryVoteStatus: function() { // this.$http.jsonp(this.queryVoteStatusUrl + '?userID=' + selfUserID) this.$http.jsonp(this.queryVoteStatusUrl, { params: { 'userID': selfUserID } }) .then(function(res) { var rtnData = res.data; if (rtnData.rtn == 0) { this.todayHadVote = false; } else if (rtnData.rtn == 1) { this.todayHadVote = true; this.anchorUserID = rtnData.data.anchorUserID; } }) .catch(function(res) { console.info('网络失败'); }); }, ... }, filters: { ... getVoteStatus: function(val, anchor) { if (anchor.userID == this.anchorUserID) { // 可支持 return true; } else { // 不可支持 return false; } } ... }, });
上面是我们添加的新代码。 queryVoteStatusUrl 代表着获取是否已投票的接口地址(这个地址后面需要加上当前投票用户的userID,我们可以自己在地址后面添加 userID=10003等,userID从10000开始到11000都可以用来测试)。anchorUserID 为空字符串,后面获取数据的时候如果已投票,会把投给的那个人的ID赋值给它。 todayHadVote 代表今天是否已经投票了,如果已经投票的话禁止继续投票。
所以我们在vue实例的 methods 对象可以看到 queryVoteStatus 方法,如果 res.data.rtn 为0的时候,代表今天还可以投票,进行下面的操作:
this.todayHadVote = true;
this.anchorUserID = rtnData.data.anchorUserID;
最后就是添加的 getVoteStatus 过滤器,如下图,如果 voteStatus 为真,今日已支持按钮会显示出来,否则显示支持按钮
<template v-if="voteStatus | getVoteStatus anchor">
    <div class="had-btn"> <p>今日已支持</p> </div> </template> <template v-else> <div class="do-btn"> <p>支持</p> </div> </template>
getVoteStatus 过滤器的代码如下:
getVoteStatus: function(val, anchor) {
    if (anchor.userID == this.anchorUserID) { // 可支持 return true; } else { // 不可支持 return false; } }
只有当当前用户的ID和 data 里面的 anchorUserID 一致的时候,voteStatus 会返回 true。
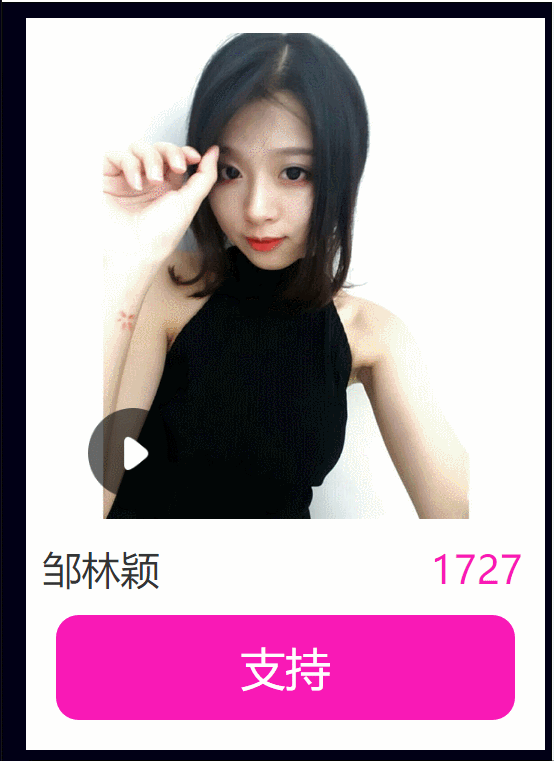
当然我们现在都还没有进行操作,所以所有的按钮都是支持按钮,我们可以在先修改成下面这样:自己把 todayHadVote 设置为 true ,而 anchorUserID 设置一个存在的用户ID来看效果(然后记得撤销修改)
if (rtnData.rtn == 0) {
    this.todayHadVote = true;
    this.anchorUserID = 1089536; } else if (rtnData.rtn == 1) { this.todayHadVote = true; this.anchorUserID = rtnData.data.anchorUserID; }
截图如下:
接下来还有一个小的需求,就是每隔一段时间重新拉取用户的信息和是否在直播的状态,添加下面的代码:
var app = new Vue({
    el: '#app',
    data: {
        ...
        setIntervalGetAnchorInfo: null,
        setIntervalGetLiveStatus: null, intervalDuration: 60 * 1000, ... }, ready: function() { ... this.initSetTimeout(); ... }, methods: { ... initSetTimeout: function() { var that = this; setIntervalGetAnchorInfo = setInterval(function() { that.getAnchorInfo(); }, that.intervalDuration); setIntervalGetLiveStatus = setInterval(function() { that.getLiveStatus(); }, that.intervalDuration); }, ... }, });
获取用户信息的定时器 setIntervalGetAnchorInfo 和获取直播状态的定时器 setIntervalGetLiveStatus,初始化定时器的 initSetTimeout 方法。
接下来就开始讲解交互部分,首先是投票部分。
<div class="do-btn" @click="singerVote(anchor)"> <p>支持</p> </div> 给支持按钮添加一个点击事件,监听函数是 singerVote ,把当前用户当做参数传入。
var app = new Vue({
    el: '#app',
    data: {
        ....
        singerVoteUrl: "http://a.impingo.me/activity/singerVote",
        ...
    },
    methods: {
        ...
        singerVote: function(anchor) { var getUserID = selfUserID, getTargetUserID = anchor.userID; if (this.todayHadVote) { console.info('每日仅支持一次!'); return; } this.$http.jsonp(this.singerVoteUrl, { params: { userID: getUserID, targetUserID: getTargetUserID, sessionID: selfSessionID, sessionToken: selfSessionToken, peerID: selfPeerID } }) .then(function(res) { var rtnData = res.data, that = this; if (rtnData.rtn == 0) { // console.info(rtnData.msg); Vue.set(anchor, 'showAdd', true); anchor.supportCnt++; this.anchorUserID = getTargetUserID; this.todayHadVote = true; clearInterval(setIntervalGetAnchorInfo); // 点击投票,动画(2秒)以后,重新拉取直播状态以及直播信息 setTimeout(function() { that.getAnchorInfo(); that.getLiveStatus(); setIntervalGetAnchorInfo = setInterval(function() { that.getAnchorInfo(); }, that.intervalDuration); }, 2000); } else if (rtnData.rtn == 2 || rtnData.rtn == 3 || rtnData.rtn == 1) { console.info(rtnData.msg); } }) .catch(function(res) { console.info('网络失败'); }); }, ... }, });
我们可以看到上面是点击时候的处理。 singerVoteUrl 是投票接口的地址,singerVote 是对应的方法。
一开始看到,如果已经投票了,会反馈 每日仅支持一次! 的提示语,由 this.todayHadVote 判断。否则,通过 vue-resource 发起请求。
因为上面已经提到很多次了,这里就不赘述太多,我们看看主要的部分。
我们应该还记得:
<p class="add" v-show="anchor.showAdd">+1</p>
这个+1的动画的元素,点击投票,成功反馈以后,会进行
Vue.set(anchor, 'showAdd', true);
这个操作,这个时候 .add 元素就会显示出来了。
anchor.supportCnt++;
this.anchorUserID = getTargetUserID;
this.todayHadVote = true;
之后我们是本地该用户的投票数 ++,然后设置用户今天已投票,以及投票的人的ID
clearInterval(setIntervalGetAnchorInfo);
之后我们清楚了获取用户信息的计时器
setTimeout(function() {
    that.getAnchorInfo();
    that.getLiveStatus();

    setIntervalGetAnchorInfo = setInterval(function() { that.getAnchorInfo(); }, that.intervalDuration); }, 2000);
并在两秒(+1动画结束以后),重新获取直播信息还有主播信息,并且重启获取用户信息的计时器。这里主要考虑的是,点击以后,用户的票数会改变,排序上可能会改变,这个时候重新从后台获取信息,能保证点击以后数据是最新的,排序也是正确的。而清除计时器的原因是,在这次交互后我们已经更新了数据,计时器就应该重置,在规定的 that.intervalDuration 时间以后再重新拉取。
//this.$http.jsonp(this.singerVoteUrl + '?userID=' + getUserID + '&targetUserID=' + getTargetUserID + '&sessionID=' + selfSessionID + '&sessionToken=' + selfSessionToken + '&peerID=' + selfPeerID) this.$http.jsonp(this.singerVoteUrl, { params: { userID: getUserID, targetUserID: getTargetUserID, sessionID: selfSessionID, sessionToken: selfSessionToken, peerID: selfPeerID } }); 另外我们在这里看到一窜拼接的地址, vue-resource 应该是可以传递 data 对象来传递参数的,试了几次不知道为什么都不行,待改善。
更新:vue-resource传参可以通过上面的方法。 然后这个地方可能会报错,因为后台需要 sessionID 和 sessionToken
?userID=10003&peerID=45C7781DE9BF&sessionID=67056f7abd062d4dea&&sessionToken=3df4ce5d23
可以按照上面这样在url地址加上,然后再发送请求。
<div class="name" v-text="anchor.anchorName" @click="jumpProfile(anchor.userID)"></div>
另外也有一个点击用户名跳转到他个人主页的需求,我们简单的增加一个方法就好了
jumpProfile: function(userID) {
    console.log(userID);
    if (window.pingo_js) { window.pingo_js.jumpPage('profile://' + userID); } },
这里的 window.pingo_js 不用考虑太多,是公司APP的接口,后面也有这样的代码,可无视。
<a class="link" @click="jumpVideo(anchor)">
    <div class="live" v-show="living | getLiving anchor"> <p>观看直播 ></p> </div> <img :src="anchor.userID | getUserImg" class="user"> <img src="./images/play.png" class="play"> <p class="add" v-show="anchor.showAdd">+1</p> </a>
我们这里再给 .link 添加了一个 jumpVideo 的点击事件绑定。
jumpVideo: function(anchor) {
    var curUserID = anchor.userID;
    window.location.href = 'http://api.impingo.me/static/singer/preselection-live.html?userID=' + curUserID; // 视频地址 return; },
就只是简单的跳转到我们准备好的视频播放地址,传入用户的ID就好了。
<div class="live" v-show="living | getLiving anchor" @click.stop="jumpLive(anchor)"> <p>观看直播 ></p> </div> 而正在直播的用户,点击观看直播的时候,我们绑定了 jumpLive 事件。这里给 @click 加了一个修饰符 .stop ,即禁止冒泡,反正冒泡到父元素的 jumpVideo 点击事件函数。
jumpLive: function(anchor) {
    var curUserID = anchor.userID,
        curRoomID;
    this.livingInfo.forEach(function(living) { if (living.createUserID === curUserID) { if (living.state == "1") { curRoomID = living.roomID; } } }); window.location.href = 'http://api.impingo.me/miniSite/livePage?liveID=' + curRoomID; }
而里面也是简单地循环遍历 livingInfo 数组来匹配对应的用户,找出它直播间的房号,跳转到直播页面(这里也有一个跳转到APP直播间的方法,省略掉了,降低理解成本和代码量)。
大功告成。
感觉需要改善的地方有:
-
livingInfo数组和anchorInfo数组可以通过 computed 属性计算合成一个大的数组,那么很多的过滤器还有forEach遍历就可以省略掉了 -
可以把整个
ul下的部分做成一个组件 -
文章可能描述的很啰嗦
全部代码:
guide.html:
<!DOCTYPE html>
<html>

<head> <title>vue guide</title> <meta charset="utf-8"> <meta name="viewport" content="width=device-width, initial-scale=1.0, minimum-scale=1.0, maximum-scale=1.0, user-scalable=0"> <meta content="telephone=no" name="format-detection" /> <meta content="email=no" name="format-detection" /> <link rel="stylesheet" href="./css/guide.css" /> <script src="http://7xnv74.com1.z0.glb.clouddn.com/static/lib/flexible/flexible.js"></script> </head> <body> <div class="container" id="app"> <div class="radio-wrapper"> <ul class="list clearfix" v-cloak> <li v-for="anchor in anchorInfo"> <a class="link" @click="jumpVideo(anchor)"> <div class="live" v-show="living | getLiving anchor" @click.stop="jumpLive(anchor)"> <p>观看直播 ></p> </div> <img :src="anchor.userID | getUserImg" class="user"> <img src="./images/play.png" class="play"> <p class="add" v-show="anchor.showAdd">+1</p> </a> <div class="user-wrapper"> <div class="name" v-text="anchor.anchorName" @click="jumpProfile(anchor.userID)"></div> <div class="num" v-text="anchor.supportCnt"></div> </div> <template v-if="voteStatus | getVoteStatus anchor"> <div class="had-btn"> <p>今日已支持</p> </div> </template> <template v-else> <div class="do-btn" @click="singerVote(anchor)"> <p>支持</p> </div> </template> </li> </ul> </div> </div> <script src="http://7xnv74.com1.z0.glb.clouddn.com/static/lib/fastclick/fastclick.min.js"></script> <script src="./js/vue.min.js"></script> <script src="./js/vue-resource.min.js"></script> <script src="./js/guide.js"></script> </body> </html>
guide.js
var lib = {
    urlParams: function(url) {
        var urlParamsList = {}; var params = url.search.replace(/^\?/, "").split('&'); //分开成各个不同的对像,去掉'&' for (var i = 0; i < params.length; i++) { var param = params[i]; var temp = param.split("="); urlParamsList[temp[0]] = decodeURI(temp[1]); } return urlParamsList; } }; window.onload = function() { var attachFastClick = Origami.fastclick; attachFastClick(document.body); var windowLocation = window.location, selfUserID = lib.urlParams(windowLocation)['userID'], selfSessionID = lib.urlParams(windowLocation)['sessionID'], selfSessionToken = lib.urlParams(windowLocation)['sessionToken'], selfPeerID = lib.urlParams(windowLocation)['peerID']; var app = new Vue({ el: '#app', data: { anchorInfo: [], livingInfo: [], getAnchorInfoUrl: "http://a.impingo.me/activity/getAnchorInfo", getLiveStatusUrl: "http://a.impingo.me/activity/getLiveStatus", queryVoteStatusUrl: "http://a.impingo.me/activity/queryVoteStatus", singerVoteUrl: "http://a.impingo.me/activity/singerVote", anchorUserID: '', todayHadVote: false, setIntervalGetLiveStatus: null, setIntervalGetAnchorInfo: null, intervalDuration: 60 * 1000, }, ready: function() { this.getAnchorInfo(); this.getLiveStatus(); this.queryVoteStatus(); this.initSetTimeout(); }, methods: { getAnchorInfo: function() { this.$http.jsonp(this.getAnchorInfoUrl) .then(function(res) { console.log(res); var rtnData = res.data; if (rtnData.rtn == 0) { this.$set('anchorInfo', rtnData.data); } }) .catch(function(res) { console.info('网络失败'); }); }, getLiveStatus: function() { this.$http.jsonp(this.getLiveStatusUrl) .then(function(res) { var that = this; var rtnData = res.data; if (rtnData.rtn == 0) { this.$set('livingInfo', rtnData.data); } }) .catch(function(res) { console.info('网络失败'); }); }, queryVoteStatus: function() { // this.$http.jsonp(this.queryVoteStatusUrl + '?userID=' + selfUserID) this.$http.jsonp(this.queryVoteStatusUrl, { params: { 'userID': selfUserID } }) .then(function(res) { var rtnData = res.data; if (rtnData.rtn == 0) { this.todayHadVote = false; } else if (rtnData.rtn == 1) { this.todayHadVote = true; this.anchorUserID = rtnData.data.anchorUserID; } }) .catch(function(res) { console.info('网络失败'); }); }, initSetTimeout: function() { var that = this; setIntervalGetAnchorInfo = setInterval(function() { that.getAnchorInfo(); }, that.intervalDuration); setIntervalGetLiveStatus = setInterval(function() { that.getLiveStatus(); }, that.intervalDuration); }, singerVote: function(anchor) { var getUserID = selfUserID, getTargetUserID = anchor.userID; if (this.todayHadVote) { console.info('每日仅支持一次!'); return; } this.$http.jsonp(this.singerVoteUrl, { params: { userID: getUserID, targetUserID: getTargetUserID, sessionID: selfSessionID, sessionToken: selfSessionToken, peerID: selfPeerID } }) .then(function(res) { var rtnData = res.data, that = this; if (rtnData.rtn == 0) { // console.info(rtnData.msg); Vue.set(anchor, 'showAdd', true); anchor.supportCnt++; this.anchorUserID = getTargetUserID; this.todayHadVote = true; clearInterval(setIntervalGetAnchorInfo); // 点击投票,动画(2秒)以后,重新拉取直播状态以及直播信息 setTimeout(function() { that.getAnchorInfo(); that.getLiveStatus(); setIntervalGetAnchorInfo = setInterval(function() { that.getAnchorInfo(); }, that.intervalDuration); }, 2000); } else if (rtnData.rtn == 2 || rtnData.rtn == 3 || rtnData.rtn == 1) { console.info(rtnData.msg); } }) .catch(function(res) { console.info('网络失败'); }); }, jumpProfile: function(userID) { console.log(userID); if (window.pingo_js) { window.pingo_js.jumpPage('profile://' + userID); } }, jumpVideo: function(anchor) { var curUserID = anchor.userID; window.location.href = 'http://api.impingo.me/static/singer/preselection-live.html?userID=' + curUserID; // 视频地址 return; }, jumpLive: function(anchor) { var curUserID = anchor.userID, curRoomID; this.livingInfo.forEach(function(living) { if (living.createUserID === curUserID) { if (living.state == "1") { curRoomID = living.roomID; } } }); window.location.href = 'http://api.impingo.me/miniSite/livePage?liveID=' + curRoomID; } }, filters: { getUserImg: function(val) { return 'http://a.impingo.me/static/activity/singer/resource/' + val + '.jpg' }, getLiving: function(val, anchor) { var curUserID = anchor.userID, isLiving = false; this.livingInfo.forEach(function(living) { if (living.createUserID === curUserID) { if (living.state == "1") { isLiving = true; } } }); return isLiving; }, getVoteStatus: function(val, anchor) { if (anchor.userID == this.anchorUserID) { // 可支持 return true; } else { // 不可支持 return false; } }, }, }); }
guide.less
@import (inline) './normalize.css';
body {
    background-color: #010017;
}

.container {
    user-select: none;
    font-family: 'Microsoft YaHei', sans-serif;
    position: relative;
    min-width: 320px; max-width: 750px; margin: 0 auto; font-size: 0.32rem; } [v-cloak] { display: none; } // 设计稿是 750px // 1rem = 75px @base: 75rem; .demo { text-align: center; .btn { width: 560 / @base; } }


 4083
4083

 被折叠的 条评论
为什么被折叠?
被折叠的 条评论
为什么被折叠?
 到【灌水乐园】发言


