


参考文章:
http://androidwing.net/index.php/70
https://www.jianshu.com/p/f7989a2a3ec2 (可以看这篇文章)
今天记录下CoordinateLayout源码学习的过程,下周又要在CoordinateLayout上面做文章了,实现暂时也还没啥思路,不看源码也不行了。
关于CoordinateLayout的使用,这里就不详细说明了,不懂得可以查阅这篇文章。
这里研究的是排除anchor作用的源码
这里先放上个一个简单的例子吧:
<android.support.design.widget.CoordinatorLayout
    xmlns:android="http://schemas.android.com/apk/res/android"
    xmlns:app="http://schemas.android.com/apk/res-auto"
    xmlns:tools="http://schemas.android.com/tools"
    android:layout_width="match_parent"
    android:layout_height="match_parent"
    android:id="@+id/coordinator"
    tools:context=".photo.TestActivity">

    <android.support.design.widget.AppBarLayout
        android:layout_width="match_parent"
        android:id="@+id/appbar"
        android:layout_height="220dp"
        android:background="#ffffff">

        <LinearLayout
            android:layout_width="match_parent"
            android:layout_height="match_parent"
            app:layout_scrollFlags="scroll"
            android:orientation="vertical">
        <View
            android:layout_width="match_parent"
            android:id="@+id/edit"
            android:background="#e29de3"
            android:layout_height="50dp">

        </View>
        </LinearLayout>
    </android.support.design.widget.AppBarLayout>

    <android.support.v4.widget.NestedScrollView
        android:layout_width="match_parent"
        android:layout_height="500dp"
        android:background="#1d9d29"
        app:layout_behavior="@string/appbar_scrolling_view_behavior">

        <LinearLayout
            android:layout_width="match_parent"
            android:layout_height="wrap_content"
            android:orientation="vertical">

            <View
                android:layout_width="match_parent"
                android:layout_height="200dp"
                android:layout_margin="20dp"
                android:background="#d9ee33">

            </View>

            <View
                android:layout_width="match_parent"
                android:layout_height="200dp"
                android:layout_margin="20dp"
                android:background="#2277dd">

            </View>

            <View
                android:layout_width="match_parent"
                android:layout_height="200dp"
                android:layout_margin="20dp"
                android:background="#2277dd">

            </View>

            <View
                android:layout_width="match_parent"
                android:layout_height="200dp"
                android:layout_margin="20dp"
                android:background="#2277dd">

            </View>

            <View
                android:layout_width="match_parent"
                android:layout_height="200dp"
                android:layout_margin="20dp"
                android:background="#2277dd">

            </View>

            <View
                android:layout_width="match_parent"
                android:layout_height="200dp"
                android:layout_margin="20dp"
                android:background="#2277dd">

            </View>

            <View
                android:layout_width="match_parent"
                android:layout_height="200dp"
                android:layout_margin="20dp"
                android:background="#2277dd">

            </View>

            <View
                android:layout_width="match_parent"
                android:layout_height="200dp"
                android:layout_margin="20dp"
                android:background="#dd2288">

            </View>
        </LinearLayout>
    </android.support.v4.widget.NestedScrollView>

</android.support.design.widget.CoordinatorLayout>
实现的效果如下:
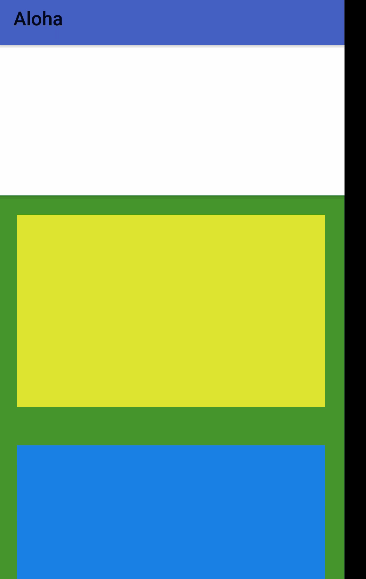
代码很简单,通过一个appbar_scrolling_view_behavior就能够直接实现联动的效果,那么首先就介绍一下解耦父View和子View的关键类:Behavior吧。
Behavior定义在CoordinateLayout内部:
public static abstract class Behavior<V extends View> {

        ...
      //在子View获取触摸事件之前调用
        public boolean onInterceptTouchEvent(CoordinatorLayout parent, V child, MotionEvent ev) {
            return false;
        }
		//在Behavior开始时候调用
        public boolean onTouchEvent(CoordinatorLayout parent, V child, MotionEvent ev) {
            return false;
        }
		//依赖选择
        public boolean layoutDependsOn(CoordinatorLayout parent, V child, View dependency) {
            return false;
        }

       //依赖选择后的变化回调
        public boolean onDependentViewChanged(CoordinatorLayout parent, V child, View dependency) {
            return false;
        }

       ...
 		//底下的方法跟NestedScrollingParent中的解释一致
        public boolean onStartNestedScroll(@NonNull CoordinatorLayout coordinatorLayout,
                @NonNull V child, @NonNull View directTargetChild, @NonNull View target,
                @ScrollAxis int axes, @NestedScrollType int type) {
            if (type == ViewCompat.TYPE_TOUCH) {
                return onStartNestedScroll(coordinatorLayout, child, directTargetChild,
                        target, axes);
            }
            return false;
        }


        @Deprecated
        public void onNestedScrollAccepted(@NonNull CoordinatorLayout coordinatorLayout,
                @NonNull V child, @NonNull View directTargetChild, @NonNull View target,
                @ScrollAxis int axes) {
            // Do nothing
        }


        public void onNestedScrollAccepted(@NonNull CoordinatorLayout coordinatorLayout,
                @NonNull V child, @NonNull View directTargetChild, @NonNull View target,
                @ScrollAxis int axes, @NestedScrollType int type) {
            if (type == ViewCompat.TYPE_TOUCH) {
                onNestedScrollAccepted(coordinatorLayout, child, directTargetChild,
                        target, axes);
            }
        }


        @Deprecated
        public void onStopNestedScroll(@NonNull CoordinatorLayout coordinatorLayout,
                @NonNull V child, @NonNull View target) {
            // Do nothing
        }


        public void onStopNestedScroll(@NonNull CoordinatorLayout coordinatorLayout,
                @NonNull V child, @NonNull View target, @NestedScrollType int type) {
            if (type == ViewCompat.TYPE_TOUCH) {
                onStopNestedScroll(coordinatorLayout, child, target);
            }
        }


        @Deprecated
        public void onNestedScroll(@NonNull CoordinatorLayout coordinatorLayout, @NonNull V child,
                @NonNull View target, int dxConsumed, int dyConsumed,
                int dxUnconsumed, int dyUnconsumed) {
            // Do nothing
        }

        public void onNestedScroll(@NonNull CoordinatorLayout coordinatorLayout, @NonNull V child,
                @NonNull View target, int dxConsumed, int dyConsumed,
                int dxUnconsumed, int dyUnconsumed, @NestedScrollType int type) {
            if (type == ViewCompat.TYPE_TOUCH) {
                onNestedScroll(coordinatorLayout, child, target, dxConsumed, dyConsumed,
                        dxUnconsumed, dyUnconsumed);
            }
        }

        @Deprecated
        public void onNestedPreScroll(@NonNull CoordinatorLayout coordinatorLayout,
                @NonNull V child, @NonNull View target, int dx, int dy, @NonNull int[] consumed) {
            // Do nothing
        }
        public void onNestedPreScroll(@NonNull CoordinatorLayout coordinatorLayout,
                @NonNull V child, @NonNull View target, int dx, int dy, @NonNull int[] consumed,
                @NestedScrollType int type) {
            if (type == ViewCompat.TYPE_TOUCH) {
                onNestedPreScroll(coordinatorLayout, child, target, dx, dy, consumed);
            }
        }

        public boolean onNestedFling(@NonNull CoordinatorLayout coordinatorLayout,
                @NonNull V child, @NonNull View target, float velocityX, float velocityY,
                boolean consumed) {
            return false;
        }

        public boolean onNestedPreFling(@NonNull CoordinatorLayout coordinatorLayout,
                @NonNull V child, @NonNull View target, float velocityX, float velocityY) {
            return false;
        }

        ....
    }
上述的方法中主要重要的为两个,layoutDependsOn()和onDependentViewChanged(),这里详细拿出来说一下吧。借用wing神写的文章的话:
其实Behavior就是一个应用于View的观察者模式,一个View跟随者另一个View的变化而变化,或者说一个View监听另一个View。在Behavior中,被观察View 也就是事件源被称为denpendcy,而观察View,则被称为child。
layoutDependsOn() 代表寻找被观察View.
onDependentViewChanged() 被观察View变化的时候回调用的方法.
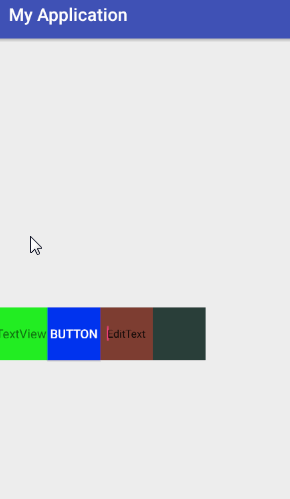
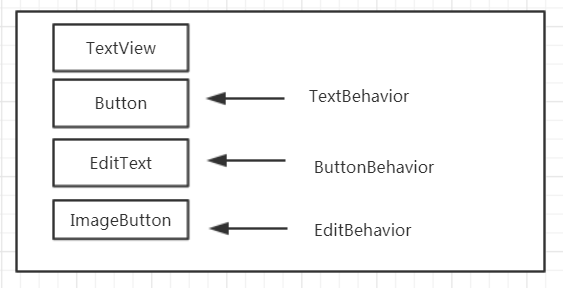
这里举个例子,分别定义一个TextView,Button,EditText和ImageButton,让ImageButton跟着EditText移动,EditText跟着Button移动,Button跟着TextView,由于所有Behavior都基本一样,唯一区别就是layoutDependsOn()中的判断,为了节省篇幅,贴一个Button跟着TextView移动的Behavior:
public class TextBehavior extends CoordinatorLayout.Behavior<View> {
...
    @Override
    public boolean layoutDependsOn(CoordinatorLayout parent, View child, View dependency) {
        return dependency.getId==R.id.textView;
    }

    @Override
    public boolean onDependentViewChanged(CoordinatorLayout parent, View child, View dependency) {
        child.setY(dependency.getY());
        return true;
    }
}
xml文件如下,省略无关代码:
<android.support.design.widget.CoordinatorLayout
  ...>

    <TextView
        android:id="@+id/textView"
        android:layout_width="60dp"
        android:layout_height="60dp"
        android:background="#22ee22"
        android:gravity="center"
        android:text="TextView"
        />

    <Button
        app:layout_behavior=".TextBehavior"/>

    <EditText
        app:layout_behavior=".ButtonBehavior"/>

    <ImageButton
        app:layout_behavior=".EditBehavior"
/>
</android.support.design.widget.CoordinatorLayout>
layoutDependsOn中dependency为TextView的时候为true,即我们移动了TextView时候就会触发onDependentViewChanged()方法,然后再onDependentViewChanged()操作Button的坐标Y,然后依次触发后续的View的移动。效果如下:
在CoordinateLayout中设置Behavior有两种方式,一种是通过LayoutParam调用setBehavior()直接设置,一种是通过反射的方式,即通过在子View的xml中的layout_behavior来获取对应的Behavior,这里也都不叙述了。
OK,Behavior的介绍就到这,下面我们就研究一下CoordinateLayout源码吧, 构造函数中没什么关键信息,直接看onAttachTowindow(),在onAttachToWindow()中初始化了OnPreDrawListener类,在其回调onPreDraw()实现了onChildViewsChanged(EVENT_PRE_DRAW),这里由于onPreDraw()回调当视图树将要被绘制时,所以我们先放着,接着继续往下看onMeasure()方法:
 @Override
    protected void onMeasure(int widthMeasureSpec, int heightMeasureSpec) {
        prepareChildren();
        ensurePreDrawListener();
		...//确定宽高
		 final Behavior b = lp.getBehavior();
		 //是否由child自主测量宽高
         if (b == null || !b.onMeasureChild(this, child, childWidthMeasureSpec, keylineWidthUsed,
                    childHeightMeasureSpec, 0)) {
                onMeasureChild(child, childWidthMeasureSpec, keylineWidthUsed,
                        childHeightMeasureSpec, 0);
            }
			...
		}
在测量方法中主要看prepareChildren(),这里面会实例化一个的实例变量:mDependencySortedChildren
  private void prepareChildren() {
        mDependencySortedChildren.clear();
        mChildDag.clear();
		//a
        for (int i = 0, count = getChildCount(); i < count; i++) {
            final View view = getChildAt(i);

            final LayoutParams lp = getResolvedLayoutParams(view);
            lp.findAnchorView(this, view);
			//1
            mChildDag.addNode(view);

			//b
            for (int j = 0; j < count; j++) {
                if (j == i) {
                    continue;
                }
                final View other = getChildAt(j);
				//2
                if (lp.dependsOn(this, view, other)) {
                    if (!mChildDag.contains(other)) {
                        // Make sure that the other node is added
                        mChildDag.addNode(other);
                    }
                    // Now add the dependency to the graph
                    mChildDag.addEdge(other, view);
                }
            }
        }

        //3
        mDependencySortedChildren.addAll(mChildDag.getSortedList());
        // We also need to reverse the result since we want the start of the list to contain
        // Views which have no dependencies, then dependent views after that
        Collections.reverse(mDependencySortedChildren);
    }
首先整理一下Demo中的对应关系:
分析该段代码,我们使用上面的自定义联动的四个View的Demo进行分析,在a循环代码段执行完毕后,在mChildDrag中的Map会依次记录下各个View的依赖关系:

可以看下mChildDrag的结构,以及对应方法:
public final class DirectedAcyclicGraph<T> {
    private final Pools.Pool<ArrayList<T>> mListPool = new Pools.SimplePool<>(10);
    private final SimpleArrayMap<T, ArrayList<T>> mGraph = new SimpleArrayMap<>();
	...
	public void addNode(@NonNull T node) {
        if (!mGraph.containsKey(node)) {
            mGraph.put(node, null);
        }
    }
	...
	public void addEdge(@NonNull T node, @NonNull T incomingEdge) {
       ...
        ArrayList<T> edges = mGraph.get(node);
        if (edges == null) {
            // If edges is null, we should try and get one from the pool and add it to the graph
            edges = getEmptyList();
            mGraph.put(node, edges);
        }
        // Finally add the edge to the list
        edges.add(incomingEdge);
    }
	...
}
在prepareChildren()执行完毕后,mDependencySortedChildren按依赖关系排序,被依赖者排在前面,在上述Demo中即TextView,Button,EditText,ImageButton这样排序。
看完onMeasure(....)后再看下onLayout(...)方法:
protected void onLayout(boolean changed, int l, int t, int r, int b) {
        final int layoutDirection = ViewCompat.getLayoutDirection(this);
        final int childCount = mDependencySortedChildren.size();
        for (int i = 0; i < childCount; i++) {
            final View child = mDependencySortedChildren.get(i);
            if (child.getVisibility() == GONE) {
                // If the child is GONE, skip...
                continue;
            }

            final LayoutParams lp = (LayoutParams) child.getLayoutParams();
            final Behavior behavior = lp.getBehavior();
			//是否代理给Behavior进行layout
            if (behavior == null || !behavior.onLayoutChild(this, child, layoutDirection)) {				//由CoordinatorLayout进行layout
                onLayoutChild(child, layoutDirection);
            }
        }
    }
layout方法比较简单,通过我们在onMeasure()方法中获取到的mDependencySortedChildren来进行layout。
接下来再说一下NestScrolling的问题吧,CoordinateLayout中实现了NestedScrollingParent2接口,意味着可以进行联动实现,在CoordinatorLayout源码中有关于NestedScrollingParent2的方法皆由Behavior进行实现,Behavior也实现了NestedScrollingParent2接口,相当于CoordinatorLayout是Behavior的代理,这里就不贴源码了,由于上一篇文章中分析过NestedScrollingParent和NestedScrollingChild的源码。
再回来重新看下OnPreDrawListener类,在其回调onPreDraw()实现了onChildViewsChanged(EVENT_PRE_DRAW)的方法:
final void onChildViewsChanged(@DispatchChangeEvent final int type) {
        final int layoutDirection = ViewCompat.getLayoutDirection(this);
        final int childCount = mDependencySortedChildren.size();
        final Rect inset = acquireTempRect();
        final Rect drawRect = acquireTempRect();
        final Rect lastDrawRect = acquireTempRect();

        for (int i = 0; i < childCount; i++) {
            final View child = mDependencySortedChildren.get(i);//获取对应的View
            final LayoutParams lp = (LayoutParams) child.getLayoutParams();
          ...
			if (type != EVENT_VIEW_REMOVED) {//如果当前View所在视图没有变化,则进入下次循环
                // Did it change? if not continue
                getLastChildRect(child, lastDrawRect);
                if (lastDrawRect.equals(drawRect)) {
                    continue;
                	}
                recordLastChildRect(child, drawRect);
            	}
			...
            // Update any behavior-dependent views for the change
            for (int j = i + 1; j < childCount; j++) {
                final View checkChild = mDependencySortedChildren.get(j);
                final LayoutParams checkLp = (LayoutParams) checkChild.getLayoutParams();
                final Behavior b = checkLp.getBehavior();
				//通知依赖于的View进行对应的回调
                if (b != null && b.layoutDependsOn(this, checkChild, child)) {
                    ...
                    final boolean handled;
					//回调Behavior对应的方法
                    switch (type) {
                        case EVENT_VIEW_REMOVED:
                            // EVENT_VIEW_REMOVED means that we need to dispatch
                            // onDependentViewRemoved() instead
                            b.onDependentViewRemoved(this, checkChild, child);
                            handled = true;
                            break;
                        default:
                            // Otherwise we dispatch onDependentViewChanged()
                            handled = b.onDependentViewChanged(this, checkChild, child);
                            break;
                    }

                    if (type == EVENT_NESTED_SCROLL) {
                        // If this is from a nested scroll, set the flag so that we may skip
                        // any resulting onPreDraw dispatch (if needed)
                        checkLp.setChangedAfterNestedScroll(handled);
                    }
                }
            }
        }

        releaseTempRect(inset);
        releaseTempRect(drawRect);
        releaseTempRect(lastDrawRect);
    }
上面就可以看见我们在Behavior中可能会重写的方法layoutDependsOn()以及onDependentViewChanged()了。
总结一下Behavior的作用,对于Behavior而言,总共有两个作用:
1.监听CoordinatorLayout内部子View的滑动,从而进行滑动处理,即NestScrollingParent2以及NestScrollingChild联动,主要由Behavior中的NestScrollingParent2接口实现。
2.一个子View监听CoordinatorLayout内部另一个子View的位置,大小等变换,主要由
layoutDependsOn()以及onDependentViewChanged()实现。
关于触摸事件,在CoordinatorLayout中的onInterceptEvent(..)以及onTouchEvent(..)中也都是交由被Behavior处理,CoordinatorLayout中本身并没有进行额外的处理,这里也就不详细分析了,有兴趣可以自己看下源码。
有个问题,从上面的分析来看CoordinatorLayout相当于一个FrameLayout,并没有进行什么滑动的操作,那么为什么AppBarLayout可以滑动呢?这个问题一开始看完源码后就直接出现在脑子里面了,后来一想可以通过Behavior委托给AppbarLayout进行滑动的处理啊,后面看AppbarLayout源码的时候也证实这点。
那么CoordinatorLayout源码总体的思路大概清楚了,通过委托给Behavior的方式,CoordinatorLayout本身不做什么处理,所有操作都由子View的自定义Behavior进行实现,充分解耦子View和CoordinatorLayout的逻辑,不得不佩服google大牛的撸代码手法与思路。下篇文章需要分析一下AppBarLayout跟CoordinatorLayout的关系,理清对应滑动的流程。


 2731
2731

 被折叠的 条评论
为什么被折叠?
被折叠的 条评论
为什么被折叠?
 到【灌水乐园】发言


