本节书摘来自异步社区出版社《PowerShell V3—SQL Server 2012数据库自动化运维权威指南》一书中的第2章,第2.12节,作者:【加拿大】Donabel Santos,更多章节内容可以访问云栖社区“异步社区”公众号查看。
2.12 创建表
本方案展示了如何用PowerShell和SMO创建表。
2.12.1 准备
我们将在AdventureWorks2008R2数据库创建一个表Student,包含5列。为了更好地了解我们要完成什么,下面给出了等价的创建表的T-SQL脚本。
USE AdventureWorks2008R2
GO
CREATE TABLE [dbo].[Student](
[StudentID] [INT] IDENTITY(1,1) NOT NULL,
[FName] [VARCHAR](50) NULL,
[LName] [VARCHAR](50) NOT NULL,
[DateOfBirth] [DATETIME] NULL,
[Age] AS (DATEPART(YEAR,GETDATE())-DATEPART(YEAR,[DateOfBirth])),
CONSTRAINT [PK_Student_StudentID] PRIMARY KEY CLUSTERED
(
 [StudentID] ASC
)
)
GO
2.12.2 如何做…
1.通过“Start | Accessories | Windows PowerShell | Windows PowerShell ISE”打开PowerShell控制台。
2.导入SQLPS模块,创建一个新的SMO服务器对象。
#import SQL Server module
Import-Module SQLPS –DisableNameChecking
#replace this with your instance name
$instanceName = "KERRIGAN"
$server = New-Object -TypeName Microsoft.SqlServer.Management.Smo.Server
-ArgumentList $instanceName
3.接下来,添加如下代码配置数据库和表名,如果存在,则删除表。
$dbName = "AdventureWorks2008R2"
$tableName = "Student"
$db = $server.Databases[$dbName]
$table = $db.Tables[$tableName]
#if table exists drop
if($table)
{
   $table.Drop()
}
4.添加下面的脚本创建表,并运行。
#table class on MSDN
#http://msdn.microsoft.com/en-us/library/ms220470.aspx
$table = New-Object -TypeName Microsoft.SqlServer.Management.SMO.Table-ArgumentList
$db, $tableName
#column class on MSDN
#http://msdn.microsoft.com/en-us/library/microsoft.sqlserver.management smo.column.as
px
#column 1
$col1Name = "StudentID"
$type = [Microsoft.SqlServer.Management.SMO.DataType]::Int;
$col1 = New-Object -TypeName Microsoft.SqlServer.Management.SMO.Column
-ArgumentList $table, $col1Name, $type
$col1.Nullable = $false
$col1.Identity = $true
$col1.IdentitySeed = 1
$col1.IdentityIncrement = 1
$table.Columns.Add($col1)
#column 2 – nullable
$col2Name = "FName"
$type = [Microsoft.SqlServer.Management.SMO.DataType]::VarChar(50)
$col2 = New-Object -TypeName Microsoft.SqlServer.Management.SMO.Column
-ArgumentList $table, $col2Name, $type
$col2.Nullable = $true
$table.Columns.Add($col2)
#column 3 - not nullable, with default value
$col3Name = "LName"
$type = [Microsoft.SqlServer.Management.SMO.DataType]::VarChar(50)
$col3 = New-Object -TypeName Microsoft.SqlServer.Management.SMO.Column
-ArgumentList $table, $col3Name, $type
$col3.Nullable = $false
$col3.AddDefaultConstraint("DF_Student_LName").Text = "'Doe'"
$table.Columns.Add($col3)
#column 4 - nullable, with default value
$col4Name = "DateOfBirth"
$type = [Microsoft.SqlServer.Management.SMO.DataType]::DateTime;
$col4 = New-Object -TypeName Microsoft.SqlServer.Management.SMO.Column
-ArgumentList $table, $col4Name, $type
$col4.Nullable = $true
$col4.AddDefaultConstraint("DF_Student_DateOfBirth").Text = "'1800-00-00'"
$table.Columns.Add($col4)
#column 5
$col5Name = "Age"
$type = [Microsoft.SqlServer.Management.SMO.DataType]::Int;
$col5 = New-Object -TypeName Microsoft.SqlServer.Management.SMO.Column
-ArgumentList $table, $col5Name, $type
$col5.Nullable = $false
$col5.Computed = $true
$col5.ComputedText = "YEAR(GETDATE()) - YEAR(DateOfBirth)";
$table.Columns.Add($col5)
$table.Create()
5.让StudentID作为主键。
#########################################
#make StudentID a clustered PK
#########################################
#note this is just a "placeholder" right now for PK
#no columns are added in this step
$PK=New-Object -TypeName Microsoft.SqlServer.Management.SMO.Index –ArgumentList
$table,"PK_Student_StudentID"
$PK.IsClustered =$true
$PK.IndexKeyType =[Microsoft.SqlServer.Management.SMO.IndexKeyType]::DriPrimaryKey
#identify columns part of the PK
$PKcol=New-Object -TypeName Microsoft.SqlServer.Management.SMO.IndexedColumn
-ArgumentList $PK,$col1Name
$PK.IndexedColumns.Add($PKcol)
$PK.Create()
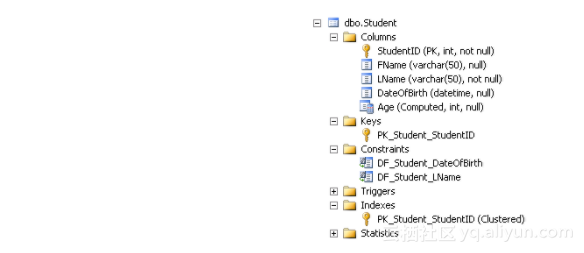
6.检查表是否被创建,有正确的列和约束。
(1)打开SSMS。
(2)展开AdventureWorks2008R2数据库的“Tables”。
(3)展开“dbo.Student”表的“Columns”、“Keys”、“Constraints”和“Indexes”。

2.12.3 如何实现…
创建表的第一步是创建一个SMO表对象。
$table = New-Object -TypeName Microsoft.SqlServer.Management.SMO.Table -ArgumentList $db,
$tableName
之后,在调用Microsoft.SqlServer.Management.SMO.Table类的方法之前,把所有将要被定义的列逐一添加到表中。
让我们一步步来。创建列时,我们首先需要识别存储在列的数据类型和列属性。
在SMO中列数据类型定义为Microsoft.SqlServer.Management.SMO.DataType。在枚举中每个T-SQL数据类型是相当有代表性的。如下格式显示了如何使用数据类型。
为了创建列,你需要定制表变量、数据类型和列名。
$col1Name = "StudentID"
$type = [Microsoft.SqlServer.Management.SMO.DataType]::Int
$col1 = New-Object -TypeName Microsoft.SqlServer.Management.SMO.
Column -ArgumentList $table, $col1Name, $type
通常列属性对列变量是可访问的。常用的属性包括:
Nullable
Computed
ComputedText
Default Constraint(通过使用AddDefaultConstraint方法)
例如:
#column 4 - nullable, with default value
$col4Name = "DateOfBirth"
$type = [Microsoft.SqlServer.Management.SMO.DataType]::DateTime;
$col4 = New-Object -TypeName Microsoft.SqlServer.Management.SMO.
Column -ArgumentList $table, $col4Name, $type
$col4.Nullable = $true
$col4.AddDefaultConstraint("DF_Student_DateOfBirth").Text = "'1800-00-00'"
有些额外的属性会根据你选择的数据类型显示出来。例如,[Microsoft.SqlServer. Management.SMO.DataType]::Int将允许你确认是否标识列并让你设置种子和增量。[Microsoft.SqlServer. Management.SMO.DataType]::Varchar 允许你设置长度。
一旦你设置了属性,你可以将列添加到表。
$table.Columns.Add($col4)
当一切都设置好后,你可以调用表的Create方法。
$table.Create()
现在,创建一个主键时,你需要创建另外两个SMO对象。第一个是Index对象。对于这个对象,你需要指定索引的类型,是聚集索引还是非聚集索引。
$PK = New-Object -TypeName Microsoft.SqlServer.Management.SMO.
Index -ArgumentList $table, "PK_Student_StudentID"
$PK.IsClustered = $true
$PK.IndexKeyType = [Microsoft.SqlServer.Management.SMO.
IndexKeyType]::DriPrimaryKey
第二个对象,IndexedColumn,指定索引中的列。
#identify columns part of the PK
$PKcol = New-Object -TypeName Microsoft.SqlServer.Management.SMO.IndexedColumn
-ArgumentList $PK, $col1Name
如果列为包含列,只需将IndexedColumn对象的IsIncluded属性设置为true。
一旦你创建了所有的索引列,你可以将它们添加到Index,并调用Index对象的Create方法:
$PK.IndexedColumns.Add($PKcol)
$PK.Create()
你可能会想我们刚才创建表的操作是一个非常长的方式。你想的没错,这个创建表的方式太繁琐。然而,注意,这只是另一种方式而已。如果你想创建表,并且T-SQL是一种更快的方法,那就用T-SQL。然而,知道如何使用PowerShell和SMO去完成工作可能只是多了一个工具,你可能需要动态创建表或更有扩展性—例如,你需要从多用户导入存储在Excel、CSV或XML文件中的定义。
2.12.4 可参阅…
创建索引方案
从MSDN检查完整的SMO DataType类的列表。


 816
816

 被折叠的 条评论
为什么被折叠?


