resin app server安装总结

本文详细记录了Resin服务器的安装步骤,并解决了安装过程中遇到的问题。同时介绍了如何将Resin与Eclipse集成,方便进行Web项目的开发。

摘要生成于 C知道 ,由 DeepSeek-R1 满血版支持, 前往体验 >

之前一直用的tomcat,这次项目中用到resin服务器,百度和google到的资料都很有限,而且其中有很多不完善的地方,安装过程中走了一些弯路。

以下记录了自己成功安装的步骤,补充了红色字体部分,仅供参考。


下载地址 

Windows安装
  1. Install JDK 6 or later.
  2. Check that the environment variable JAVA_HOME is set to the JDK location, e.g. c:\java\jdk1.6.0_14
  3. Unzip resin-4.0.x.zip
  4. Define the environment variable RESIN_HOME to the location of Resin, for example c:\resin-4.0.x并在环境变量path添加“%RESIN_HOME%\bin”,具体如下:
path: ...... %RESIN_HOME%\bin
  1. Execute resin.exe
  • or run java -jar lib/resin.jar start
  1. Browse to http://localhost:8080
与eclipse集成
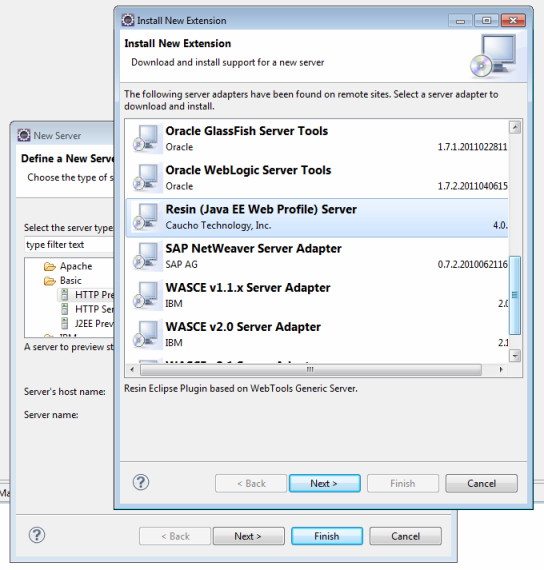
The Resin Eclipse plugin supports Helios (Eclipse 3.6) and above. Indigo (Eclipse 3.7) and above already comes with the Resin plugin registered. To download the Resin plugin, go to the 'New Server' dialog and click on 'Download additional server adapters'. In the 'Install New Extension' dialog, you'll see Resin as an option.
Installing Resin Eclipse Plugin
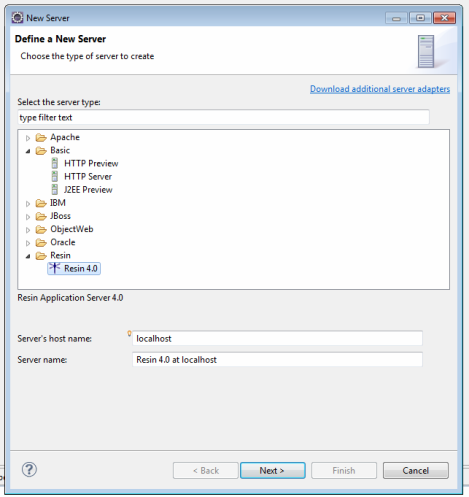
Once the plugin is installed, you'll see Resin 4.0 as an option in the 'New Server' dialog. When you select Resin, the wizard will take you through the steps to create a server instance in Eclipse.
Creating new Resin Server
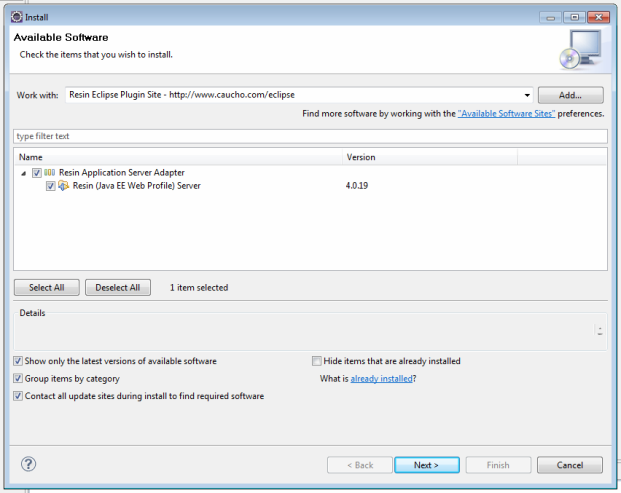
If you're using Helios, you will need to install the Resin plugin yourself directly from the Resin Eclipse plugin website ( http://www.caucho.com/eclipse/ ). You can do this by registering the plugin website as an Available Software Site in Eclipse. Once you've done that, you'll be able to install the plugin manually.
Installing Resin Eclipse Plugin Manually
Using the Eclipse Plugin
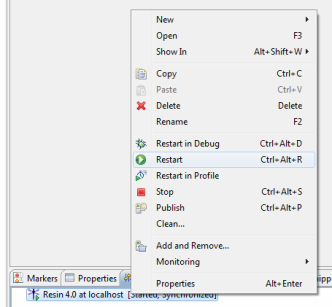
The Resin plugin supports all of the common server operations supported by WTP. You can start a server, stop a server, restart a server, debug on the server (including debugging remote servers), profile a server, add/remove projects to the server, clean the server, deploy/redeploy applications and so on. These operations are accessed either by right-clicking the server instance or right-clicking a project associated with a Resin server. If you are an experienced Eclipse user you should feel right at home.
Using the Resin Eclipse Plugin
按照以下步骤操作:
For greater details on the Resin Eclipse plugin, check out the  Caucho Wiki page for Eclipse .
成功时如下图


转载于:https://www.cnblogs.com/pennli/p/7814757.html

<think>好的,用户想在IDE中安装和配置Resin应用服务器。首先,我需要回忆一下常见的IDE,比如Eclipse或IntelliJ IDEA,因为用户提到的引用中有提到Eclipse集成Resin的例子。用户可能使用的是Eclipse,所以需要指导如何在Eclipse中安装Resin插件或者配置Resin服务器。 根据引用[2],用户需要找到Resin的配置文件resin.xml,并在其中添加web-app节点,指向项目的根目录。这说明在Eclipse中配置Resin可能需要手动修改配置文件,或者在IDE中添加服务器实例。 另外,引用[5]提到Resin相比Tomcat更稳定和方便,但缺少管理控制台。这可能意味着配置步骤需要更多手动操作,但IDE集成可以简化这个过程。 首先,用户需要确认是否已经下载并安装Resin服务器。如果还没有,可能需要指导用户先下载Resin,并解压到本地目录。然后,在Eclipse中安装Resin插件,或者通过Eclipse的服务器配置界面添加Resin服务器。 根据引用[3],Eclipse集成应用服务器通常需要插件或通过服务器运行时环境来添加。例如,对于Geronimo或Tomcat,Eclipse有内置的支持。但Resin可能需要手动配置,或者需要特定的插件。 接下来,用户可能需要配置Resin的运行时环境,指定Resin安装路径。然后在创建新的服务器实例时选择Resin,并设置相关参数,如端口号、部署目录等。引用[2]中的示例显示需要在resin.xml中配置web-app的路径,这可能需要用户根据实际项目路径进行调整。 此外,引用[1]提到远程调试的配置,可能用户还希望设置远程调试功能,这需要调整Resin的启动参数,添加JVM调试选项,并在IDE中配置远程调试配置。 可能还需要考虑项目部署的设置,例如将项目的输出目录指向Resin的webapps目录,或者在IDE中设置自动部署。如果用户遇到问题,比如404错误,可能需要检查配置路径是否正确,或者是否有权限问题。 总结步骤应该是:安装Resin服务器,在IDE中添加Resin服务器实例,配置项目部署路径,调整配置文件如resin.xml,最后启动服务器并测试应用。同时,确保所有步骤符合用户的具体开发环境,比如Eclipse版本和Resin版本是否兼容,是否需要额外插件等。</think>### 在IDE中安装和配置Resin应用服务器的步骤 #### 1. 安装Resin服务器 - **下载Resin**:从Resin官网下载最新版本并解压到本地目录(例如:`C:\resin-4.0.xx`)[^5]。 - **验证安装**:运行`resin.exe`(Windows)或`resin.sh`(Linux/Mac)启动服务器,访问`http://localhost:8080`确认安装成功。 #### 2. 在Eclipse中集成Resin(以Eclipse为例) - **添加服务器运行时**: 1. 打开Eclipse,进入`Window → Preferences → Server → Runtime Environments`。 2. 点击`Add`,选择`ResinResin 4.0`(若未列出,需手动指定安装路径)。 3. 填写Resin根目录(如`C:\resin-4.0.xx`),完成配置[^3]。 - **创建服务器实例**: 1. 进入`Servers`视图,右键新建服务器,选择`Resin 4.0`。 2. 关联项目:将本地Java Web项目添加到服务器部署列表。 #### 3. 配置Resin服务器参数 - **修改`resin.xml`**: 1. 在Eclipse的`Servers`目录下找到`Resin 4.0 at localhost-config/resin.xml`[^2]。 2. 在`<host>`节点中添加项目路径: ```xml <web-app id="/projectName" root-directory="webapps/projectName"/> ``` - **设置调试参数**(可选): 在Resin启动配置中添加JVM参数以启用远程调试: ``` -Xdebug -Xrunjdwp:transport=dt_socket,address=8000,server=y,suspend=n ``` 随后在Eclipse中配置`Remote Java Application`调试连接[^1]。 #### 4. 部署与测试 - **启动服务器**:右键服务器实例选择`Start`,控制台输出无报错即表示成功。 - **访问应用**:通过`http://localhost:8080/projectName`验证部署结果。
评论
添加红包

请填写红包祝福语或标题

红包个数最小为10个

红包金额最低5元

当前余额3.43前往充值 >
需支付:10.00
成就一亿技术人!
领取后你会自动成为博主和红包主的粉丝 规则
hope_wisdom
发出的红包
实付
使用余额支付
点击重新获取
扫码支付
钱包余额 0

抵扣说明:

1.余额是钱包充值的虚拟货币,按照1:1的比例进行支付金额的抵扣。
2.余额无法直接购买下载,可以购买VIP、付费专栏及课程。

余额充值