 SpringCloud配置中心实战


 本文详细介绍了如何使用SpringCloud配置中心实现应用配置的集中管理和动态更新。通过搭建配置中心服务和客户端,实现了配置文件的远程读取和更新,以及通过Git进行版本控制。

背景
spring boot项目不再读取自己的配置文件,而是统一去配置中心读取属于自己的配置文件
配置中心服务端
IDEA上面创建一个空的maven工程,命名为configuration-service。
创建目录
mkdir -p src/main/java/hello
配置服务器pom.xml
<?xml version="1.0" encoding="UTF-8"?>
<project xmlns="http://maven.apache.org/POM/4.0.0"
         xmlns:xsi="http://www.w3.org/2001/XMLSchema-instance"
         xsi:schemaLocation="http://maven.apache.org/POM/4.0.0 http://maven.apache.org/xsd/maven-4.0.0.xsd">
    <modelVersion>4.0.0</modelVersion>

    <groupId>io.spring</groupId>
    <artifactId>configuration-service</artifactId>
    <version>0.0.1-SNAPSHOT</version>
    <packaging>jar</packaging>

    <parent>
        <groupId>org.springframework.boot</groupId>
        <artifactId>spring-boot-starter-parent</artifactId>
        <version>2.0.6.RELEASE</version>
        <relativePath/> <!-- lookup parent from repository -->
    </parent>

    <properties>
        <project.build.sourceEncoding>UTF-8</project.build.sourceEncoding>
        <java.version>1.8</java.version>
    </properties>


    <dependencies>
        <dependency>
            <groupId>org.springframework.cloud</groupId>
            <artifactId>spring-cloud-config-server</artifactId>
        </dependency>

        <dependency>
            <groupId>org.springframework.boot</groupId>
            <artifactId>spring-boot-starter-test</artifactId>
            <scope>test</scope>
        </dependency>
    </dependencies>

    <dependencyManagement>
        <dependencies>
            <dependency>
                <groupId>org.springframework.cloud</groupId>
                <artifactId>spring-cloud-dependencies</artifactId>
                <version>Finchley.SR2</version>
                <type>pom</type>
                <scope>import</scope>
            </dependency>
        </dependencies>
    </dependencyManagement>
</project>
这个Maven配置主要是引入Spring Cloud的配置中心服务器的配置。
创建服务器端主类ConfigServiceApplication.java
package hello;

import org.springframework.boot.SpringApplication;
import org.springframework.boot.autoconfigure.SpringBootApplication;
import org.springframework.cloud.config.server.EnableConfigServer;

@EnableConfigServer
@SpringBootApplication
public class ConfigServiceApplication {
    public static void main(String[] args) {
        SpringApplication.run(ConfigServiceApplication.class, args);
    }
}
这里主要是启用该服务为配置中心服务。
创建服务器端主配置application.properties
server.port=8888

spring.cloud.config.server.git.uri=${HOME}/Downloads/config
这里配置配置中心服务端口为8888,以及读取的配置文件位置目录配置。
配置中心客户端
在IDEA上面创建Maven空工程,命名为configuration-client。
创建目录
mkdir -p src/main/java/hello
添加客户端pom.xml
<?xml version="1.0" encoding="UTF-8"?>
<project xmlns="http://maven.apache.org/POM/4.0.0"
         xmlns:xsi="http://www.w3.org/2001/XMLSchema-instance"
         xsi:schemaLocation="http://maven.apache.org/POM/4.0.0 http://maven.apache.org/xsd/maven-4.0.0.xsd">
    <modelVersion>4.0.0</modelVersion>

    <groupId>io.spring</groupId>
    <artifactId>configuration-client</artifactId>
    <version>1.0-SNAPSHOT</version>
    <packaging>jar</packaging>


    <parent>
        <groupId>org.springframework.boot</groupId>
        <artifactId>spring-boot-starter-parent</artifactId>
        <version>2.0.6.RELEASE</version>
        <relativePath/> <!-- lookup parent from repository -->
    </parent>

    <properties>
        <project.build.sourceEncoding>UTF-8</project.build.sourceEncoding>
        <java.version>1.8</java.version>
    </properties>

    <dependencies>
        <dependency>
            <groupId>org.springframework.cloud</groupId>
            <artifactId>spring-cloud-starter-config</artifactId>
        </dependency>
        <dependency>
            <groupId>org.springframework.boot</groupId>
            <artifactId>spring-boot-starter-actuator</artifactId>
        </dependency>
        <dependency>
            <groupId>org.springframework.boot</groupId>
            <artifactId>spring-boot-starter-web</artifactId>
        </dependency>
        <dependency>
            <groupId>org.springframework.boot</groupId>
            <artifactId>spring-boot-starter-test</artifactId>
            <scope>test</scope>
        </dependency>
    </dependencies>

    <dependencyManagement>
        <dependencies>
            <dependency>
                <groupId>org.springframework.cloud</groupId>
                <artifactId>spring-cloud-dependencies</artifactId>
                <version>Finchley.SR2</version>
                <type>pom</type>
                <scope>import</scope>
            </dependency>
        </dependencies>
    </dependencyManagement>

</project>
添加客户端主类ConfigClientApplication
package hello;

import org.springframework.boot.SpringApplication;
import org.springframework.boot.autoconfigure.SpringBootApplication;

@SpringBootApplication
public class ConfigClientApplication {
    public static void main(String[] args) {
        SpringApplication.run(ConfigClientApplication.class, args);
    }
}
这里是spring boot的正常配置。
添加客户端资源主类MessageRestController
package hello;

import org.springframework.beans.factory.annotation.Value;
import org.springframework.cloud.context.config.annotation.RefreshScope;
import org.springframework.web.bind.annotation.RequestMapping;
import org.springframework.web.bind.annotation.RestController;

@RefreshScope
@RestController
public class MessageRestController {
    @Value("${message:Hello default}")
    private String message;

    @RequestMapping("/message")
    String getMessage() {
        return this.message;
    }
}
这里暴露一个请求,这个请求是从配置文件中读取自己的配置参数message。
客户端application.properties配置
server.port=8082
spring.application.name=a-bootiful-client
management.endpoints.web.exposure.include=*
这里主要就是设置当前服务端口和服务名,已经开放相关运维接口,这些运维接口主要就是localhost:8082/actuator/refresh的post请求,用于刷新配置中心的配置参数的。
客户端bootstrap.properties针对配置中心的配置
spring.application.name=a-bootiful-client
# N.B. this is the default:
spring.cloud.config.uri=http://localhost:8888
这里主要是配置当前服务名称,以及配置中心的服务地址。注意这里服务名,必须与配置中心读取的文件名保持一致,即配置中心的配置文件名必须为a-bootiful-client.properties才能够读取到文件。
配置中心的配置文件管理
配置中心主要使用git来管理配置文件,也就是说每次对配置文件的修改,必须使用git来提交后,配置中心才会认可。
创建配置文件
cd ~/Downloads/config
git init
vi a-bootiful-client.properties
git add a-bootiful-client.properties
git commit -m "创建a-bootiful-client.properties文件"
a-bootiful-client.properties内容如下:
message=zyl
客户端测试是否生效

修改配置文件
vi a-bootiful-client.properties
git commit -am "修改配置a-bootiful-client.properties文件"
a-bootiful-client.properties内容如下:
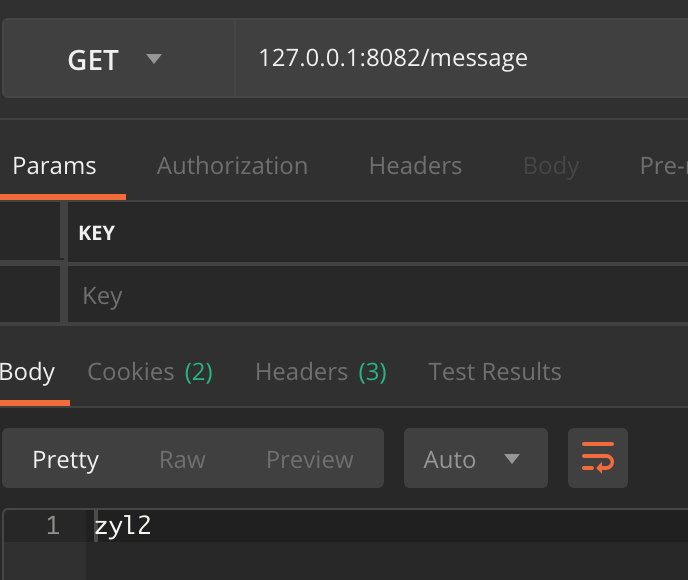
message=zyl2
客户端测试是否生效
这个适合就需要先调用刷新接口,再进行测试。 
再调用测试接口:
总结
上面就是对Spring Cloud的配置中心这个部门的基本使用,这里还是涉及到配置文件更新后,使用git版本控制工具提交后,各个节点怎么批量更新的问题。
源代码在这里:


 1371
1371

 被折叠的 条评论
为什么被折叠?
被折叠的 条评论
为什么被折叠?
 到【灌水乐园】发言


