


 本文详细介绍了如何在RHEL7.8系统中配置本地yum源,扩展GCC和C++的32位支持,以及添加静态库支持。步骤包括挂载ISO文件,创建yum源配置,安装32位库,并提供了测试编译C和C++的示例。
初次安装系统后,需要配置一下yum本地源,这是因为,我们需要的软件系统默认安装过程中许多软件没有安装
1:配置本地yum源
配置本地yum源是通过本地映射光盘挂载到系统中,然后将yum的配置文件中的 baseurl 指向挂载的目录即可。
首先在虚拟机的这个配置中,勾选使用iso映射文件,然后选中我们iso文件所在的位置即可。
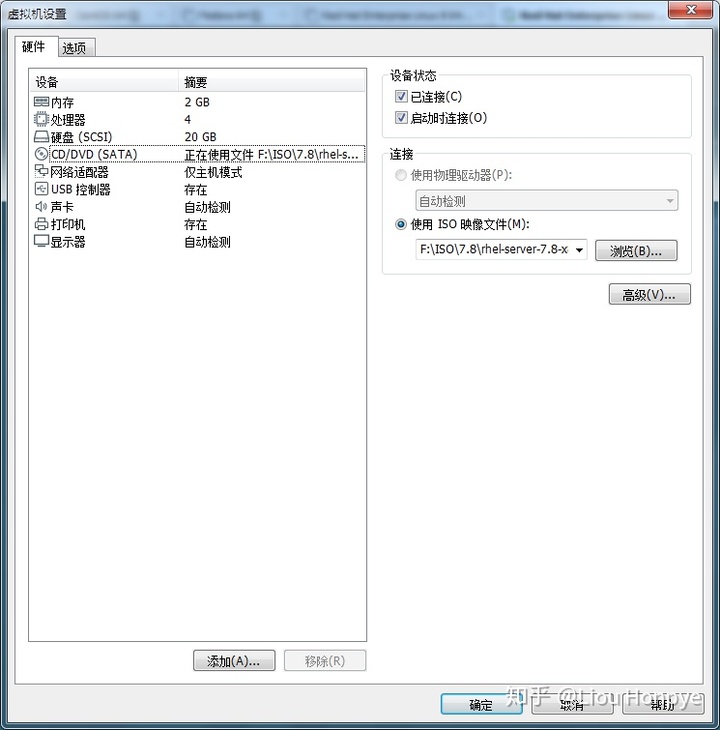
在虚拟机系统中,我们的 iso 文件是 /dev/sr0 设备,系统会默认把我们的iso文件挂载到 /run/media/$username/ 目录下。但是现在我们要将iso文件挂载到 /mnt/cdrom 下。如果mnt目录下没有cdrom,那么我们自己新建一个。
挂载有两种方式挂载
- 一次性挂载,重启完系统后失效
[root@localhost c]# mkdir /mnt/cdrom
[root@localhost c]# mount -t iso9660 /dev/sr0 /mnt/cdrom/
mount: /dev/sr0 写保护,将以只读方式挂载
[root@localhost c]# ls /mnt/cdrom/
addons            GPL       media.repo               RPM-GPG-KEY-redhat-release
EFI               images    Packages                 TRANS.TBL
EULA              isolinux  repodata
extra_files.json LiveOS RPM-GPG-KEY-redhat-beta- 自动挂载
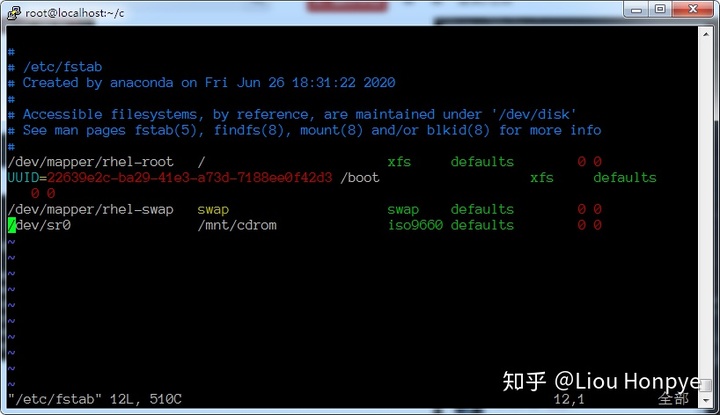
在末行添加如下代码:
/dev/sr0 /mnt/cdrom iso9660 defaults 0 0然后保存退出
挂载好iso文件之后,我们在 /etc/yum.repos.d/ 下创建一个repo结尾的文件
cd /etc/yum.repos.d
vim cdrom.repo
修改内容如下:
[cdrom]
name=cdrom
baseurl=file:///mnt/cdrom
enable=1
gpgcheck=0
保存退休vim后,运行如下命令(可以看到本地源已经启用了):
[root@localhost yum.repos.d]# yum repolist all
已加载插件:langpacks, product-id, search-disabled-repos, subscription-manager

This system is not registered with an entitlement server. You can use subscription-manager to register.

源标识                                源名称                                状态
cdrom                                 cdrom                                 启用: 5,231
repolist: 5,231
[root@localhost yum.repos.d]#
使用本地yum源安装gcc,c++
yum install gcc gcc-c++查看安装的gcc,c++版本
[root@localhost yum.repos.d]# gcc -v
使用内建 specs。
COLLECT_GCC=gcc
COLLECT_LTO_WRAPPER=/usr/libexec/gcc/x86_64-redhat-linux/4.8.5/lto-wrapper
目标:x86_64-redhat-linux
配置为:../configure --prefix=/usr --mandir=/usr/share/man --infodir=/usr/share/info --with-bugurl=http://bugzilla.redhat.com/bugzilla --enable-bootstrap --enable-shared --enable-threads=posix --enable-checking=release --with-system-zlib --enable-__cxa_atexit --disable-libunwind-exceptions --enable-gnu-unique-object --enable-linker-build-id --with-linker-hash-style=gnu --enable-languages=c,c++,objc,obj-c++,java,fortran,ada,go,lto --enable-plugin --enable-initfini-array --disable-libgcj --with-isl=/builddir/build/BUILD/gcc-4.8.5-20150702/obj-x86_64-redhat-linux/isl-install --with-cloog=/builddir/build/BUILD/gcc-4.8.5-20150702/obj-x86_64-redhat-linux/cloog-install --enable-gnu-indirect-function --with-tune=generic --with-arch_32=x86-64 --build=x86_64-redhat-linux
线程模型:posix
gcc 版本 4.8.5 20150623 (Red Hat 4.8.5-39) (GCC)
[root@localhost yum.repos.d]# c++ -v
使用内建 specs。
COLLECT_GCC=c++
COLLECT_LTO_WRAPPER=/usr/libexec/gcc/x86_64-redhat-linux/4.8.5/lto-wrapper
目标:x86_64-redhat-linux
配置为:../configure --prefix=/usr --mandir=/usr/share/man --infodir=/usr/share/info --with-bugurl=http://bugzilla.redhat.com/bugzilla --enable-bootstrap --enable-shared --enable-threads=posix --enable-checking=release --with-system-zlib --enable-__cxa_atexit --disable-libunwind-exceptions --enable-gnu-unique-object --enable-linker-build-id --with-linker-hash-style=gnu --enable-languages=c,c++,objc,obj-c++,java,fortran,ada,go,lto --enable-plugin --enable-initfini-array --disable-libgcj --with-isl=/builddir/build/BUILD/gcc-4.8.5-20150702/obj-x86_64-redhat-linux/isl-install --with-cloog=/builddir/build/BUILD/gcc-4.8.5-20150702/obj-x86_64-redhat-linux/cloog-install --enable-gnu-indirect-function --with-tune=generic --with-arch_32=x86-64 --build=x86_64-redhat-linux
线程模型:posix
gcc 版本 4.8.5 20150623 (Red Hat 4.8.5-39) (GCC)
[root@localhost yum.repos.d]#
2:扩展gcc,c++的32位支持
gcc,c++安装过后,使用-m32时会出错,其实是系统没有安装32位库支持,使用下面命令试gcc,c++支持32编译。部分低版本,需要网络下载相应的软件包安装。
yum install glibc-devel.i686 glibc-devel libgcc.i686 libstdc++.i686 libstdc++-devel.i6863:扩展gcc,c++的静态库支持
静态库需要打开下面打开这个网站: (这个网站内容比较全)
https://www.rpmfind.net/linux/RPM/index.htmlwww.rpmfind.net一些备用的rpm库下载地址:
RPM Searchrpm.pbone.net
下载下面4个软件包
glibc-static-2.17-307.el7.1.i686.rpm    libstdc++-static-4.8.5-39.el7.i686.rpm
glibc-static-2.17-307.el7.1.x86_64.rpm  libstdc++-static-4.8.5-39.el7.x86_64.rpm
安装4个软件包
rpm -ivh glibc-* libstdc++*4:测试如下
c文件源代码:hello.c
#include <stdio.h>

int main(void)
{
        printf("hello world!n");

        return 0;
}
c语言编译运行:
[root@localhost c]# gcc -Wall -std=c99 -o hello hello.c
[root@localhost c]# gcc -Wall -std=c99 -m32 -o hello_x86 hello.c
[root@localhost c]# gcc -Wall -std=c99 -static -o hello_static hello.c
[root@localhost c]# gcc -Wall -std=c99 -static -m32 -o hello_static_x86 hello.c
[root@localhost c]# ll
总用量 1624
-rwxr-xr-x. 1 root root   8360 6月  26 20:37 hello
-rw-r--r--. 1 root root     79 6月  26 18:56 hello.c
-rwxr-xr-x. 1 root root 861104 6月  26 20:37 hello_static
-rwxr-xr-x. 1 root root 773916 6月  26 20:37 hello_static_x86
-rwxr-xr-x. 1 root root   7216 6月  26 20:37 hello_x86
[root@localhost c]# file hello
hello: ELF 64-bit LSB executable, x86-64, version 1 (SYSV), dynamically linked (uses shared libs), for GNU/Linux 2.6.32, BuildID[sha1]=0def4001abbd8d813e084fb05dd5a86dd7a1ec39, not stripped
[root@localhost c]# file hello_x86
hello_x86: ELF 32-bit LSB executable, Intel 80386, version 1 (SYSV), dynamically linked (uses shared libs), for GNU/Linux 2.6.32, BuildID[sha1]=6007c1f4e7d015516f55b4d7094947eb19aed590, not stripped
[root@localhost c]# file hello_static
hello_static: ELF 64-bit LSB executable, x86-64, version 1 (GNU/Linux), statically linked, for GNU/Linux 2.6.32, BuildID[sha1]=efd6d1b6b4b499c76a90c81ada2f1a8eed74a1bf, not stripped
[root@localhost c]# file hello_static_x86
hello_static_x86: ELF 32-bit LSB executable, Intel 80386, version 1 (GNU/Linux), statically linked, for GNU/Linux 2.6.32, BuildID[sha1]=85d90d2fd7463ef8cc39270c26ba256c1771a29c, not stripped
[root@localhost c]# ^C
[root@localhost c]# ./hello
hello world!
[root@localhost c]# ./hello_static
hello world!
[root@localhost c]# ./hello_x86
hello world!
[root@localhost c]# ./hello_static_x86
hello world!
[root@localhost c]#
C语言测试完全没有问题。接下来看C++
c++源代码:
#include <iostream>
using std::cin;
using std::cout;
using std::endl;
using std::ends;
using std::clog;
using std::cerr;

int main(void)
{
        cout << "hello world" << endl;

        return 0;
}
C++编译测试:
[root@localhost cpp]# g++ -Wall -std=c++0x -o hello hello.cpp
[root@localhost cpp]# g++ -Wall -std=c++0x -m32 -o hello_x86 hello.cpp
[root@localhost cpp]# g++ -Wall -std=c++0x -static -o hello_static hello.cpp
[root@localhost cpp]# g++ -Wall -std=c++0x -static -m32 -o hello_static_x86 hello.cpp
[root@localhost cpp]# ll
总用量 3092
-rwxr-xr-x. 1 root root    9024 6月  26 20:41 hello
-rw-r--r--. 1 root root     186 6月  26 19:39 hello.cpp
-rwxr-xr-x. 1 root root 1608232 6月  26 20:42 hello_static
-rwxr-xr-x. 1 root root 1530996 6月  26 20:42 hello_static_x86
-rwxr-xr-x. 1 root root    7780 6月  26 20:42 hello_x86
[root@localhost cpp]# file hello
hello: ELF 64-bit LSB executable, x86-64, version 1 (SYSV), dynamically linked (uses shared libs), for GNU/Linux 2.6.32, BuildID[sha1]=bcee8282c15a3c4f321d54536fe3d985db8b21fb, not stripped
[root@localhost cpp]# file hello_x86
hello_x86: ELF 32-bit LSB executable, Intel 80386, version 1 (SYSV), dynamically linked (uses shared libs), for GNU/Linux 2.6.32, BuildID[sha1]=2d33e1d331b061f868b64dbf3c5801f6c9d32a64, not stripped
[root@localhost cpp]# file hello_static
hello_static: ELF 64-bit LSB executable, x86-64, version 1 (GNU/Linux), statically linked, for GNU/Linux 2.6.32, BuildID[sha1]=ec0b102d67b7ada6ee452c0b17ae480230f699de, not stripped
[root@localhost cpp]# file hello_static_x86
hello_static_x86: ELF 32-bit LSB executable, Intel 80386, version 1 (GNU/Linux), statically linked, for GNU/Linux 2.6.32, BuildID[sha1]=0a161fb9d6f37d019254c46fdeed0da0457158c2, not stripped
[root@localhost cpp]# ./hello
hello world
[root@localhost cpp]# ./hello_x86
hello world
[root@localhost cpp]# ./hello_static
hello world
[root@localhost cpp]# ./hello_static_x86
hello world
[root@localhost cpp]#
C++测试也没有问题。至此C,C++32位以及静态编译支持完工。


 2013
2013

 被折叠的 条评论
为什么被折叠?
被折叠的 条评论
为什么被折叠?
 到【灌水乐园】发言


