


 本文介绍如何使用IntelliJ IDEA结合Gradle快速搭建Java Web应用程序,包括创建Gradle项目、配置Web插件、添加Servlet及JSP文件等步骤,并利用gretty插件进行本地测试。

#利用IDEA+gradle进行java的web应用开发:
##一、准备
- 25分钟
- IDEA
- JDK
- Gradle
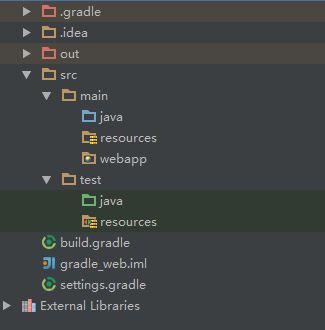
##二、建立Gradle工程 在IDEA里新建一个Gradle工程,步骤为:file-new-projects,选中Gradle,一步一步next,其中需要选中自动导入和添加空文件夹以便更好的进行项目组织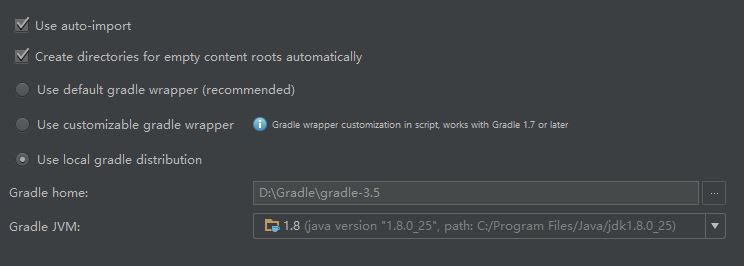 ##三、将Gradle工程转为Web工程 编辑build.gradle文件,在apply plugin:'java'后添加:apply plugin: 'war',然后进行gradle build,完成后得到项目结构如下图所示:
此时的build.gradle文件如下:
apply plugin: 'java'
apply plugin: 'war'

sourceCompatibility = 1.5

repositories {
    mavenCentral()
}

dependencies {
	providedCompile 'javax.servlet:javax.servlet-api:3.1.0'
    testCompile group: 'junit', name: 'junit', version: '4.11'
}
##四、添加java类、jsp文件 首先在src/main/java文件夹内添加: src/main/java/com/gradle/demo/HelloServlet.java
package org.gradle.demo;

import javax.servlet.ServletException;
import javax.servlet.annotation.WebServlet;
import javax.servlet.http.HttpServlet;
import javax.servlet.http.HttpServletRequest;
import javax.servlet.http.HttpServletResponse;
import java.io.IOException;

@WebServlet(name = "HelloServlet", urlPatterns = {"hello"}, loadOnStartup = 1)
public class HelloServlet extends HttpServlet {
    protected void doGet(HttpServletRequest request, HttpServletResponse response)
          throws ServletException, IOException {
        response.getWriter().print("Hello, World!");
    }

    protected void doPost(HttpServletRequest request, HttpServletResponse response)
            throws ServletException, IOException {
        String name = request.getParameter("name");
        if (name == null) name = "World";
        request.setAttribute("user", name);
        request.getRequestDispatcher("response.jsp").forward(request, response);
    }
}
随后在src/main/webapp内添加index.html和response.jsp
src/main/webapp/index.html如下:
<html>
    <head>
        <title>Web Demo</title>
    </head>
    <body>
        <p>Say <a href="hello">Hello</a></p>

        <form method="post" action="hello">
            <h2>Name:</h2>
            <input type="text" id="say-hello-text-input" name="name" />
            <input type="submit" id="say-hello-button" value="Say Hello" />
        </form>
    </body>
</html>
src/main/webapp/response.jsp如下:
<%@ page contentType="text/html;charset=UTF-8" language="java" %>
<html>
    <head>
        <title>Hello Page</title>
    </head>
    <body>
        <h2>Hello, ${user}!</h2>
    </body>
</html>
##五、添加gretty插件运行web应用: gretty插件能够为gradle添加许多tasks,可以用来测试Tomcat和Jetty的环境,安装好gretty后就可以利用runApp来测试应用了,将gretty添加到build.gradle中:
plugins {
    id 'java'
    id 'war'
    id 'org.akhikhl.gretty' version '1.4.2'
}
注意这里利用plugins block来填写plugin的时候,前面除了buildScript和plugins之外不能有别的内容
gradle build完之后就可以利用runApp来跑程序了,通过 http://localhost:8080/‘project_name’ 就可以访问了


 1626
1626

 被折叠的 条评论
为什么被折叠?
被折叠的 条评论
为什么被折叠?
 到【灌水乐园】发言


