


 介绍了Servlet3.0中的异步处理机制,包括AsyncContext的使用方式、异步线程池的创建以及AsyncListener的事件监控。
在Servlet 3.0之前,Servlet采用Thread-Per-Request的方式处理请求,即每一次Http请求都由某一个线程从头到尾负责处理。如果一个请求需要进行IO操作,比如访问数据库、调用第三方服务接口等,那么其所对应的线程将同步地等待IO操作完成, 而IO操作是非常慢的,所以此时的线程并不能及时地释放回线程池以供后续使用,在并发量越来越大的情况下,这将带来严重的性能问题。即便是像Spring、Struts这样的高层框架也脱离不了这样的桎梏,因为他们都是建立在Servlet之上的。为了解决这样的问题,Servlet 3.0引入了异步处理。
在Servlet 3.0中,我们可以从HttpServletRequest对象中获得一个AsyncContext对象,该对象构成了异步处理的上下文,Request和Response对象都可从中获取。AsyncContext可以从当前线程传给另外的线程,并在新的线程中完成对请求的处理并返回结果给客户端,初始线程便可以还回给容器线程池以处理更多的请求。如此,通过将请求从一个线程传给另一个线程处理的过程便构成了Servlet 3.0中的异步处理。
举个例子,对于一个需要完成长时处理的Servlet来说,其实现通常为:
|
1
2
3
4
5
6
7
8
9
|
@WebServlet
(
"/syncHello"
)
public
class
SyncHelloServlet
extends
HttpServlet {
protected
void
doGet(HttpServletRequest request,
HttpServletResponse response)
throws
ServletException, IOException {
new
LongRunningProcess().run();
response.getWriter().write(
"Hello World!"
);
}
}
|
为了模拟长时处理过程,我们创建了一个LongRunningProcess类,其run()方法将随机地等待2秒之内的一个时间:
|
1
2
3
4
5
6
7
8
9
10
11
12
13
14
15
|
public
class
LongRunningProcess {
public
void
run() {
try
{
int
millis = ThreadLocalRandom.current().nextInt(
2000
);
String currentThread = Thread.currentThread().getName();
System.out.println(currentThread +
" sleep for "
+ millis +
" milliseconds."
);
Thread.sleep(millis);
}
catch
(InterruptedException e) {
e.printStackTrace();
}
}
}
|
此时的SyncHelloServlet将顺序地先执行LongRunningProcess的run()方法,然后将将HelloWorld返回给客户端,这是一个典型的同步过程。
在Servlet 3.0中,我们可以这么写来达到异步处理:
|
1
2
3
4
5
6
7
8
9
10
11
12
13
14
15
16
17
|
@WebServlet
(value =
"/simpleAsync"
, asyncSupported =
true
)
public
class
SimpleAsyncHelloServlet
extends
HttpServlet {
protected
void
doGet(HttpServletRequest request, HttpServletResponse response)
throws
ServletException, IOException {
AsyncContext asyncContext = request.startAsync();
asyncContext.start(() -> {
new
LongRunningProcess().run();
try
{
asyncContext.getResponse().getWriter().write(
"Hello World!"
);
}
catch
(IOException e) {
e.printStackTrace();
}
asyncContext.complete();
});
}
|
此时,我们先通过request.startAsync()获取到该请求对应的AsyncContext,然后调用AsyncContext的start()方法进行异步处理,处理完毕后需要调用complete()方法告知Servlet容器。start()方法会向Servlet容器另外申请一个新的线程(可以是从Servlet容器中已有的主线程池获取,也可以另外维护一个线程池,不同容器实现可能不一样),然后在这个新的线程中继续处理请求,而原先的线程将被回收到主线程池中。事实上,这种方式对性能的改进不大,因为如果新的线程和初始线程共享同一个线程池的话,相当于闲置下了一个线程,但同时又占用了另一个线程。
当然,除了调用AsyncContext的start()方法,我们还可以通过手动创建线程的方式来实现异步处理:
|
1
2
3
4
5
6
7
8
9
10
11
12
13
14
15
16
17
18
19
20
21
22
|
@WebServlet
(value =
"/newThreadAsync"
, asyncSupported =
true
)
public
class
NewThreadAsyncHelloServlet
extends
HttpServlet {
protected
void
doGet(HttpServletRequest request, HttpServletResponse response)
throws
ServletException, IOException {
AsyncContext asyncContext = request.startAsync();
Runnable runnable = () -> {
new
LongRunningProcess().run();
try
{
asyncContext.getResponse().getWriter().write(
"Hello World!"
);
}
catch
(IOException e) {
e.printStackTrace();
}
asyncContext.complete();
};
new
Thread(runnable).start();
}
}
|
自己手动创建新线程一般是不被鼓励的,并且此时线程不能重用。因此,一种更好的办法是我们自己维护一个线程池。这个线程池不同于Servlet容器的主线程池
如下图:
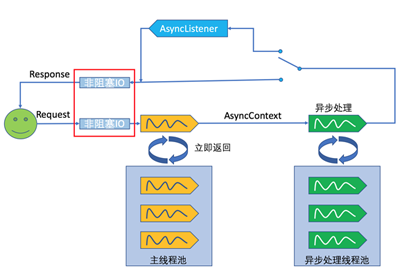
在上图中,用户发起的请求首先交由Servlet容器主线程池中的线程处理,在该线程中,我们获取到AsyncContext,然后将其交给异步处理线程池。可以通过Java提供的Executor框架来创建线程池:
|
1
2
3
4
5
6
7
8
9
10
11
12
13
14
15
16
17
18
19
20
21
22
23
24
25
|
@WebServlet
(value =
"/threadPoolAsync"
, asyncSupported =
true
)
public
class
ThreadPoolAsyncHelloServlet
extends
HttpServlet {
private
static
ThreadPoolExecutor executor =
new
ThreadPoolExecutor(
100
,
200
, 50000L, TimeUnit.MILLISECONDS,
new
ArrayBlockingQueue<>(
100
));
protected
void
doGet(HttpServletRequest request, HttpServletResponse response)
throws
ServletException, IOException {
AsyncContext asyncContext = request.startAsync();
executor.execute(() -> {
new
LongRunningProcess().run();
try
{
asyncContext.getResponse().getWriter().write(
"Hello World!"
);
}
catch
(IOException e) {
e.printStackTrace();
}
asyncContext.complete();
});
}
}
|
除此之外,Servlet 3.0 还为异步处理提供了一个监听器,使用 AsyncListener 接口表示。它可以监控如下四种事件:
- 异步线程开始时,调用 AsyncListener 的 onStartAsync(AsyncEvent event) 方法;
- 异步线程出错时,调用 AsyncListener 的 onError(AsyncEvent event) 方法;
- 异步线程执行超时,则调用 AsyncListener 的 onTimeout(AsyncEvent event) 方法;
- 异步执行完毕时,调用 AsyncListener 的 onComplete(AsyncEvent event) 方法;
参见于:http://www.jb51.net/article/110504.htm


 645
645

 被折叠的 条评论
为什么被折叠?
被折叠的 条评论
为什么被折叠?
 到【灌水乐园】发言


