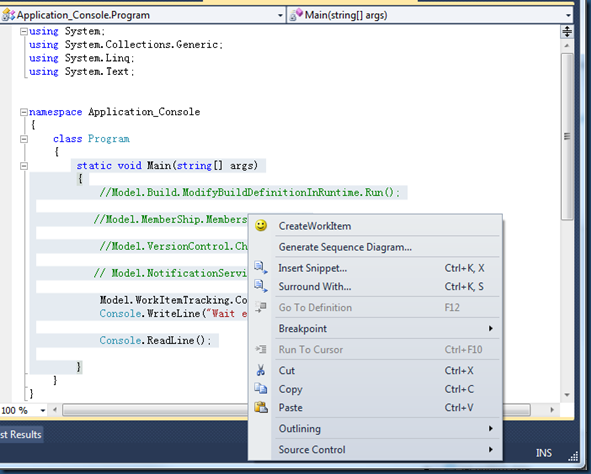
Some developers or testers may find that it will be more convenient that they could create a bug in code editor. Select a method, right click and create a work item.
Following steps and sample codes is for VS2010 and .NET4.0.
1 Create a VS Add-in project
2 Add new entry to the context menu of code editor.
The add-in class Connect will implement interface IDTExtensibility2
1: namespace Extensibility2: {3: [Guid("B65AD801-ABAF-11D0-BB8B-00A0C90F2744")]4: [TypeLibType(4160)]5: public interface IDTExtensibility26: {7: [DispId(3)]8: void OnAddInsUpdate(ref Array custom);9: [DispId(5)]10: void OnBeginShutdown(ref Array custom);11: [DispId(1)]12: void OnConnection(object Application, ext_ConnectMode ConnectMode, object AddInInst, ref Array custom);13: [DispId(2)]14: void OnDisconnection(ext_DisconnectMode RemoveMode, ref Array custom);15: [DispId(4)]16: void OnStartupComplete(ref Array custom);17: }18: }
Implement method OnConnection with following code
1: public void OnConnection(object application, ext_ConnectMode connectMode, object addInInst, ref Array custom)2: {3: _applicationObject = (DTE2)application;4: _addInInstance = (AddIn)addInInst;5: if(connectMode == ext_ConnectMode.ext_cm_UISetup)6: {7: object []contextGUIDS = new object[] { };8: Commands2 commands = (Commands2)_applicationObject.Commands;9: string toolsMenuName = "";10:11:12: //Place the command on the tools menu.13: //Find the MenuBar command bar, which is the top-level command bar holding all the main menu items:14: Microsoft.VisualStudio.CommandBars.CommandBar menuBarCommandBar = ((Microsoft.VisualStudio.CommandBars.CommandBars)_applicationObject.CommandBars)["Editor Context Menus"];15:16: //Find the Tools command bar on the MenuBar command bar:17: CommandBarControl toolsControl = menuBarCommandBar.Controls[toolsMenuName];18: CommandBarPopup toolsPopup = (CommandBarPopup)toolsControl;19:20: //This try/catch block can be duplicated if you wish to add multiple commands to be handled by your Add-in,21: // just make sure you also update the QueryStatus/Exec method to include the new command names.22: try23: {24: //Add a command to the Commands collection:25: Command command = commands.AddNamedCommand2(_addInInstance, "CreateWorkItem", "CreateWorkItem", "Executes the command for CreateWorkItem", true, 59, ref contextGUIDS, (int)vsCommandStatus.vsCommandStatusSupported + (int)vsCommandStatus.vsCommandStatusEnabled, (int)vsCommandStyle.vsCommandStylePictAndText, vsCommandControlType.vsCommandControlTypeButton);26:27: //Add a control for the command to the tools menu:28: if((command != null) && (toolsPopup != null))29: {30: command.AddControl(toolsPopup.CommandBar, 1);31:32: }33: }34: catch(System.ArgumentException)35: {36: //If we are here, then the exception is probably because a command with that name37: // already exists. If so there is no need to recreate the command and we can38: // safely ignore the exception.39: }40: }41: }
3 Handle the command when the menu is clicked
The add-in class Connect will implement interface IDTCommandTarget
1: public interface IDTCommandTarget2: {3: [DispId(2)]4: void Exec(string CmdName, vsCommandExecOption ExecuteOption, ref object VariantIn, ref object VariantOut, ref bool Handled);5: [DispId(1)]6: void QueryStatus(string CmdName, vsCommandStatusTextWanted NeededText, ref vsCommandStatus StatusOption, ref object CommandText);7: }
When the menu is click, the method Exec is called.
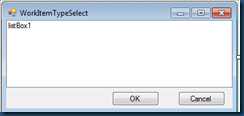
In the Exec command, show a dialog to choose work item type.
1: public void Exec(string commandName, vsCommandExecOption executeOption, ref object varIn, ref object varOut, ref bool handled)2: {3: handled = false;4: if(executeOption == vsCommandExecOption.vsCommandExecOptionDoDefault)5: {6: if (commandName == "CreateWorkItem.Connect.CreateWorkItem")7: {8: Microsoft.VisualStudio.TeamFoundation.TeamFoundationServerExt tfsExt9: = (Microsoft.VisualStudio.TeamFoundation.TeamFoundationServerExt)_applicationObject.GetObject("Microsoft.VisualStudio.TeamFoundation.TeamFoundationServerExt");10:11: //Confirm that TFS is connected12: if ((tfsExt == null)13: || (tfsExt.ActiveProjectContext == null)14: || (tfsExt.ActiveProjectContext.DomainUri == null)15: || (tfsExt.ActiveProjectContext.ProjectUri == null))16: {17: MessageBox.Show("Please Connect to TFS first and select a Team Project");18: }19:20: WorkItemTypeSelect witselect = new WorkItemTypeSelect();21: witselect._applicationObject = _applicationObject;22: witselect.ShowDialog();23:24: handled = true;25: return;26: }27: }28: }
The UI of the dialog is like
The codes are
1: using System;2: using System.Collections.Generic;3: using System.ComponentModel;4: using System.Data;5: using System.Drawing;6: using System.Linq;7: using System.Text;8: using System.Windows.Forms;9: using EnvDTE80;10: using Microsoft.TeamFoundation.Client;11: using Microsoft.VisualStudio.TeamFoundation.WorkItemTracking;12: using Microsoft.TeamFoundation.WorkItemTracking.Client;13:14: namespace CreateWorkItem15: {16: public partial class WorkItemTypeSelect : Form17: {18: public DTE2 _applicationObject { get; set; }19: Microsoft.VisualStudio.TeamFoundation.TeamFoundationServerExt tfsExt;20: DocumentService witDocumentService;21: TfsTeamProjectCollection tfsProjectCollection;22: WorkItemStore wiStore;23:24: public WorkItemTypeSelect()25: {26: InitializeComponent();27: }28:29: private void button1_Click(object sender, EventArgs e)30: {31:32: WorkItem wi = new WorkItem(wiStore.Projects[tfsExt.ActiveProjectContext.ProjectName].WorkItemTypes[listBox1.SelectedItem.ToString()]);33:34: wi.Title = listBox1.SelectedItem.ToString();35:36: dynamic selection = _applicationObject.ActiveDocument.Selection;37: wi.Description = selection.Text;38:39: IWorkItemDocument widoc = null;40: widoc = witDocumentService.CreateWorkItem(wi,41: new object());42: try43: {44: witDocumentService.ShowWorkItem(widoc);45: }46: finally47: {48: widoc.Release(this);49: }50: this.Close();51: }52:53: private void WorkItemTypeSelect_Load(object sender, EventArgs e)54: {55: tfsExt = (Microsoft.VisualStudio.TeamFoundation.TeamFoundationServerExt)_applicationObject.GetObject("Microsoft.VisualStudio.TeamFoundation.TeamFoundationServerExt");56:57: witDocumentService = (DocumentService)_applicationObject.GetObject("Microsoft.VisualStudio.TeamFoundation.WorkItemTracking.DocumentService");58:59: tfsProjectCollection = TfsTeamProjectCollectionFactory.GetTeamProjectCollection(new Uri(tfsExt.ActiveProjectContext.DomainUri));60:61: wiStore = tfsProjectCollection.GetService<WorkItemStore>();62:63: listBox1.Items.Clear();64: foreach (WorkItemType wit in wiStore.Projects[tfsExt.ActiveProjectContext.ProjectName].WorkItemTypes)65: {66: listBox1.Items.Add(wit.Name);67: }68:69:70: }71: }72: }
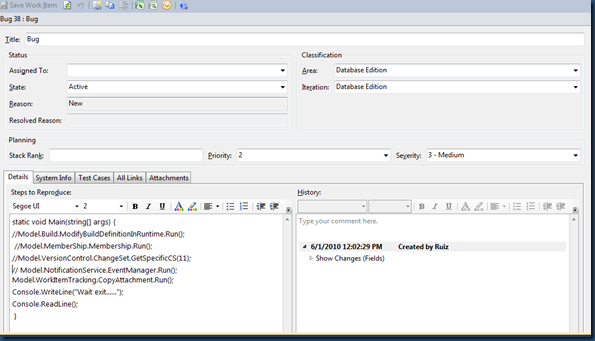
Note that in MSF for Agile 5, description is not displayed in Bug work item, you can
set the field Microsoft.VSTS.TCM.ReproSteps.
The final result is
 VS2010中创建Bug工作项


 本文介绍如何在Visual Studio 2010中通过代码编辑器快速创建Bug工作项。通过实现VS Add-in项目并在代码编辑器上下文菜单中添加新条目,用户可以选择方法并右键创建工作项。文章详细介绍了实现步骤及关键代码。


 1483
1483

 被折叠的 条评论
为什么被折叠?


