


 本文介绍如何使用 Visual Studio 2013 开发 Azure Service Bus 队列应用,包括创建云项目、配置 Web 角色与 Worker 角色,以及实现消息发送与接收的具体代码。
《Windows Azure Platform 系列文章目录》
在之前的Azure Service Bus中,我们已经介绍了Service Bus 队列(Queue)的基本概念。
在本章中,笔者将介绍如何使用Visual Studio 2013,开发一个Service Bus Queue的Demo Project。
场景:
1.在前端有一个ASP.NET页面,客户从输入框输入数据,并且通过按钮进行提交
2.输入框输入的数据,会被后端的WorkerRoleWithSBQueue接受处理,并在后端显示
主要步骤有:
1.使用Azure Management Portal,创建Service Bus
2.修改Web Role逻辑
3.创建Cloud Project,添加Web Role和Service Bus Worker Role
4.配置WebRole和ServiceBusWorkerRole
3.DEMO
一.笔者已经在之前的文章中,介绍如何创建Service Bus了。不熟悉的读者,可以参考Windows Azure Service Bus (2) 队列(Queue)入门
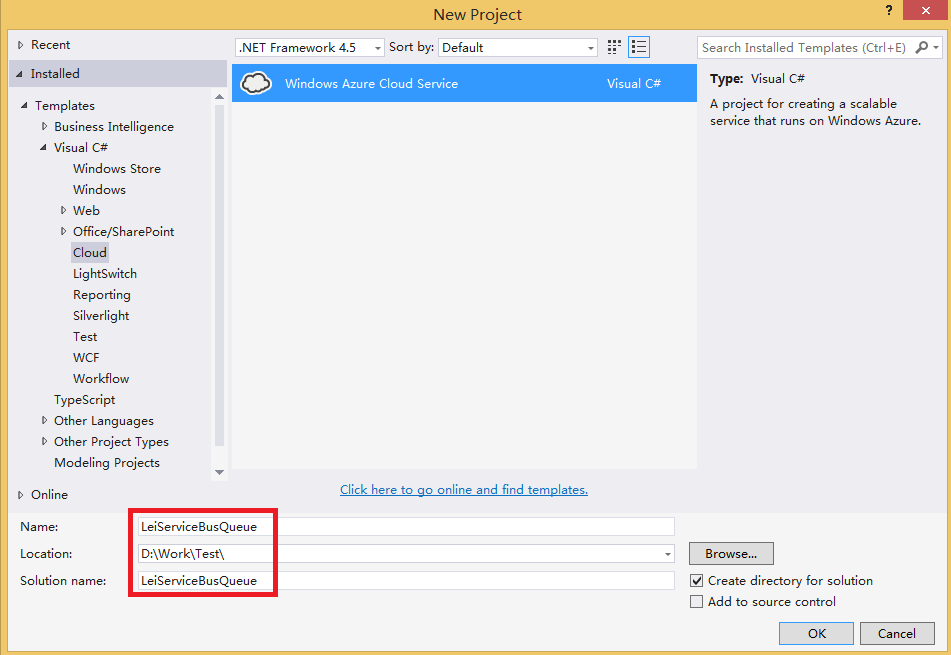
二.创建Cloud Project
1.首先我们以管理员身份,运行VS2013
2.创建一个新的Cloud Service,命名为LeiServiceBusQueue,如下图:
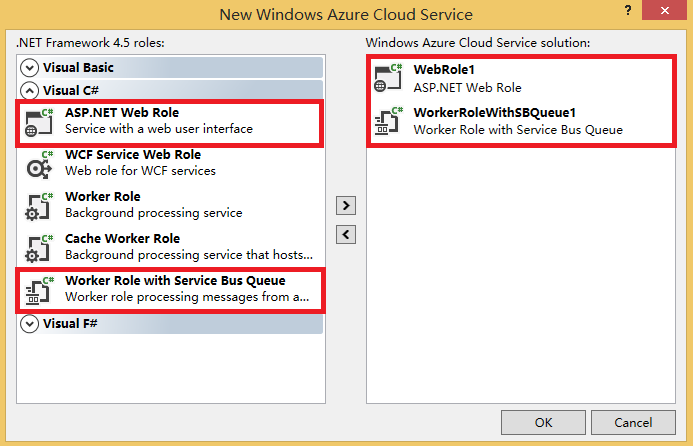
3.增加ASP.NET Web Role和Worker Role with Service Bus Queue。如下图
二.设置WorkerRoleWithSBQueue1
1.在WorkerRoleWithSBQueue1项目中,修改WorkerRole.cs代码,如下:

using System;
using System.Collections.Generic;
using System.Diagnostics;
using System.Linq;
using System.Net;
using System.Threading;
using Microsoft.ServiceBus;
using Microsoft.ServiceBus.Messaging;
using Microsoft.WindowsAzure;
using Microsoft.WindowsAzure.ServiceRuntime;

namespace WorkerRoleWithSBQueue1
{
    public class WorkerRole : RoleEntryPoint
    {
        // The name of your queue
        const string QueueName = "ProcessingQueue";// QueueClient is thread-safe. Recommended that you cache
        // rather than recreating it on every request
        QueueClient Client;
        ManualResetEvent CompletedEvent = new ManualResetEvent(false);

        public override void Run()
        {
            Trace.WriteLine("Starting processing of messages");

            // Initiates the message pump and callback is invoked for each message that is received, calling close on the client will stop the pump.
            Client.OnMessage((receivedMessage) =>
                {
                    try
                    {
                        // Process the message
                        Trace.WriteLine("Processing Service Bus message: " + receivedMessage.SequenceNumber.ToString());

                        string received = receivedMessage.GetBody<string>();
                        Trace.WriteLine("You input is" + received);
                    }
                    catch
                    {
                        // Handle any message processing specific exceptions here
                    }
                });

            CompletedEvent.WaitOne();
        }


     public override bool OnStart()
        {
            // Set the maximum number of concurrent connections
            ServicePointManager.DefaultConnectionLimit = 12;

            // Create the queue if it does not exist already
            string connectionString = CloudConfigurationManager.GetSetting("Microsoft.ServiceBus.ConnectionString");
            var namespaceManager = NamespaceManager.CreateFromConnectionString(connectionString);
            if (!namespaceManager.QueueExists(QueueName))
            {
                namespaceManager.CreateQueue(QueueName);
            }// Initialize the connection to Service Bus Queue
            Client = QueueClient.CreateFromConnectionString(connectionString, QueueName);
            return base.OnStart();
        }

        public override void OnStop()
        {
            // Close the connection to Service Bus Queue
            Client.Close();
            CompletedEvent.Set();
            base.OnStop();
        }
    }
}
在上面的WokerRole.cs类代码中,分为两个逻辑:
(1)OnStart函数,表示WorkerRole在启动的时候,初始化了ProcessingQueue对象
(2)Run函数,表示在WorkerRole在执行的时候,将ProcessingQueue的内容输出
三.设置Web Role
1.在Web Role的根目录下,创建一个新的ASPX页面,重命名为ServiceBusQueue.aspx
在ServiceBusQueue.aspx页面中,
- 增加一个TextBox控件,重命名为txbInput
- 增加一个Button控件,重命名为BtnSend
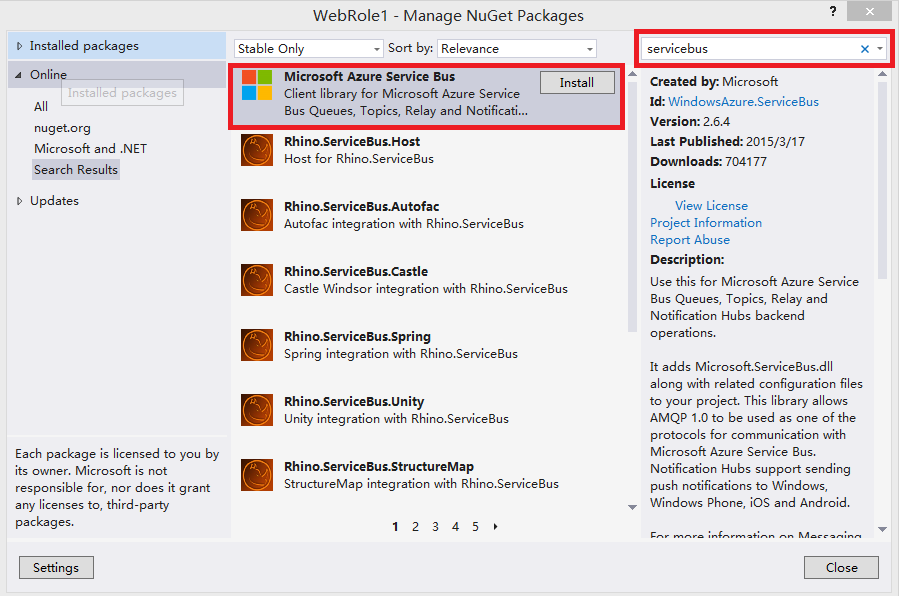
2.在WebRole1项目中,增加NuGet,添加ServiceBus引用。如下图:
3.在ServiceBusQueue.aspx.cs中,增加如下代码
using System;
using System.Collections.Generic;
using System.Linq;
using System.Web;
using System.Web.UI;
using System.Web.UI.WebControls;

using Microsoft.WindowsAzure;
using Microsoft.ServiceBus;
using Microsoft.ServiceBus.Messaging;

namespace WebRole1
{
    public partial class ServiceBusQueue : System.Web.UI.Page
    {
        const string QueueName = "ProcessingQueue";

     protected void Page_Load(object sender, EventArgs e)
        {

        }

        protected void BtnSend_Click(object sender, EventArgs e)
        {
            string strinput = txbInput.Text.ToString();
            Send(strinput);
            txbInput.Text = string.Empty;
        }

        private void Send(string text)
        {
            string connectionString = CloudConfigurationManager.GetSetting("Microsoft.ServiceBus.ConnectionString");
            MessagingFactory factory = MessagingFactory.CreateFromConnectionString(connectionString);

            // Initialize the connection to Service Bus Queue
            MessageSender sender = factory.CreateMessageSender(QueueName);

            BrokeredMessage message1 = new BrokeredMessage(text);

            sender.Send(message1);

        }
    }
}
上面的代码中,会将用户从界面的输入值,插入到ProcessingQueue对象中
四.配置WebRole和ServiceBusWorkerRole
我们修改WebRole的配置文件,如下图:
在WebRole1的Settings中,点击Add Setting增加Microsoft.ServiceBus.ConnectionString对象,如下图:
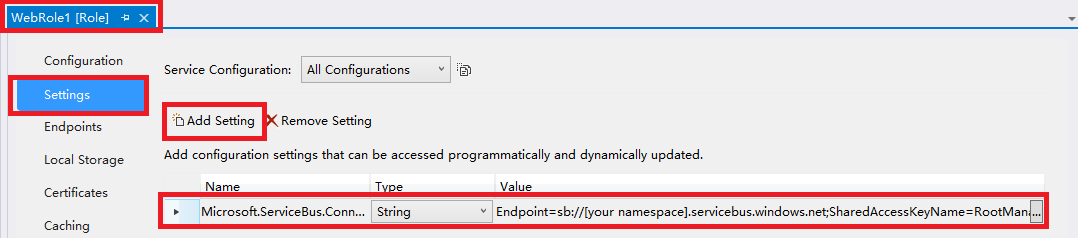
上图中,需要将Value值修改为我们在Azure Management Portal中创建的ServiceBus连接字符串,如下图:

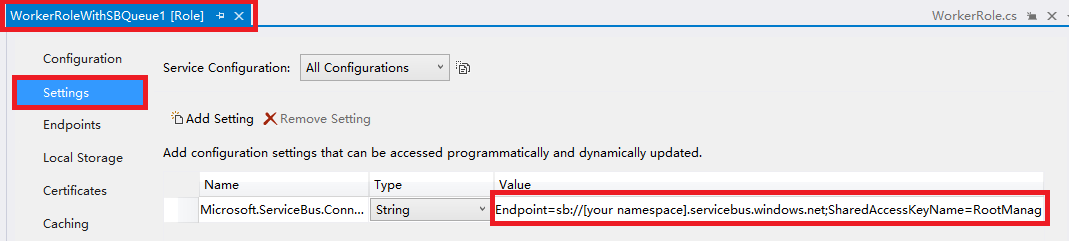
修改完毕后,我们需要修改ServiceBusWorkerRole的配置文件
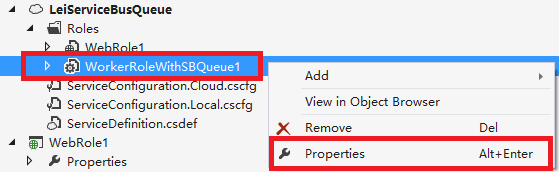
将Microsoft.ServiceBus.ConnectionString的Value属性,修改为我们在Azure Management Portal中创建的ServiceBus连接字符串。如下图:
五.然后我们用Visual Studio的Azure模拟器运行。
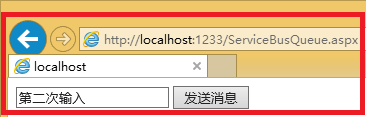
我们依次在ServiceBusQueue.aspx中,输入不同的值。如下图:
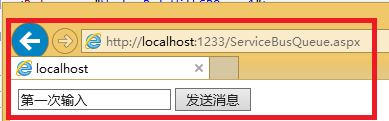
我们可以在Azure Compute模拟器中,查看到2次输入的结果。如下图:
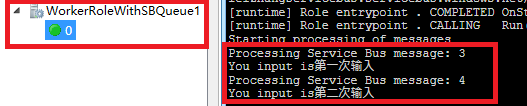
可以观察到,首先输入的值,最先被处理。这也说明了Service Bus Queue 先进先出的特性。
最后我们还可以在Management Portal中,查看到由代码生成的processingqueue对象

=====================================分隔符=======================================================
看到最后,如果有读者觉得,从Azure Compute Emulator查看到aspx页面的输入,这也太不智能啦。
放心,其实我们可以将aspx页面的输入,返回到另外的ReturnQueue对象中去,并在前端aspx进行显示:
(1)ProcessingQueue:插入(Send)数据
(2)ProcessingQueue:返回(Receive)数据
别问我为什么不能保存到代码中申明的ProcessingQueue中,笔者试验过,不能对ProcessingQueue同时执行Send和Receive操作
ServiceBusQueue.aspx.cs代码如下
using System;
using System.Collections.Generic;
using System.Linq;
using System.Web;
using System.Web.UI;
using System.Web.UI.WebControls;

using Microsoft.WindowsAzure;
using Microsoft.ServiceBus;
using Microsoft.ServiceBus.Messaging;

namespace WebRole1
{
    public partial class ServiceBusQueue : System.Web.UI.Page
    {
        const string QueueName = "ProcessingQueue";
        const string ReturnQueueName = "ReturnQueue";
        protected void Page_Load(object sender, EventArgs e)
        {

        }

        protected void BtnSend_Click(object sender, EventArgs e)
        {
            string strinput = txbInput.Text.ToString();
            Send(strinput);
            txbInput.Text = string.Empty;
        }

        private void Send(string text)
        {
            string connectionString = CloudConfigurationManager.GetSetting("Microsoft.ServiceBus.ConnectionString");
            MessagingFactory factory = MessagingFactory.CreateFromConnectionString(connectionString);

            // Initialize the connection to Service Bus Queue
            MessageSender sender = factory.CreateMessageSender(QueueName);

            BrokeredMessage message1 = new BrokeredMessage(text);

            sender.Send(message1);

        }

        protected void btnReceiveMessage_Click(object sender, EventArgs e)
        {
           string connectionString = CloudConfigurationManager.GetSetting("Microsoft.ServiceBus.ConnectionString");
           QueueClient Client = QueueClient.CreateFromConnectionString(connectionString, ReturnQueueName);

           var message = Client.Receive(TimeSpan.FromSeconds(3));
           if (message != null)
           {
               var ret = message.GetBody<string>();
               message.Complete();


           }
        }
    }
}
WorkerRole.cs代码如下:
using System;
using System.Collections.Generic;
using System.Diagnostics;
using System.Linq;
using System.Net;
using System.Threading;
using Microsoft.ServiceBus;
using Microsoft.ServiceBus.Messaging;
using Microsoft.WindowsAzure;
using Microsoft.WindowsAzure.ServiceRuntime;

namespace WorkerRoleWithSBQueue1
{
    public class WorkerRole : RoleEntryPoint
    {
        // The name of your queue
        const string QueueName = "ProcessingQueue";
        const string ReturnQueueName = "ReturnQueue";

        // QueueClient is thread-safe. Recommended that you cache
        // rather than recreating it on every request
        QueueClient Client;
        ManualResetEvent CompletedEvent = new ManualResetEvent(false);

        public override void Run()
        {
            Trace.WriteLine("Starting processing of messages");

            // Initiates the message pump and callback is invoked for each message that is received, calling close on the client will stop the pump.
            Client.OnMessage((receivedMessage) =>
                {
                    try
                    {
                        // Process the message
                        Trace.WriteLine("Processing Service Bus message: " + receivedMessage.SequenceNumber.ToString());

                        string received = receivedMessage.GetBody<string>();
                        Trace.WriteLine("You input is" + received);

                        SendToReturnQueue(ReturnQueueName, received);
                    }
                    catch
                    {
                        // Handle any message processing specific exceptions here
                    }
                });

            CompletedEvent.WaitOne();
        }

        private void SendToReturnQueue(string queueName, string inputString)
        {
            string connectionString = CloudConfigurationManager.GetSetting("Microsoft.ServiceBus.ConnectionString");
            MessagingFactory factory = MessagingFactory.CreateFromConnectionString(connectionString);

            // Initialize the connection to Service Bus Queue
            MessageSender sender = factory.CreateMessageSender(queueName);

            BrokeredMessage message1 = new BrokeredMessage(inputString);

            sender.Send(message1);

        }

        public override bool OnStart()
        {
            // Set the maximum number of concurrent connections
            ServicePointManager.DefaultConnectionLimit = 12;

            // Create the queue if it does not exist already
            string connectionString = CloudConfigurationManager.GetSetting("Microsoft.ServiceBus.ConnectionString");
            var namespaceManager = NamespaceManager.CreateFromConnectionString(connectionString);
            if (!namespaceManager.QueueExists(QueueName))
            {
                namespaceManager.CreateQueue(QueueName);
            }
            if (!namespaceManager.QueueExists(ReturnQueueName))
            {
                namespaceManager.CreateQueue(ReturnQueueName);
            }

            // Initialize the connection to Service Bus Queue
            Client = QueueClient.CreateFromConnectionString(connectionString, QueueName);
            return base.OnStart();
        }

        public override void OnStop()
        {
            // Close the connection to Service Bus Queue
            Client.Close();
            CompletedEvent.Set();
            base.OnStop();
        }
    }
}
本博-三石Blog(下文简称本博),在本博客文章结尾处右下脚未注明转载、来源、出处的作品(内容)均为本博原创,本站对于原创作品内容对其保留版权,请勿随意转载,如若真有需要的朋友可以发Mail联系我;转载本博原创作品(内容)也必须遵循“署名-非商业用途-保持一致”的创作共用协议,请务必以文字链接的形式标明或保留文章原始出处和博客作者(Lei Zhang)的信息,关于本博摄影作品请务必注意保留(www.cnblog.com/threestone)等相关水印版权信息,否则视为侵犯原创版权行为;本博谢绝商业网站转载。版权所有,禁止一切有违中华人民共和国著作权保护法及相关法律和本博(法律)声明的非法及恶意抄袭。
本文转自Lei Zhang博客园博客,原文链接:http://www.cnblogs.com/threestone/p/4308998.html,如需转载请自行联系原作者


 314
314

 被折叠的 条评论
为什么被折叠?
被折叠的 条评论
为什么被折叠?
 到【灌水乐园】发言


