下面开始动手吧。。。
首先我们先建立一个j2ee的web project
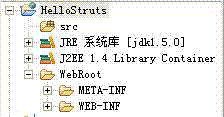
然后给这个项目添加Struts框架必要的文件.在我们项目名上点击右键,选择MyEclipes --> Add Struts Capabilities...弹出对话框图2:
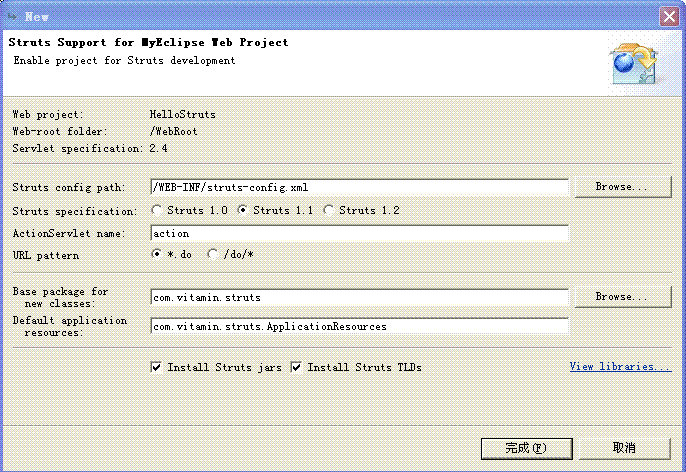
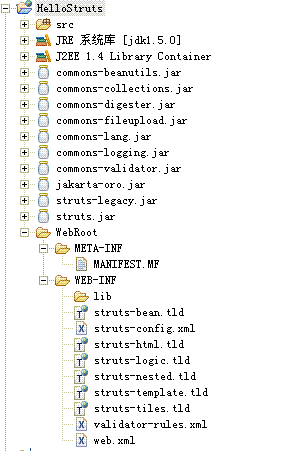
其中Struts config path就是我们的struts配置文件,URL pattern我们选择*.do,Default application resource为我们默认的资源文件地方,你可以选择它的存储位置,我们在这里保持默认。点击Finish后,项目结构类似于图3:
然后修改/WEB-INF/web.xml文件,为其添加标签库。将下面代码添加至 </webapp> 上面:
<jsp-config>
<taglib>
<taglib-uri>/tags/struts-html</taglib-uri>
<taglib-location>/WEB-INF/struts-html.tld</taglib-location>
</taglib>
<taglib>
<taglib-uri>/tags/struts-bean</taglib-uri>
<taglib-location>/WEB-INF/struts-bean.tld</taglib-location>
</taglib>
<taglib>
<taglib-uri>/tags/struts-logic</taglib-uri>
<taglib-location>/WEB-INF/struts-logic.tld</taglib-location>
</taglib>
</jsp-config>
完成后,打开struts-config.xml文件,点击这个界面左下角的Design进入可视化设计界面。我们先建立loginSuccess.jsp文件.点击Palette面版上的创建JSP文件图标,弹出创建JSP文件面板。图4:
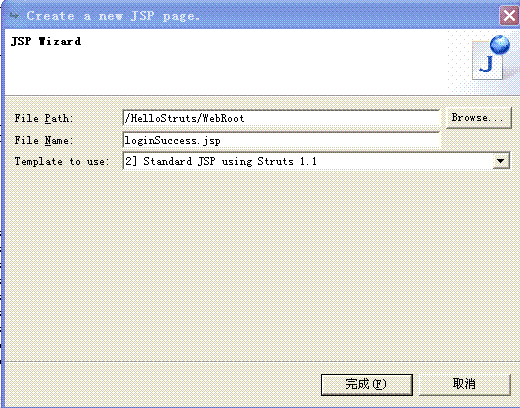
完成后,struts-config.xml文件自动被更新,可视化界在上也出现了刚新建的JSP模块。新建的jsp文件也打开了。覆盖所有的<%@ taglib ...... 为我们开始在/WEB-INF/web.xml中定义的:
<%@ taglib uri="/tags/struts-html" prefix="html"%>
<%@ taglib uri="/tags/struts-bean" prefix="bean"%>
<%@ taglib uri="/tags/struts-logic" prefix="logic"%>
然后在<body></body>中添加:
Hello <bean:write name="userName" scope="request" /> .
这里将request中的属性userName输出在页面上,所以等下我们在loginAction中,登录成功后要设置一个相关属性。
下面来开始我们最后三个文件的设计吧。在Struts-config.xml的Design模式中,在画版的空白区域点右键,选择New --> New Form, Action and JSP 弹出ActionForm的选项面板,我们按图上输入相关值,图5:
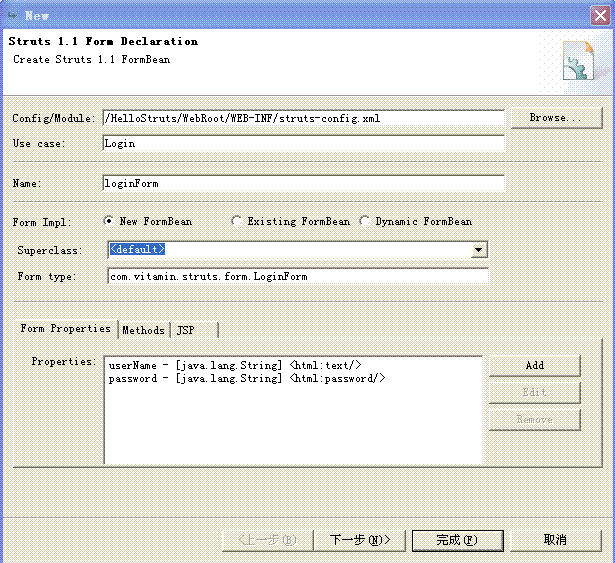
因为我们这只是简单的演示一个登录片段,所以不用验证用户信息是否合法,所以将 Option Details的method选项卡的新建方法去掉,如图:
接下来选择 Optional Details的JSP选项卡,我们选中Create JSP form? 这一步myeclipse将为我们创建一个简单的与用户交互的登录页面:
点Next,进入Action选项面板.将Option Details的Form选项卡中Validate Form取消选择,如图: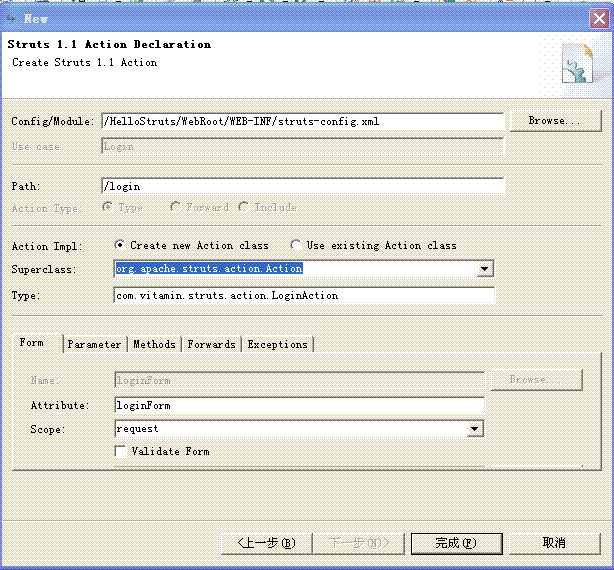
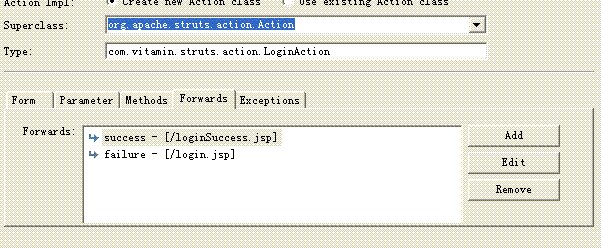
点击Finish完成。在Struts-config.xml的Design中,可以看到图所示:
最后,简单的修改一下login.jsp,将所有<%@ taglib ...%>替换为:
<%@ taglib uri="/tags/struts-html" prefix="html"%>
<%@ taglib uri="/tags/struts-bean" prefix="bean"%>
修改LoginAction如下所示:

 /** */
/**
  * Method execute
 * @param mapping
 * @param form
 * @param request
 * @param response
 * @return ActionForward
 */
*/
 public
ActionForward execute(
 ActionMapping mapping,
 ActionForm form,
 HttpServletRequest request,
 HttpServletResponse response)

 {
{ LoginForm loginForm = (LoginForm) form;
 // TODO Auto-generated method stub
 String name = loginForm.getUserName();
 String password = loginForm.getPassword();
 DBbase myDb = new DBbase();
 ResultSet rs = null;
 int result = 0;
 String sql = "select count(*) as count from users where username = '"+name+"' and password = '"+password+"'";
 try
try

 {
{ rs = myDb.executeQuery(sql);
 if(rs.next())

 {
{ result = rs.getInt("count");
 }
} }
} catch(SQLException ex)

 {
{ ex.printStackTrace();
 }
}
 if(result>0)

 {
{ request.setAttribute("userName",name);
 return mapping.findForward("success");
 }
}
 return mapping.findForward("failure");
 }
}
加入一个数据访问javaBean:
 package
com.vitamin.DataAccess;
 import
java.sql.
*
;

 public
class
DBbase
 {
{ String sDBDriver = "sun.jdbc.odbc.JdbcOdbcDriver";
 String sConnstr = "jdbc:odbc:myDB";
 Connection connect = null;
 ResultSet rs = null;
 Statement stmt = null;

 public DBbase()

 {
{
 try
try

 {
{
 Class.forName(sDBDriver);
 }
} catch(ClassNotFoundException ex)

 {
{ System.err.println(ex.getMessage());
 }
} }
} public ResultSet executeQuery(String sql)

 {
{
 try
try

 {
{ this.connect = DriverManager.getConnection(sConnstr);
 this.stmt = this.connect.createStatement();
 rs = stmt.executeQuery(sql);
 }
} catch(SQLException ex)

 {
{ System.err.println(ex.getMessage());
 }
} return rs;
 }
} public int executeUpdate(String sql)

 {
{ int result = 0;
 try
try

 {
{ this.connect = DriverManager.getConnection(sConnstr);
 this.stmt = this.connect.createStatement();
 result = stmt.executeUpdate(sql);
 }
} catch(SQLException ex)

 {
{ System.err.println(ex.getMessage());
 }
} return result;
 }
}
 }
}


好了,完成!!用浏览器上打开:http://localhost:8080/HelloStruts/login.jsp,就可以了
哦,出了问题了,中文输入不支持,呵呵,想点办法来让个一劳永逸吧。。
Servlet2.3开始增加了事件监听和过滤器,管道和过滤器是为处理数据流的系统而提供的一种模式,它由管道和过滤器组成,每个处理步骤都封装在一个过滤器组件中,数据通过相邻过滤器之间的管道进行传输,每个过滤器可以单独修改,功能单一,并且顺序可以进行配置。
在Web.xml中修改如下:
<filter>
<filter-name>EncodingFilter</filter-name>
<filter-class>com.vitamin.util.EncodingFilter</filter-class>
<init-param>
<param-name>encoding</param-name>
<param-value>GB2312</param-value>
</init-param>
</filter>
<filter-mapping>
<filter-name>EncodingFilter</filter-name>
<url-pattern>/*</url-pattern>
</filter-mapping>
新加一个类EncodingFilter:
 package
com.vitamin.util;
 import
javax.servlet.Filter;
 import
javax.servlet.FilterConfig;
 import
javax.servlet.FilterChain;
 import
javax.servlet.ServletException;
 import
javax.servlet.ServletRequest;
 import
javax.servlet.ServletResponse;
 import
java.io.IOException;
 public
class
EncodingFilter
implements
Filter

 {
{ private FilterConfig config = null;
 private String targetEncoding = "GBK";
 public EncodingFilter()

 {
{ super();
 // TODO 自动生成构造函数存根
 }
}
 public void init(FilterConfig config) throws ServletException

 {
{ // TODO 自动生成方法存根
 this.config = config;
 this.targetEncoding = config.getInitParameter("encoding");//从配置中读取初始化参数
 }
}
 public void doFilter(ServletRequest request, ServletResponse response, FilterChain chain) throws IOException, ServletException

 {
{ // TODO 自动生成方法存根
 System.out.println("目标编码:"+this.targetEncoding);
 request.setCharacterEncoding(this.targetEncoding);
 response.setCharacterEncoding(this.targetEncoding);
 chain.doFilter(request,response);
 }
}
 public void destroy()

 {
{ // TODO 自动生成方法存根
 this.config = null;
 this.targetEncoding = null;
 }
}

 }
}

这样就可以很好地解决中文乱码的问题了。。。


 本文介绍使用Struts框架在MyEclipse环境下实现用户登录功能的过程,包括项目搭建、配置文件编辑、页面与Action交互等内容。


 1017
1017

 被折叠的 条评论
为什么被折叠?


