


 本文详细介绍了在Gentoo系统中构建Mysql集群的过程,包括软件版本选择、集群架构搭建、主主及主从同步配置、健康检查脚本编写、haproxy负载均衡配置等内容。
Mysql cluster实验
1 测试环境:
1.1 软件系统版本
Gentoo 3.8.13
Mysql 5.1.67
Haproxy-1.4.24
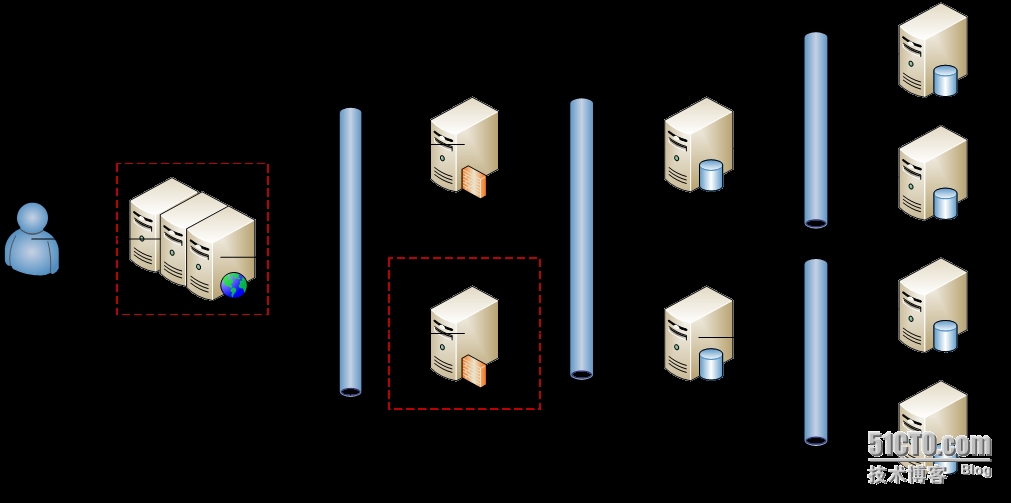
1.2 架构

1.3 主机信息
| hostname | Network interface | IP addr | note | 主机编号 |
| Mysql111 | Enp2s1 | 192.168.254.111 | master1 | 1 |
| Mysql112 | Enp2s1 | 192.168.254.112 | master2 | 2 |
| Mysql121 | Enp2s1 | 192.168.254.121 | master1/slave1 | 3 |
| Mysql122 | Enp2s1 | 192.168.254.122 | master1/slave2 | 4 |
| Mysql123 | Enp2s1 | 192.168.254.123 | master2/slave3 | 5 |
| Mysql124 | Enp2s1 | 192.168.254.124 | master2/slave4 | 6 |
| Haproxy110 | Enp2s1 | 192.168.254.110 | Double port | 0 |
| Enp2s4 | 192.168.254.120 |
1.Mysql111和mysql112为主主模式同步数据
2.Mysql121,mysql122,mysql123,mysql124和mysql111,mysql112为主从模式,其中mysql111和mysql121,mysql122为主从; mysql112和mysql123,mysql124为主从
3.当mysql112停止同步,mysql111为主库,代理停止发送请求到mysql112,mysql123,mysql124
4.当mysql111停止同步,mysql112为主库,代理停止发送请求到mysql111,mysql121,mysql122
5.当mysql111和mysql112同时停止同步,集群变为readonly状态
6.当mysql112宕机,mysql111为backup模式,haproxy停止发送请求到mysql112,mysql123,mysql124
7.当mysql111宕机,mysql112为backup模式,haproxy停止发送请求到mysql111,mysql121,mysql122
8.当mysql111和mysql112同时宕机,集群停止工作
2. 准备工作
主机1-6
Vi /etc/mysql/mysql.cnf

如果有注销掉,或者修改为0.0.0.0
重启数据库
/etc/init.d/mysql restart
3. 配置mysql111和mysql112主主同步
3.1 主机1上
Vi /etc/mysql/my.cnf

主机 2上

主机1和2上
/etc/init.d/mysql restart
添加同步用户
Mysql –uroot -p
Grant replication slave on *.* to ‘copy’@’192.168.254.%’ identified by ‘copy’;

如上图,root是原有的账号,copy是刚才添加的
记录日志文件名称和pos号


在主机1上
Change master to
Master_host=’192.168.254.112’,
Master_port=3306,
Master_user=’copy’,
Master_password=’copy’,
Master_log_file=’mysql-bin.000004’
Master_log_pos=’192’;
Start slave;
Show slave status

在主机2上
Change master to
Master_host=’192.168.254.111’,
Master_port=3306,
Master_user=’copy’,
Master_password=’copy’,
Master_log_file=’mysql-bin.000005’,
Master_log_pos=’106’;
Start slave;
Show slave status

测试主主同步的可用性
分别在主机1和主机2 上创建个数据库,然后看另一台主机上是否存在就可以了
4. 在主机1,2,3,4,5,6上配置主从同步
在主机3-6上
Vi /etc/mysql/my.cnf

备注:server-id不能相同,其他换成改主机主机号就可以了
重启mysql
/etc/init.d/mysql restart
在主机3-4上
Mysql –uroot –p
Change master to
Master_host=’192.168.254.111’,
Master_port=3306,
Master_user=’copy’,
Master_password=’copy’,
Master_log_file=’mysql-bin.000005’,
Master_log_pos=’106’;
Start slave;
Show slave status;

在主机5-6上
Mysql –uroot –p
Change master to
Master_host=’192.168.254.112’,
Master_port=3306,
Master_user=’copy’,
Master_password=’copy’,
Master_log_file=’mysql-bin.000004’,
Master_log_pos=’192’;
Start slave;
Show slave status;

测试
同上,分别在1和2上创建1个数据库,看是否同步
5 安装xinetd
在主机1-6上
Emerge –av xinetd
Rc-update add xinetd default
/etc/init.d/xinetd start
在主机1-2上
Vi /etc/xinetd.d/mysqlchk
|
1
2
3
4
5
6
7
8
9
10
11
12
13
14
15
16
17
18
19
20
21
22
23
24
25
26
27
|
#
# /etc/xinetd.d/mysqlchk
#
service mysqlchk_write
{
flags = REUSE
socket_type = stream
port = 9200
wait = no
user = nobody
server =
/opt/mysqlchk_status
.sh
log_on_failure += USERID
disable = no
only_from =192.168.254.0
/24
}
service mysqlchk_replication
{
flags = REUSE
socket_type = stream
port = 9201
wait = no
user = nobody
server =
/opt/mysqlchk_replication
.sh
log_on_failure += USERID
disable = no
only_from = 192.168.254.0
/24
}
|
添加服务端口
Mysqlchk_write9200/tcp# mysqlchk_write
Mysqlchk_replication9201/tcp# mysqlchk_replication
备注:
如果9200和9201端口被占用也可以使用其他端口号
在主机1上
Vi /opt/mysqlchk_status.sh
|
1
2
3
4
5
6
7
8
9
10
11
12
13
14
15
16
17
18
19
20
21
22
|
#!/bin/bash
MYSQL_HOST=
"localhost"
MYSQL_PORT=
"3306"
MYSQL_USERNAME=
"root"
MYSQL_PASSWORD=
"root"
ERROR_MSG=`
/usr/bin/mysql
--host=$MYSQL_HOST --port=$MYSQL_PORT --user=$MYSQL_USERNAME --password=$MYSQL_PASSWORD -e
"show databases;"
2>dev
/null
`
if
[
"$ERROR_MSG"
!=
""
]
then
# mysql is fine, return http 200
/bin/echo
-e
"HTTP/1.1 200 OK\r\n"
/bin/echo
-e
"Content-Type: Content-Type:text\r\n"
/bin/echo
-e
"\r\n"
/bin/echo
-e
"MySQL is running.\r\n"
/bin/echo
-e
"\r\n"
else
#mysql is down, return http 503
/bin/echo
-e
"HTTP/1.1 503 Service Unavailable\r\n"
/bin/echo
-e
"Content-Type: Content-Type:text/plain\r\n"
/bin/echo
-e
"\r\n"
/bin/echo
-e
"MYSQL is *down*.\r\n"
/bin/echo
-e
"\r\n"
fi
|
Vi /opt/mysqlchk_replication.sh
|
1
2
3
4
5
6
7
8
9
10
11
12
13
14
15
16
17
18
19
20
21
22
23
24
25
|
#!/bin/bash
MYSQL_HOST=
"localhost"
MYSQL_PORT=
"3306"
MYSQL_USERNAME=
"root"
MYSQL_PASSWORD=
"root"
/usr/bin/mysql
--host=$MYSQL_HOST --port=$MYSQL_PORT --user=$MYSQL_USERNAME --password=$MYSQL_PASSWORD -e
"show slave status;"
>
/tmp/check_repl
.txt
iostat=`
grep
"Slave_IO_Running"
/tmp/check_repl
.txt |
awk
'{print $2}'
`
sqlstat=`
grep
"Slave_SQL_Running"
/tmp/check_repl
.txt |
awk
'{print $2}'
`
#echo iostat:$iostat and sqlstat:$sqlstat
if
[
"$iostat"
=
"No"
] || [
"$sqlstat"
=
"No"
];
then
#mysql is down,return http 503
/bin/echo
-e
"HTTP/1.1 503 Service Unavailable\r\n"
/bin/echo
-e
"Content-Type: Content-Type:text/plain\r\n"
/bin/echo
-e
"\r\n"
/bin/echo
-e
"MySQL replication is *down*.\r\n"
/bin/echo
-e
"\r\n"
else
#mysql is fine,return http 200
/bin/echo
-e
"HTTP/1.1 200 OK\r\n"
/bin/echo
-e
"Content-Type: Content-Type:text/plain\r\n"
/bin/echo
-e
"\r\n"
/bin/echo
-e
"MySQL replication is running.\r\n"
/bin/echo
-e
"\r\n"
fi
|
在主机2上
Vi /opt/mysqlchk_status.sh
|
1
2
3
4
5
6
7
8
9
10
11
12
13
14
15
16
17
18
19
20
21
22
|
#!/bin/bash
MYSQL_HOST=
"localhost"
MYSQL_PORT=
"3306"
MYSQL_USERNAME=
"root"
MYSQL_PASSWORD=
"root"
ERROR_MSG=`
/usr/bin/mysql
--host=$MYSQL_HOST --port=$MYSQL_PORT --user=$MYSQL_USERNAME --password=$MYSQL_PASSWORD -e
"show databases;"
2>dev
/null
`
if
[
"$ERROR_MSG"
!=
""
]
then
# mysql is fine, return http 200
/bin/echo
-e
"HTTP/1.1 200 OK\r\n"
/bin/echo
-e
"Content-Type: Content-Type:text\r\n"
/bin/echo
-e
"\r\n"
/bin/echo
-e
"MySQL is running.\r\n"
/bin/echo
-e
"\r\n"
else
#mysql is down, return http 503
/bin/echo
-e
"HTTP/1.1 503 Service Unavailable\r\n"
/bin/echo
-e
"Content-Type: Content-Type:text/plain\r\n"
/bin/echo
-e
"\r\n"
/bin/echo
-e
"MYSQL is *down*.\r\n"
/bin/echo
-e
"\r\n"
fi
|
Vi /opt/mysqlchk_replication.sh
|
1
2
3
4
5
6
7
8
9
10
11
12
13
14
15
16
17
18
19
20
21
22
23
24
25
|
#!/bin/bash
MYSQL_HOST=
"localhost"
MYSQL_PORT=
"3306"
MYSQL_USERNAME=
"root"
MYSQL_PASSWORD=
"root"
/usr/bin/mysql --host=$MYSQL_HOST --port=$MYSQL_PORT --user=$MYSQL_USERNAME --password=$MYSQL_PASSWORD -e
"show slave status;"
> /tmp/check_repl.txt
iostat=`grep
"Slave_IO_Running"
/tmp/check_repl.txt | awk
'{print $2}'
`
sqlstat=`grep
"Slave_SQL_Running"
/tmp/check_repl.txt | awk
'{print $2}'
`
#echo iostat:$iostat and sqlstat:$sqlstat
if
[
"$iostat"
=
"No"
] || [
"$sqlstat"
=
"No"
];
then
#mysql
is
down,
return
http
503
/bin/echo -e
"HTTP/1.1 503 Service Unavailable\r\n"
/bin/echo -e
"Content-Type: Content-Type:text/plain\r\n"
/bin/echo -e
"\r\n"
/bin/echo -e
"MySQL replication is *down*.\r\n"
/bin/echo -e
"\r\n"
else
#mysql
is
fine,
return
http
200
/bin/echo -e
"HTTP/1.1 200 OK\r\n"
/bin/echo -e
"Content-Type: Content-Type:text/plain\r\n"
/bin/echo -e
"\r\n"
/bin/echo -e
"MySQL replication is running.\r\n"
/bin/echo -e
"\r\n"
fi
|
在主机3-6上
Vi /etc/xinetd.d/mysqlchk
|
1
2
3
4
5
6
7
8
9
10
11
12
13
14
15
16
|
#
# /etc/xinetd.d/mysqlchk
#
#
service mysqlchk_replication
{
flags = REUSE
socket_type = stream
port = 9201
wait = no
user = nobody
server =
/opt/mysqlchk_replication
.sh
log_on_failure += USERID
disable = no
only_from = 192.168.254.0
/24
}
|
Vi /opt/mysqlchk_replication.sh
|
1
2
3
4
5
6
7
8
9
10
11
12
13
14
15
16
17
18
19
20
21
22
23
24
25
|
#!/bin/bash
MYSQL_HOST=
"localhost"
MYSQL_PORT=
"3306"
MYSQL_USERNAME=
"root"
MYSQL_PASSWORD=
"root"
/usr/bin/mysql
--host=$MYSQL_HOST --port=$MYSQL_PORT --user=$MYSQL_USERNAME --password=$MYSQL_PASSWORD -e
"show slave status\G"
>
/tmp/check_repl
.txt
iostat=`
grep
"Slave_IO_Running"
/tmp/check_repl
.txt |
awk
'{print $2}'
`
sqlstat=`
grep
"Slave_SQL_Running"
/tmp/check_repl
.txt |
awk
'{print $2}'
`
# echo iostat:$iostat and sqlstat:$sqlstat
if
[
"$iostat"
=
"No"
] || [
"$sqlstat"
=
"No"
]
then
#mysql is down,return http 503
/bin/echo
-e
"HTTP/1.1 503 Service Unavailable\r\n"
/bin/echo
-e
"Content-Type: Content-Type:text/plain\r\n"
/bin/echo
-e
"\r\n"
/bin/echo
-e
"MySQL replication is *down*.\r\n"
/bin/echo
-e
"\r\n"
else
#mysql is fine,return http 200
/bin/echo
-e
"HTTP/1.1 200 OK\r\n"
/bin/echo
-e
"Content-Type: Content-Type:text/plain\r\n"
/bin/echo
-e
"\r\n"
/bin/echo
-e
"MySQL replication is running.\r\n"
/bin/echo
-e
"\r\n"
fi
|
在主机1-6上
Chmod +x /opt/mysql*.sh
重启系统或者重启xinetd
reboot
|| /etc/init.d/xinetd restart
查看监听端口
在主机1-2上

如上图9201和9200开始监听
在主机3-6上

如上图9201开始监听
7 haproxy 安装配置
下载haproxy*.tar.gz,这里我下载的是最新版本1.4.24
Tar zxvf haproxy-1.4.24.tar.gz
Cd haproxy-1.4.24
Make TARGET=linux2628
Make install
配置haproxy配置文件
## 在源码包里example目录下有个,可以参考!这里配置如下
Vi /etc/haproxy.cfg
|
1
2
3
4
5
6
7
8
9
10
11
12
13
14
15
16
17
18
19
20
21
22
23
24
25
26
27
28
29
30
31
32
33
34
35
36
37
38
39
40
41
42
43
44
45
46
47
48
49
50
51
52
53
54
55
56
57
58
59
60
61
62
63
64
65
66
67
68
69
70
71
72
73
74
75
76
77
78
79
80
81
82
83
84
85
86
87
88
89
90
91
92
93
94
95
96
97
98
99
100
101
102
103
104
105
106
107
108
109
110
111
112
113
114
115
116
117
118
119
120
121
122
123
124
125
126
127
128
129
130
131
132
133
134
135
136
137
138
139
140
141
142
143
144
145
146
147
148
149
150
151
152
153
154
155
156
157
158
159
160
161
162
163
164
165
166
167
168
169
170
|
global
maxconn 40000
debug
#quiet
user haproxy
group haproxy
nbproc 1
log 127.0.0.1 local3
spread-checks 2
defaults
timeout server 3s
timeout connect 3s
timeout client 60s
timeout http-request 3s
timeout queue 3s
frontend db_write
bind 192.168.254.110:3306
default_backend cluster_db_write
frontend db_read
bind 192.168.254.120:3306
default_backend cluster_db_read
frontend web_haproxy_status
bind *:80
default_backend web_status
frontend monitor_mysql111
bind 127.0.0.1:9301
mode http
acl no_repl_mysql111 nbsrv(mysql111_replication)
eq
0
acl no_repl_mysql112 nbsrv(mysql112_replication)
eq
0
acl no_mysql111 nbsrv(mysql111_status)
eq
0
acl no_mysql112 nbsrv(mysql112_status)
eq
0
monitor-uri
/dbs
monitor fail unless no_repl_mysql111 no_repl_mysql112 no_mysql112
monitor fail
if
no_mysql111 no_mysql112
frontend monitor_mysql112
bind 127.0.0.1:9302
mode http
acl no_repl_mysql111 nbsrv(mysql111_replication)
eq
0
acl no_repl_mysql112 nbsrv(mysql112_replication)
eq
0
acl no_mysql111 nbsrv(mysql111_status)
eq
0
acl no_mysql112 nbsrv(mysql112_status)
eq
0
monitor-uri
/dbs
monitor fail unless no_repl_mysql111 no_repl_mysql112 no_mysql111
monitor fail
if
no_mysql111 no_mysql112
frontend monitor_mysql121
bind 127.0.0.1:9303
mode http
acl no_repl_mysql121 nbsrv(mysql121_replication)
eq
0
acl no_repl_mysql111 nbsrv(mysql111_replication)
eq
0
acl no_mysql112 nbsrv(mysql112_status)
eq
1
monitor-uri
/dbs
monitor fail
if
no_repl_mysql121
monitor fail
if
no_repl_mysql111 no_mysql112
frontend monitor_mysql122
bind 127.0.0.1:9304
mode http
acl no_repl_mysql122 nbsrv(mysql122_replication)
eq
0
acl no_repl_mysql111 nbsrv(mysql111_replication)
eq
0
acl no_mysql112 nbsrv(mysql112_status)
eq
1
monitor-uri
/dbs
monitor fail
if
no_repl_mysql122
monitor fail
if
no_repl_mysql111 no_mysql112
frontend monitor_mysql123
bind 127.0.0.1:9305
mode http
acl no_repl_mysql123 nbsrv(mysql123_replication)
eq
0
acl no_repl_mysql112 nbsrv(mysql112_replication)
eq
0
acl no_mysql111 nbsrv(mysql111_status)
eq
1
monitor-uri
/dbs
monitor fail
if
no_repl_mysql123
monitor fail
if
no_repl_mysql112 no_mysql111
frontend monitor_mysql124
bind 127.0.0.1:9306
mode http
acl no_repl_mysql124 nbsrv(mysql124_replication)
eq
0
acl no_repl_mysql112 nbsrv(mysql112_replication)
eq
0
acl no_mysql111 nbsrv(mysql111_status)
eq
1
monitor-uri
/dbs
monitor fail
if
no_repl_mysql124
monitor fail
if
no_repl_mysql112 no_mysql111
frontend monitor_splitbrain
bind 127.0.0.1:9300
mode http
acl no_repl01 nbsrv(mysql111_replication)
eq
0
acl no_repl02 nbsrv(mysql112_replication)
eq
0
acl mysql111 nbsrv(mysql111_status)
eq
1
acl mysql112 nbsrv(mysql112_status)
eq
1
monitor-uri
/dbs
monitor fail unless no_repl01 no_repl02 mysql111 mysql112
backend mysql111_replication
mode tcp
balance roundrobin
option tcpka
option httpchk
server mysql111 192.168.254.111:3306 check port 9201 inter 1s rise 1 fall 1
backend mysql112_replication
mode tcp
balance roundrobin
option tcpka
option httpchk
server mysql112 192.168.254.112:3306 check port 9201 inter 1s rise 1 fall 1
backend mysql121_replication
mode tcp
balance roundrobin
option tcpka
option httpchk
server mysql121 192.168.254.121:3306 check port 9201 inter 1s rise 1 fall 1
backend mysql122_replication
mode tcp
balance roundrobin
option tcpka
option httpchk
server mysql122 192.168.254.122:3306 check port 9201 inter 1s rise 1 fall 1
backend mysql123_replication
mode tcp
balance roundrobin
option tcpka
option httpchk
server mysql123 192.168.254.123:3306 check port 9201 inter 1s rise 1 fall 1
backend mysql124_replication
mode tcp
balance roundrobin
option tcpka
option httpchk
server mysql124 192.168.254.124:3306 check port 9201 inter 1s rise 1 fall 1
backend mysql111_status
mode tcp
balance roundrobin
option tcpka
option httpchk
server mysql111 192.168.254.111:3306 check port 9200 inter 1s rise 2 fall 2
backend mysql112_status
mode tcp
balance roundrobin
option tcpka
option httpchk
server mysql112 192.168.254.112:3306 check port 9200 inter 1s rise 2 fall 2
backend cluster_db_write
mode tcp
option tcpka
balance roundrobin
option httpchk GET
/dbs
server mysql111 192.168.254.111:3306 weight 1 check port 9201 inter 1s rise 5 fall 1
server mysql112 192.168.254.112:3306 weight 1 check port 9201 inter 1s rise 5 fall 1 backup
server mysql111_backup 192.168.254.111:3306 weight 1 check port 9301 inter 1s rise 2 fall 2 addr 127.0.0.1 backup
server mysql112_backup 192.168.254.112:3306 weight 1 check port 9302 inter 1s rise 2 fall 2 addr 127.0.0.1 backup
backend cluster_db_read
mode tcp
option tcpka
balance roundrobin
option httpchk GET
/dbs
server mysql111 192.168.254.111:3306 weight 1 track cluster_db_write
/mysql111
server mysql112 192.168.254.112:3306 weight 1 track cluster_db_write
/mysql112
server mysql111_backup 192.168.254.111:3306 weight 1 track cluster_db_write
/mysql111_backup
server mysql112_backup 192.168.254.112:3306 weight 1 track cluster_db_write
/mysql112_backup
server mysql111_splitbrain 192.168.254.111:3306 weight 1 check port 9300 inter 1s rise 1 fall 2 addr 127.0.0.1
server mysql112_splitbrain 192.168.254.112:3306 weight 1 check port 9300 inter 1s rise 1 fall 2 addr 127.0.0.1
server mysql121_slave 192.168.254.121:3306 weight 1 check port 9303 inter 1s rise 5 fall 1 addr 127.0.0.1
server mysql122_slave 192.168.254.122:3306 weight 1 check port 9304 inter 1s rise 5 fall 1 addr 127.0.0.1
server mysql123_slave 192.168.254.123:3306 weight 1 check port 9305 inter 1s rise 5 fall 1 addr 127.0.0.1
server mysql124_slave 192.168.254.124:3306 weight 1 check port 9306 inter 1s rise 5 fall 1 addr 127.0.0.1
backend web_status
mode http
stats
enable
#stats scope
#stats hide-version
stats refresh 5s
stats uri
/status
stats realm Haproxy
/statistics
stats auth copy:copy
|
启动haproxy
/usr/local/sbin/haproxy –f /etc/haproxy.cfg
查看状态
![]()
访问haproxy监控页面


到这里配置完成
测试,按照以下步骤看是否可以达到要求
1.停止主机2,的同步
2.停止主机1,2的同步
3.停止主机1的同步
4.断开主机1网络或者关闭它
5.断开主机2网络或者关闭它
6.同时端口主机1,2网络或者关闭它们


 被折叠的 条评论
为什么被折叠?
被折叠的 条评论
为什么被折叠?
 到【灌水乐园】发言


