


 本文详细解析了ASP.NET控件开发中的DataSource属性与Repeater控件的使用,包括两者之间的对比、目标确定、实现方法以及关键代码分析。通过对比TemplatedList与内置控件,明确Repeater控件的特性和使用场景,最终实现对复杂数据源的支持,提供了一种模仿Repeater制作自定义控件的完整流程。
本篇继续上篇的讨论,可能大家已经在使用asp.net2.0了,DataSource属性不再使用,而是跟数据源控件搭配使用.现在讨论的绑定技术都是基于1.1版本,先熟悉一下,本质上是一样的,这样一步步的学习.对以后绝对有帮助.因为当你使用数据源控件,只需要设置一个DataSourceID,方便的同时你是否知道数据源控件帮你做了什么事情,如果你想觉的够用了,可以不用了解,但我相信你一定会有需求。上篇最后说过了,讨论还刚刚开始,我们大致把核心的方法都写出来了.下面我们继续。
一.控件对比
我们可以使用上篇制作的TemplatedList控件跟内置控件做一下对比异同。在2.0未到来的时候,我们只有Repeater,DataList,DataGrid,现在我们也根据这三个控件进行讨论,下面把TemplatedList与DataList进行对比
(1)布局样式没DataList多...
(2)模板没DataList多...
(3)TemplatedList没ItemCollection
(4)TemplatedList没有预定义Command事件(如EditCommand,UpdateCommand等)
或者还有更多的,上面的都是次要的,布局上面我们可以改善,我们也可以添加ItemCollection,也可以预定义Command事件,但发现TemplatedList跟内置的绑定控件有几个跟数据操作严重的不同点
(1)DataSource属性类型不同 IEnumerable和Object
为什么要将其类型设置为Object呢?
IEnumerable支持Array,ArrayList等返回类型,但却不支持DataSet类型,这是一个很严重的问题,设置其类型为Object,可以让控件支持更广泛的数据源(当然也要根据需求)这个是本次讨论的重点
(2)DataMember
其用于指定数据源的特定表,由于DataSet的介入,其可能含有多个表,所以也就有了这个属性,否则的话就不需要他
(3)DataKeyField键字段
由于预定义Command事件的介入,实现对数据的操作,DataKeyField用于帮助数据特定记录的操作
二.确定目标
根据上面的对比,我们已经知道接下来要做什么了,要让控件DataSouce属性支持更多的数据源(只要还是DataSet)
本次的demo我们将要模仿Repeater来制作,为什么不用TemplatedList?因为这样我们可以对更多控件的实现更加的熟悉,这样在使用内置控件的时候,你将明白的更透彻.此处的demo来自Building ASP.NET Server Controls书中的例子
Repeater与TemplatedList的异同
不同点
大家都知道Repeater可以灵活的进行布局,所以去掉了模板样式属性,我们为其添加了多个模板属性,Repeater控件没有预定义Command事件,所以不需要DataKeyField属性.还为Repeater定义了TemplatedListmy没有的ItemCollection集合,当然也可以为TemplatedList添加这个集合最大的不同。Repeater支持DataSet,TemplatedList不支持。
相同点
都是数据绑定控件,所以里面很多的实现方法几乎相同,如果你看过TemplatedList的实现,再看Repeater的代码,基本没有难度,Repeater的实现比TemplatedList还要简单。
好了,下面我们开始吧.
三.实现
1.为数据控件做好准备
几乎跟上篇一样,所以不再介绍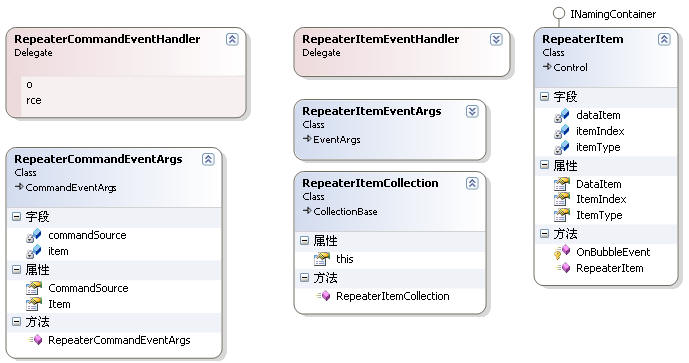
2.编写Repeater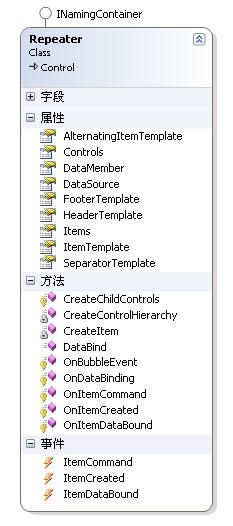
(1)定义成员属性和事件

/// <summary>
/// 绑定的列表的数据源
/// </summary>
[Category( " Data " ), Description( " 绑定的列表的数据源 " ),
DesignerSerializationVisibility(DesignerSerializationVisibility.Hidden),
DefaultValue( null ), Bindable( true )]
public object DataSource
{
get
{
return dataSource;
}
set
{
if ((value is IEnumerable) || (value is IListSource) || (value == null ))
dataSource = value;
else
throw new Exception( " 错误的数据源类型 " );
}
}
/// <summary>
/// 当数据绑定到列表数据源时要提取的数据成员
/// </summary>
[Category( " Data " ), Description( " 当数据绑定到列表数据源时要提取的数据成员 " )]
public virtual string DataMember
{
get
{
object member = ViewState[ " DataMember " ];
if (member == null )
return string .Empty;
else
return ( string )member;
}
set
{
ViewState[ " DataMember " ] = value;
}
}
(2)关键实现
1.因为Repeater模板不具有样式属性,所以去掉了PrepareControlHierarchy方法。
2.由于不涉及到复杂的样式属性,所以不必重载视图状态管理的三个方法。
这两点就可以让控件减少很多代码的编写
3.CreateControlHierarchy方法和CreateItem方法
Repeater模板的实现方法和TemplatedList稍有不同,但变化不大,应该容易理解.看下面代码
/// 创建控件各种项
/// </summary>
/// <param name="itemIndex"></param>
/// <param name="itemType"></param>
/// <param name="dataBind"></param>
/// <param name="dataItem"></param>
/// <returns></returns>
private RepeaterItem CreateItem( int itemIndex, ListItemType itemType, bool dataBind, object dataItem)
{
ITemplate selectedTemplate;
// 根据不同类型创建不同项
switch (itemType)
{
case ListItemType.Header:
selectedTemplate = headerTemplate;
break ;
case ListItemType.Item:
selectedTemplate = itemTemplate;
break ;
case ListItemType.AlternatingItem:
selectedTemplate = alternatingItemTemplate;
break ;
case ListItemType.Separator:
selectedTemplate = separatorTemplate;
break ;
case ListItemType.Footer:
selectedTemplate = footerTemplate;
break ;
default :
selectedTemplate = null ;
break ;
}
if ((itemType == ListItemType.AlternatingItem) &&
(alternatingItemTemplate == null ))
{
selectedTemplate = itemTemplate;
itemType = ListItemType.Item;
}
RepeaterItem item = new RepeaterItem(itemIndex, itemType, dataItem);
if (selectedTemplate != null )
{
selectedTemplate.InstantiateIn(item);
}
OnItemCreated( new RepeaterItemEventArgs(item));
Controls.Add(item);
if (dataBind)
{
item.DataBind();
OnItemDataBound( new RepeaterItemEventArgs(item));
}
return item;
}
private ArrayList items = null ;
private void CreateControlHierarchy( bool useDataSource)
{
items = new ArrayList();
IEnumerable ds = null ;
if (HeaderTemplate != null )
{
RepeaterItem header = CreateItem( - 1 , ListItemType.Header, false , null );
}
int count = - 1 ;
if (useDataSource)
{
// 解析DataSource
ds = (IEnumerable)DataSourceHelper.ResolveDataSource(DataSource,
DataMember);
}
else
{
count = ( int )ViewState[ " ItemCount " ];
if (count != - 1 )
{
ds = new DummyDataSource(count);
}
}
if (ds != null )
{
int index = 0 ;
count = 0 ;
RepeaterItem item;
ListItemType itemType = ListItemType.Item;
foreach ( object dataItem in (IEnumerable)ds)
{
if (index != 0 )
{
RepeaterItem separator = CreateItem( - 1 , ListItemType.Separator, false , null );
}
item = CreateItem(index, itemType, useDataSource, dataItem);
items.Add(item);
index ++ ;
count ++ ;
if (itemType == ListItemType.Item)
itemType = ListItemType.AlternatingItem;
else
itemType = ListItemType.Item;
}
}
if (FooterTemplate != null )
{
RepeaterItem footer = CreateItem( - 1 , ListItemType.Footer, false , null );
}
if (useDataSource)
{
ViewState[ " ItemCount " ] = ((ds != null ) ? count : - 1 );
}
}
 if
(useDataSource)
if
(useDataSource)

 {
{ //解析DataSource ds = (IEnumerable)DataSourceHelper.ResolveDataSource(DataSource, DataMember);
 }
}
/// 一个解析DataSource的辅助类
/// </summary>
public class DataSourceHelper
{
public static object ResolveDataSource( object dataSource, string dataMember)
{
如果数据源为空,则返回空值
如果数据源不为空,且为IEnumerable类型,则返回IEnumerable
如果数据源不为空,且为IListSource类型,则返回IListSource
return null ;
}
}
这个辅助类判断太多,刚看会看晕掉的,所以在if判断这里把代码折叠起来,有助于理解。这里有几个类可能没见过,我们把关键用到的类一一列出来,希望大家查查MSDN
1.IListSource 向对象提供返回可以绑定到数据源列表的功能
2.ITypedList 提供发现可绑定列表架构的功能,其中可用于绑定的属性不同于要绑定到的对象的公共属性
3.PropertyDescriptor 提供类上的属性的抽象化
4.PropertyDescriptorCollection 表示 PropertyDescriptor 对象的集合
下面开始
(1).首先如果传入的数据源类型是IEnumerable的话,很好,可以直接返回
if
(dataSource
is
IEnumerable)
{ return (IEnumerable)dataSource; }
虽然传入的类型非IEnumerable,如DataSet类实现了IListSource接口,其目的就是使用此接口的GetList方法返回一个IList(IList继承IEnumerable,可以进行数据绑定),大家可以参考MSDN的原话
IList list
=
null
; IListSource listSource
=
(IListSource)dataSource; list
=
listSource.GetList();
DataViewSettingCollection是什么呢?表示DataTable的DataViewSetting的集合
DataViewSetting是什么呢?表示从 DataViewManager 创建的 DataView 的 的默认设置
上面的我们不熟,DataView大家应该熟悉,其可以对数据进行排序,过滤等。DataViewManager为一个默认的DataView设置集合,不知这样是否可以理解的好些。我们的目的则是将其转化到IEnumerable类型,继续DataViewManager实现了ITypedList接口。我们需要将DataViewManager(即list)转化到ITypedList ,为什么?ITypedList的GetItemProperties方法将帮助你获取DataView数据绑定的数据对象,而非DataView本身属性。
ITypedList的GetItemProperties方法绑定数据的每项属性的PropertyDescriptorCollection集合,PropertyDescriptorCollection表示PropertyDescriptor集合,PropertyDescriptor这个类很好玩,等同于属性的说明书,即用了.net的反射技术,大家可以尝试一下,其实以前也用过这个类.下面来看代码片段
//
提供发现可绑定列表架构的功能,其中可用于绑定的属性不同于要绑定到的对象的公共属性
ITypedList typedList
=
(ITypedList)list;
//
返回表示用于绑定数据的每项上属性集合
PropertyDescriptor[] pd
=
new
PropertyDescriptor[
0
]; PropertyDescriptorCollection propDescCol
=
typedList.GetItemProperties(pd);
//
was (null)
//
如果属性说明符数目为0
if
(propDescCol.Count
==
0
)
throw
new
Exception(
"
ListSource without DataMembers
"
);
PropertyDescriptorCollection propDescCol
=
typedList.GetItemProperties(
null
);
//
was (null)
// 获取属性描述符
// 若不指定dataMember属性则获取默认数据成员
if ((dataMember == null ) || (dataMember.Length < 1 ))
{
propDesc = propDescCol[ 0 ];
}
else
// 尝试在属性集合中寻找数据成员
propDesc = propDescCol.Find(dataMember, true );
#endregion
if (propDesc == null )
throw new Exception( " ListSource missing DataMember " );
这样我们就得到了一个DataTablePropertyDescriptor属性描述符,继续
object
listitem
=
list[
0
];
//
获取组件属性当前值
object
member
=
propDesc.GetValue(listitem);
if
((member
==
null
)
||
!
(member
is
IEnumerable))
throw
new
Exception(
"
ListSource missing DataMember
"
);
return
(IEnumerable)member;
此处实现原理:
DataViewManager会在其DataSet中的DataTableCollection中搜索datamember的值进行匹配,看下图,做这么多事情,我们一直在转换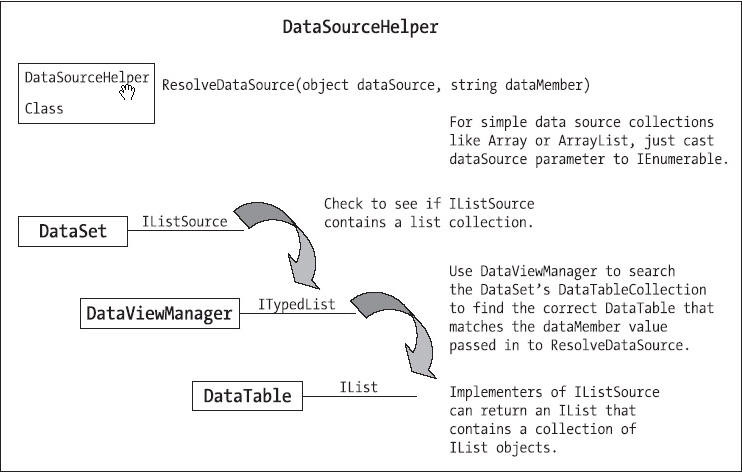
注:GetValue用法
PropertyDescriptorCollection properties
=
TypeDescriptor.GetProperties(Button1); PropertyDescriptor pd
=
properties.Find(
"
Text
"
,
false
); Button b
=
new
Button(); b.Text
=
"
cc
"
;
object
c
=
pd.GetValue(b); Response.Write(c);
//
return cc
用GetValue方法获取listitem属性值,此属性跟datamember匹配,最后member得到的是一个DataView,DataView实现了IEnumerable,现在终于可以转换了。到此为止就结束了,现在你可以成功的传入DataSet了。
下一篇:asp.net控件开发基础(19)


 2692
2692

 被折叠的 条评论
为什么被折叠?
被折叠的 条评论
为什么被折叠?
 到【灌水乐园】发言


