


 本文详细介绍了Android中的Fragment组件,包括其概念、生命周期、与Activity的交互方式等。并提供了多个示例来展示如何创建、管理和使用Fragment。

Fragment
1. Fragment概要介绍
Fragment是activity的界面中的一部分或一种行为。你可以把多个Fragment们组合到一个activity中来创建一个多面界面并且你可以在多个activity中重用一个Fragment。你可以把Fragment认为模块化的一段activity,它具有自己的生命周期,接收它自己的事件,并可以在activity运行时被添加或删除。
Fragment不能独立存在,它必须嵌入到activity中,而且Fragment的生命周期直接受所在的activity的影响。例如:当activity暂停时,它拥有的所有的Fragment们都暂停了,当activity销毁时,它拥有的所有Fragment们都被销毁。然而,当activity运行时(在onResume()之后,onPause()之前),你可以单独地操作每个Fragment,比如添加或删除它们。当你在执行上述针对Fragment的事务时,你可以将事务添加到一个棧中,这个栈被activity管理,栈中的每一条都是一个Fragment的一次事务。有了这个栈,就可以反向执行Fragment的事务,这样就可以在Fragment级支持“返回”键(向后导航)。
当向activity中添加一个Fragment时,它须置于ViewGroup控件中,并且需定义Fragment自己的界面。你可以在layout.xml文件中声明Fragment,元素为:<fragment>;也可以在代码中创建Fragment,然后把它加入到ViewGroup控件中。然而,Fragment不一定非要放在activity的界面中,它可以隐藏在后台为actvitiy工作。
本章描述如何使用fragment,包括fragment在加入activity的后退棧中时如何保持自己的状态,如何与activity以及其它fragment们共享事件,如何显示在activity的动作栏,等等。
2. 设计哲学
Android从3.0开始引入fragment,主要是为了支持更动态更灵活的界面设计,比如在平板上的应用。平板机上拥有比手机更大的屏幕空间来组合和交互界面组件们。Fragment使你在做那样的设计时,不需应付view树中复杂的变化。通过把activity的layout分成fragment,你可以在activity运行时改变它的样子,并且可以在activity的后退栈中保存这些改变。
例如:写一个读新闻的程序,可以用一个fragment显示标题列表,另一个fragment显示选中标题的内容,这两个fragment都在一个activity上,并排显示。那么这两个fragment都有自己的生命周期并响应自己感兴趣的事件。于是,不需再像手机上那样用一个activity显示标题列表,用另一个activity显示新闻内容;现在可以把两者放在一个activity上同时显示出来。如下图:
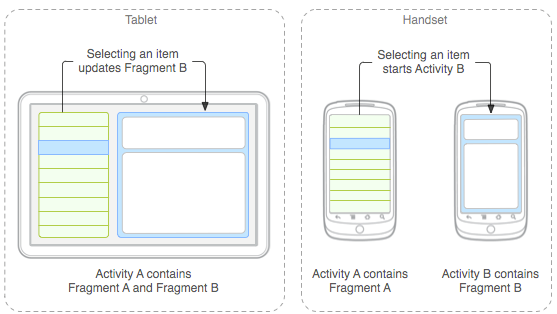
Fragment必须被写成可重用的模块。因为fragment有自己的layout,自己进行事件响应,拥有自己的生命周期和行为,所以你可以在多个activity中包含同一个Fragment的不同实例。这对于让你的界面在不同的屏幕尺寸下都能给用户完美的体验尤其重要。比如你可以在程序运行于大屏幕中时启动包含很多fragment的activity,而在运行于小屏幕时启动一个包含少量fragment的activity。
举个例子--还是刚才那个读新闻的程序-当你检测到程序运行于大屏幕时,启动activityA,你将标题列表和新闻内容这两个fragment都放在activityA中;当检测到程序运行于小屏幕时,还是启动activityA,但此时A中只有标题列表fragment,当选中一个标题时,activityA启动activityB,B中含有新闻内容fragment。
2.创建Fragment
要创建fragment,必须从Fragment或Fragment的派生类派生出一个类。Fragment的代码写起来有些像activity。它具有跟activity一样的回调方法,比如 onCreate(),onStart(),onPause()和onStop()。实际上,如果你想把老的程序改为使用fragment,基本上只需要把activity的回调方法的代码移到fragment中对应的方法即可。
通常需要实现以上生命周期函数:
onCreate()
当创建Fragment时系统调用这个方法。在你的实现中,你应该初始化哪些在Fragment暂停态、终止态、和恢复态时想要保持状态的的Fragment组件。
onCreateView()
当第一次用Fragment来描画用户界面时,系统调用这个方法。要用你的Fragment来描画一个UI界面,你必须从这个方法中返回一个View,这个View是Fragment布局的根。如果Fragment没有提供UI界面,那么它返回一个null。
onPause()
在用户要离开Fragment的第一时刻系统会调用这个方法(但这并意味着Fragment要被销毁)。通常应该在这儿提交本次用户会话之外的要持久化的改变(因为用户可能不再回来)。
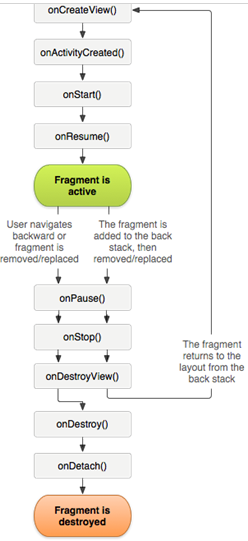
对于每个Fragment,大多数应用程序应该至少实现这三个方法,但是你也应该使用其它的回调方法来处理Fragment生命周期的各种状态。
下图为fragment的生命周期(它所在的activity处于运行状态)。
Fragment is added--->onAttach()---.onCreate()
还有几个现成的fragemtn的派生类,你可能需要从它们派生,如下所列:
DialogFragment
显示一个浮动的对话框。使用这个类创建对话框是替代activity创建对话框的最佳选择.因为你可以把fragmentdialog放入到activity的返回栈中,使用户能再返回到这个对话框。
ListFragment
显示一个列表控件,就像ListActivity类,它提供了很多管理列表的方法,比如onListItemClick()方法响应click事件。
PreferenceFragment
显示一个由Preference对象组成的列表,与PreferenceActivity相同。它用于为程序创建“设置”activity。
2.1为fragment添加用户界面
通常,Fragment是作为Activity用户界面的一部分来使用的,并且它会给Activity提供自己的布局。
要给Fragment提供一个布局,你必须实现onCreateView()回调方法,系统在给Fragment描画布局的时候会调用这个方法。这个方法的实现必须返回一个View,它是Fragment布局的根。
注:如果你的的Fragment是ListFragment的子类,默认的实现是从onCreateView()方法中返回一个ListView(),因此你不需要实现它。
为了从onCreateView()方法中返回一个布局,你能够通过XML文件中的一个布局资源的定义来填充它。为了帮助你做这件事,onCreateView()方法提供了一个LayoutInflater对象。
例如,Fragment的一个子类通过example_fragment.xml文件加载一个布局:
public static class ExampleFragment extends Fragment {
    @Override
    public View onCreateView(LayoutInflater inflater, ViewGroup container,
                             Bundle savedInstanceState) {
        // Inflate the layout for this fragment
        return inflater.inflate(R.layout.example_fragment, container, false);
    }
}
onCreateView()参数中的container是存放fragment的layout的ViewGroup对象。savedInstanceState参数是一个Bundle,跟activity的onCreate()中Bundle差不多,用于状态恢复。但是fragment的onCreate()中也有Bundle参数,所以此处的Bundle中存放的数据与onCreate()中存放的数据还是不同的。
Inflate()方法有三个参数:
1.layout的资源ID。
2.存放fragment的layout的ViewGroup。
3.布尔型数据表示是否在创建fragment的layout期间,把layout附加到container上(在这个例子中,因为系统已经把layout插入到container中了,所以值为false,如果为true会导至在最终的layout中创建多余的ViewGroup)。
现在你看到如何为fragment创建layout了,下面讲述如何把它添加到activity中。
2.2把fragment添加到activity
一般情况下,fragment把它的layout作为activitiy的loyout的一部分合并到activity中,有两种方法将一个fragment添加到activity中:
1.在activity的layout.xml文件中声明fragment
如下代码,一个activity中包含两个fragment:
<?xml version="1.0" encoding="utf-8"?>
<LinearLayout xmlns:android="http://schemas.android.com/apk/res/android"
    android:orientation="horizontal"
    android:layout_width="match_parent"
    android:layout_height="match_parent">
    <fragment android:name="com.example.news.ArticleListFragment"
            android:id="@+id/list"
            android:layout_weight="1"
            android:layout_width="0dp"
            android:layout_height="match_parent" />
    <fragment android:name="com.example.news.ArticleReaderFragment"
            android:id="@+id/viewer"
            android:layout_weight="2"
            android:layout_width="0dp"
            android:layout_height="match_parent" />
</LinearLayout>
在<fragment>元素中的android:name属性指定了在布局中要实例化的Fragment。
当系统创建这个Activity布局时,它实例化在布局中指定的每一个Fragment,并且分别调用onCreateView(),来获取每个Fragment的布局。然后系统会在Activity布局中插入通过<fragment>元素中声明直接返回的视图。
注:每个Fragment需要一个唯一的标识,这样能够在Activity被重启时系统使用这个ID来恢复Fragment(并且你能够使用这个ID获取执行事务的Fragment,如删除)。有三种给Fragment提供ID的方法:
. 使用android:id属性来设置唯一ID;
. 使用android:tag属性来设置唯一的字符串;
. 如果没有设置前面两个属性,系统会使用容器视图的ID。
静态添加Fragment到Activity示例:
title_fragment_layout.java
<?xml version="1.0" encoding="utf-8"?>
<RelativeLayout xmlns:android="http://schemas.android.com/apk/res/android"
    android:layout_width="match_parent"
    android:layout_height="45dp"
    android:background="#00aa00">

    <ImageButton
        android:id="@+id/id_title_left_btn"
        android:layout_width="wrap_content"
        android:layout_height="wrap_content"
        android:layout_centerVertical="true"
        android:layout_marginLeft="3dp"
        android:background="@mipmap/ic_launcher" />

    <TextView
        android:layout_width="match_parent"
        android:layout_height="match_parent"
        android:gravity="center"
        android:text="使用TitleFragment做标题栏"
        android:textColor="#fff"
        android:textSize="20sp"
        android:textStyle="bold" />

</RelativeLayout>
TitleFragment.java
public class TitleFragment extends Fragment
{
    private ImageButton mLeftMenu;
    @Override
    public View onCreateView(LayoutInflater inflater, ViewGroup container,
                             Bundle savedInstanceState)
    {
        View view = inflater.inflate(R.layout.title_fragment_layout, container, false);
        mLeftMenu = (ImageButton) view.findViewById(R.id.id_title_left_btn);
        mLeftMenu.setOnClickListener(new View.OnClickListener()
        {
            @Override
            public void onClick(View v)
            {
                Toast.makeText(getActivity(),
                        "i am an ImageButton in TitleFragment ! ",
                        Toast.LENGTH_SHORT).show();
            }
        });
        return view;
    }
}
content_fragment_layout.java
<?xml version="1.0" encoding="utf-8"?>
<LinearLayout xmlns:android="http://schemas.android.com/apk/res/android"
    android:layout_width="match_parent"
    android:layout_height="match_parent"
    android:orientation="vertical" >

    <TextView
        android:layout_width="match_parent"
        android:layout_height="match_parent"
        android:gravity="center"
        android:text="使用ContentFragment做主面板"
        android:textSize="20sp"
        android:textStyle="bold" />

</LinearLayout>
ContentFragment.java
public class ContentFragment extends Fragment {
    @Override
    public View onCreateView(LayoutInflater inflater, ViewGroup container,
                             Bundle savedInstanceState) {
        return inflater.inflate(R.layout.content_fragment_layout, container, false);
    }
}
activity_main.xml
<RelativeLayout xmlns:android="http://schemas.android.com/apk/res/android"
    android:layout_width="match_parent"
    android:layout_height="match_parent" >

    <fragment
        android:id="@+id/id_fragment_title"
        android:name="com.smart.myapplication.TitleFragment"
        android:layout_width="match_parent"
        android:layout_height="45dp" />

    <fragment
        android:layout_below="@id/id_fragment_title"
        android:id="@+id/id_fragment_content"
        android:name="com.smart.myapplication.ContentFragment"
        android:layout_width="match_parent"
        android:layout_height="match_parent" />

</RelativeLayout>
MainActivity.java
public class MainActivity extends AppCompatActivity {
    @Override
    protected void onCreate(Bundle savedInstanceState) {
        super.onCreate(savedInstanceState);
        requestWindowFeature(Window.FEATURE_NO_TITLE);
        setContentView(R.layout.activity_main);
    }
}
2.编程给一个既存的ViewGroup添加Fragment
在Activity运行的任何时候,都可以把Fragment添加到Activity布局中。你只需要指定一个放置Fragment的ViewGroup。要在Activity中使用Fragment事务(如添加、删除、或替换Fragment),必须使用来自FragmentTransaction的APIs。你能够向下面例子那样从Activity中获取一个FragmentTransaction实例:
FragmentManager fragmentManager = getFragmentManager()
FragmentTransaction fragmentTransaction = fragmentManager.beginTransaction();
然后,你能够使用add()方法把Fragment添加到指定的视图中,如:
ExampleFragment fragment = new ExampleFragment();
fragmentTransaction.add(R.id.fragment_container, fragment);
fragmentTransaction.commit();
传递给add()方法的第一个参数是Fragment应该被放入的ViewGroup,通过资源ID来指定这个ViewGroup,第二个参数是要添加的Fragment。
一旦FragmentTransaction对象发生了改变,就必须调用commit方法来提交改变的影响。
动态添加Fragment到Activity示例:
friend_fragment_layout.java
<?xml version="1.0" encoding="utf-8"?>
<LinearLayout xmlns:android="http://schemas.android.com/apk/res/android"
    android:layout_width="match_parent"
    android:layout_height="match_parent"
    android:orientation="vertical" >
    <TextView
        android:layout_width="match_parent"
        android:layout_height="match_parent"
        android:gravity="center"
        android:text="使用FriendFragment做主面板"
        android:textSize="20sp"
        android:textStyle="bold" />
</LinearLayout>
FriendFragment.java
public class FriendFragment extends Fragment {

    @Override
    public View onCreateView(LayoutInflater inflater, ViewGroup container,
                             Bundle savedInstanceState) {
        return inflater.inflate(R.layout.friend_fragment_layout, container, false);
    }
}
activity_main.xml
<RelativeLayout
    xmlns:android="http://schemas.android.com/apk/res/android"
    android:layout_width="match_parent"
    android:layout_height="match_parent" >

    <fragment
        android:id="@+id/id_fragment_title"
        android:name="com.smart.myapplication.TitleFragment"
        android:layout_width="match_parent"
        android:layout_height="45dp" />
    <Button
        android:layout_width="match_parent"
        android:layout_height="wrap_content"
        android:layout_below="@id/id_fragment_title"
        android:onClick="replaceFragment"
        android:text="切换"/>
    <FrameLayout
        android:id="@+id/id_content"
        android:layout_width="match_parent"
        android:layout_height="match_parent"
        android:layout_below="@id/id_fragment_title" />
</RelativeLayout>
MainActivity.java
public class MainActivity extends AppCompatActivity {

    private Fragment contentFragment;
    private Fragment friendFragment;

    @Override
    protected void onCreate(Bundle savedInstanceState) {
        super.onCreate(savedInstanceState);
        requestWindowFeature(Window.FEATURE_NO_TITLE);
        setContentView(R.layout.activity_main);

        FragmentManager fm = getFragmentManager();
        FragmentTransaction transaction = fm.beginTransaction();//开启一个事务
        contentFragment = new ContentFragment();
        transaction.add(R.id.id_content, contentFragment);//往Activity中添加一个Fragment
        transaction.commit();
    }

    public void replaceFragment(View v){
        FragmentManager fm = getFragmentManager();
        FragmentTransaction transaction = fm.beginTransaction();
        friendFragment = (FriendFragment)fm.findFragmentById(R.id.id_content);
        if(null == friendFragment){
            friendFragment = new FriendFragment();
        }
        //使用另一个Fragment替换当前的,实际上就是remove()然后add()的合体
        transaction.replace(R.id.id_content, friendFragment);
        transaction.commit();
    }
}
1、为什么需要判null呢?
主要是因为,当Activity因为配置发生改变(屏幕旋转)或者内存不足被系统杀死,造成重新创建时,我们的fragment会被保存下来,但是会创建新的FragmentManager,新的FragmentManager会首先会去获取保存下来的fragment队列,重建fragment队列,从而恢复之前的状态。
2、add(R.id.id_fragment_container,mContentFragment)中的布局的id有何作用?
一方面呢,是告知FragmentManager,此fragment的位置;另一方面是此fragment的唯一标识;就像我们上面通过fm.findFragmentById(R.id.id_fragment_container)查找
transaction.add()
往Activity中添加一个Fragment
transaction.remove()
从Activity中移除一个Fragment,如果被移除的Fragment没有添加到回退栈,这个Fragment实例将会被销毁。
transaction.replace()
使用另一个Fragment替换当前的,实际上就是remove()然后add()的合体
transaction.hide()
隐藏当前的Fragment,仅仅是设为不可见,并不会销毁
transaction.show()
显示之前隐藏的Fragment
detach()
会将view从UI中移除,和remove()不同,此时fragment的状态依然由FragmentManager维护。
attach()
重建view视图,附加到UI上并显示。
注意:常用Fragment可能会经常遇到这样Activity状态不一致:State loss这样的错误。主要是因为:commit方法一定要在Activity.onSaveInstance()之前调用。
上述,基本是操作Fragment的所有的方式了,在一个事务开启到提交可以进行多个的添加、移除、替换等操作。
值得注意的是:如果你喜欢使用Fragment,一定要清楚这些方法,哪个会销毁视图,哪个会销毁实例,哪个仅仅只是隐藏,这样才能更好的使用它们。
a、比如:我在FragmentA中的EditText填了一些数据,当切换到FragmentB时,如果希望会到A还能看到数据,则适合你的就是hide和show;也就是说,希望保留用户操作的面板,你可以使用hide和show,当然了不要使劲在那new实例,进行下非null判断。
b、再比如:我不希望保留用户操作,你可以使用remove(),然后add();或者使用replace()这个和remove,add是相同的效果。
c、remove和detach有一点细微的区别,在不考虑回退栈的情况下,remove会销毁整个Fragment实例,而detach则只是销毁其视图结构,实例并不会被销毁。那么二者怎么取舍使用呢?如果你的当前Activity一直存在,那么在不希望保留用户操作的时候,你可以优先使用detach。
2.3添加一个没有UI的Fragment
上面的例子显示了怎样把Fragment作为UI的一部分添加到Activity上,但是,你也能够使用Fragment只提供一个后台行为,而没有额外的UI展现。
要添加一个没有UI的Fragment,需要在Activity中使用add(Fragment,String)(给Fragment提供一个唯一的字符串“tag”,而不是视图ID)方法来添加Fragment。但是,因为这样添加的Fragment没有跟Activity布局中的视图关联,它不接受对onCreateView()方法的调用,因此你不需要实现这个方法。
不能说提供了字符串“tag”的Fragment就是非UIFragment,因为你也可以给有UI的Fragment提供字符串“tag”,但是如果Fragment没有UI,那么只能使用字符串的方法来标识它。如果你想要从Activity获取这个Fragment,需要使用findFragmentByTag()方法。
FragmentRetainInstance.java演示了一个没有UI的使用Fragment作为后台工作器的Activity。
public class FragmentRetainInstance extends Activity {
    @Override
    protected void onCreate(Bundle savedInstanceState) {
        super.onCreate(savedInstanceState);

        // First time init, create the UI.
        if (savedInstanceState == null) {
           getFragmentManager().beginTransaction().add(android.R.id.content,
                    newUiFragment()).commit();
        }
    }

    /**
     * This is a fragment showing UI that will be updated fromwork done
     * in the retained fragment.
     */
    public static class UiFragment extends Fragment {
        RetainedFragment mWorkFragment;

        @Override
        public View onCreateView(LayoutInflater inflater,ViewGroup container,
                BundlesavedInstanceState) {
            View v =inflater.inflate(R.layout.fragment_retain_instance, container, false);

            // Watch for button clicks.
            Button button =(Button)v.findViewById(R.id.restart);
            button.setOnClickListener(newOnClickListener() {
                public voidonClick(View v) {
                   mWorkFragment.restart();
                }
            });

            return v;
        }

        @Override
        public void onActivityCreated(BundlesavedInstanceState) {
           super.onActivityCreated(savedInstanceState);

            FragmentManager fm =getFragmentManager();

            // Check to see if we have retainedthe worker fragment.
            mWorkFragment =(RetainedFragment)fm.findFragmentByTag("work");

            // If not retained (or first timerunning), we need to create it.
            if (mWorkFragment == null) {
                mWorkFragment = newRetainedFragment();
                // Tell it who it isworking with.
               mWorkFragment.setTargetFragment(this, 0);
               fm.beginTransaction().add(mWorkFragment, "work").commit();
            }
        }

    }

    /**
     * This is the Fragment implementation that will be retainedacross
     * activity instances.  It represents some ongoingwork, here a thread
     * we have that sits around incrementing a progressindicator.
     */
    public static class RetainedFragment extends Fragment {
        ProgressBar mProgressBar;
        int mPosition;
        boolean mReady = false;
        boolean mQuiting = false;

        /**
         * This is the thread that will do our work. It sits in a loop running
         * the progress up until it has reached thetop, then stops and waits.
         */
        final Thread mThread = new Thread() {
            @Override
            public void run() {
                // We‘ll figure thereal value out later.
                int max = 10000;

                // This thread runsalmost forever.
                while (true) {

                    // Updateour shared state with the UI.
                   synchronized (this) {
                       // Our thread is stopped if the UI is not ready
                       // or it has completed its work.
                       while (!mReady || mPosition >= max) {
                           if (mQuiting) {
                               return;
                           }
                           try {
                               wait();
                           } catch (InterruptedException e) {
                           }
                       }

                       // Now update the progress.  Note it is important that
                       // we touch the progress bar with the lock held, so it
                       // doesn‘t disappear on us.
                       mPosition++;
                       max = mProgressBar.getMax();
                       mProgressBar.setProgress(mPosition);
                    }

                    //Normally we would be doing some work, but put a kludge
                    // hereto pretend like we are.
                   synchronized (this) {
                       try {
                           wait(50);
                       } catch (InterruptedException e) {
                       }
                    }
                }
            }
        };

        /**
         * Fragment initialization.  We way wewant to be retained and
         * start our thread.
         */
        @Override
        public void onCreate(Bundle savedInstanceState) {
            super.onCreate(savedInstanceState);

            // Tell the framework to try to keepthis fragment around
            // during a configuration change.
            setRetainInstance(true);

            // Start up the worker thread.
            mThread.start();
        }

        /**
         * This is called when the Fragment‘s Activityis ready to go, after
         * its content view has been installed; it iscalled both after
         * the initial fragment creation and after thefragment is re-attached
         * to a new activity.
         */
        @Override
        public void onActivityCreated(Bundle savedInstanceState){
           super.onActivityCreated(savedInstanceState);

            // Retrieve the progress bar from thetarget‘s view hierarchy.
            mProgressBar =(ProgressBar)getTargetFragment().getView().findViewById(
                    R.id.progress_horizontal);

            // We are ready for our thread to go.
            synchronized (mThread) {
                mReady = true;
                mThread.notify();
            }
        }

        /**
         * This is called when the fragment is goingaway.  It is NOT called
         * when the fragment is being propagatedbetween activity instances.
         */
        @Override
        public void onDestroy() {
            // Make the thread go away.
            synchronized (mThread) {
                mReady = false;
                mQuiting = true;
                mThread.notify();
            }

            super.onDestroy();
        }

        /**
         * This is called right before the fragment isdetached from its
         * current activity instance.
         */
        @Override
        public void onDetach() {
            // This fragment is being detachedfrom its activity.  We need
            // to make sure its thread is notgoing to touch any activity
            // state after returning from thisfunction.
            synchronized (mThread) {
                mProgressBar = null;
                mReady = false;
                mThread.notify();
            }

            super.onDetach();
        }

        /**
         * API for our UI to restart the progressthread.
         */
        public void restart() {
            synchronized (mThread) {
                mPosition = 0;
                mThread.notify();
            }
        }
    }
}
3.管理Fragment
要管理Activity中Fragment,需要使用FragmentManager对象,在Activity中调用getFragmentManager()方法能够获得这个对象。
FragmentManager对象能够做以下事情:
1.获得Activity中既存的Fragment,用findFragmentById()获得Activity布局中提供UI的Fragment,或用findFragmentByTag()方法获得没有提供UI的Fragment;
2.使用popBackStack()方法从回退堆栈中弹出Fragment,类似用户的回退命令;
3.用addOnBackStackChangedListener()给回退堆栈的改变注册一个监听器。
你也能使用FragmentManager来打开一个FragmentTransaction对象,以便执行诸如添加和删除Fragment等事务。
4.执行Fragment事务
在Activity中使用有关Fragment的添加、删除、替换以及用它们执行其他响应用户交互行为的能力是一项伟大的功能。你提交给Activity的每组改变集合被叫做一个事务,并且你能使用FragmentTransaction中APIs来执行它。也能够把每个事务保存到被Activity管理的回退堆栈中,并允许用户通过Fragment改变来向后导航(类似同Activity的向后导航)。
你能够从FragmentManager对象中获取一个FragmentTransaction对象的实例,例如
FragmentManager fragmentManager = getFragmentManager();
FragmentTransaction fragmentTransaction = fragmentManager.beginTransaction();
每个事务是一组想要同时执行的改变,你能够使用诸如add()、remove()和replace()方法把想要在一个事务中执行的所有改变组合到一起,然后,调用commit()方法,把事务的执行结果反映到Activity中。
但是,在调用commit()方法之前,为了把事务添加到Fragment事务的回退堆栈,你可能要调用addToBackStack()方法。这个回退堆栈被Activity管理,并且允许用户通过按返回按钮返回到先前的Fragment状态。
下例说明了怎样用另一个Fragment替换当前的Fragment,并且在回退堆栈中保留这个Fragment的当前状态。
// Create new fragment and transaction
Fragment newFragment = new ExampleFragment();
FragmentTransaction transaction = getFragmentManager().beginTransaction();

// Replace whatever is in the fragment_container view with this fragment,
// and add the transaction to the back stack
transaction.replace(R.id.fragment_container, newFragment);
transaction.addToBackStack(null);

// Commit the transaction
transaction.commit();
在这个例子中,newFragment替换了在布局容器中被R.id.fragment_container ID标识的任何当前Fragment。通过调用addToBackStack()方法,替换事务被保存到回退堆栈中,以便用户能够反转事务,并且能够通过按回退按钮返回到前一个Fragment。
如果给事务添加多个改变(如用add()或remove()方法),并且调用了addToBackStack()方法,那么所有这些改变在调用commit()方法之前,都会作为一个单一的事务被添加到回退堆栈中,并且案返回按钮时,所有这些改变将会被恢复。
除了以下两种情况之外,添加到FragmentTransaction的改变顺序无关紧要:
1. 最后必须调用commit()方法;
2. 如果给同一个容器添加了多个Fragment,那么添加的顺序决定了它们在View层次树中显示顺序。
在你执行删除Fragment的事务时,如果没有调用addToBackStack()方法,那么Fragment将会在事务被提交时销毁,并且用户不能再向后导航。因此,在删除Fragment时,如果调用了addToBackStack()方法,那么这个Fragment就会被终止,并且用户向后导航时将会被恢复。
提示:对于每个Fragment事务,你能够在提交之前通过调用setTransition()方法,申请一个过渡动画。
调用commit()方法并不立即执行这个事务,而是在Activity的UI线程之上(”main”线程)调度运行,以便这个线程能够尽快执行这个事务。但是,如果需要,可以调用来自UI线程的executePendingTransactions()方法,直接执行被commit()方法提交的事务。通常直到事务依赖其他线程的工作时才需要这样做。
注意:常用Fragment的哥们,可能会经常遇到这样Activity状态不一致:State loss这样的错误。主要是因为:commit方法一定要在Activity.onSaveInstance()之前调用。
警告:你能够使用commit()方法提交一个只保存之前Activity状态的事务(在用户离开Activity时)。如果试图在用户离开Activity之后提交,将会发生一个异常。这是因为如果Activity需要被恢复,而提交之后的状态却丢失了。这种情况下,使用commitAllowingStateLoss()方法,你丢失的提交就没问题了。
值得注意的是:如果你喜欢使用Fragment,一定要清楚这些方法,哪个会销毁视图,哪个会销毁实例,哪个仅仅只是隐藏,这样才能更好的使用它们。
a、 比如:我在FragmentA中的EditText填了一些数据,当切换到FragmentB时,如果希望会到A还能看到数据,则适合你的就是hide和 show;也就是说,希望保留用户操作的面板,你可以使用hide和show,当然了不要使劲在那new实例,进行下非null判断。
b、再比如:我不希望保留用户操作,你可以使用remove(),然后add();或者使用replace()这个和remove,add是相同的效果。
c、 remove和detach有一点细微的区别,在不考虑回退栈的情况下,remove会销毁整个Fragment实例,而detach则只是销毁其视图结 构,实例并不会被销毁。那么二者怎么取舍使用呢?如果你的当前Activity一直存在,那么在不希望保留用户操作的时候,你可以优先使用detach
4.1案例
public class MainActivity extends Activity
{


	@Override
	protected void onCreate(Bundle savedInstanceState)
	{
		super.onCreate(savedInstanceState);
		requestWindowFeature(Window.FEATURE_NO_TITLE);
		setContentView(R.layout.activity_main);

		FragmentManager fm = getFragmentManager();
public class FragmentOne extends Fragment implements OnClickListener
{

	private Button mBtn;

	@Override
	public View onCreateView(LayoutInflater inflater, ViewGroup container,
			Bundle savedInstanceState)
	{
		View view = inflater.inflate(R.layout.fragment_one, container, false);
		mBtn = (Button) view.findViewById(R.id.id_fragment_one_btn);
		mBtn.setOnClickListener(this)
	return view;
	}

	@Override
	public void onClick(View v)
	{
		FragmentTwo fTwo = new FragmentTwo();
		FragmentManager fm = getFragmentManager();
		FragmentTransaction tx = fm.beginTransaction();
		tx.replace(R.id.id_content, fTwo, "TWO");
		tx.addToBackStack(null);
		tx.commit();

	}

}
5.跟Activity通信
尽管Fragment是作为一个独立于Activity来实现的一个对象,并且能够在多个Activity内部使用,但是一个给定的Fragment实例直接被捆绑包含它的Activity中。
特别是Fragment能够使用getActivity()方法访问Activity的实例,并且很容易执行如在Activity布局中查找视图的任务:
View listView = getActivity().findViewById(R.id.list);同样Activity通过从FragmentManager中获得的Fragment引用也能够调用Fragment中的方法,使用findFragmentById()或findFragmentByTag()方法获取Fragment引用,例如:
ExampleFragmen fragment = (ExampleFragment) getFragmentManager().findFragmentById(R.id.example_fragment);1)给Activity创建事件回调
在某些案例中,可能需要Fragment与Activity共享事件。在Fragment内部定义一个回调接口是一个好方法,并且规定由持有它的Activity实现这个回调方法。当Activity通过接口接受回调时,它能在必要时与布局中的其他Fragment共享信息。
例如,如果一个新闻类的应用程序在一个Activity中有两个Fragment---一个用来显示文章列表(Fragment A),另一个用来显示文章内容(Fragment B)---然后再列表项目被选中时Fragment A必须告诉Activity,以便它能告诉Fragment B显示对应的文章。在下面的例子中在Fragment A的内部声明了OnArticleSelectedListener接口。
public static class FragmentA extends ListFragment {
    ...
    // Container Activity must implement this interface
    public interface OnArticleSelectedListener {
        public void onArticleSelected(Uri articleUri);
    }
    ...
}
然后,持有这个Fragment的Activity要实现OnArticleSelectedListener接口,并且要重写onArticleSelected()方法把来自Fragment A的事件通知给Fragment B。要确保持有Fragment的Activity实现这个接口, Fragment A 的onAttach()回调方法(当Fragment被添加到Activity时系统调用这个方法)通过类型转换onAttach()传入的Activity来实例化一个OnArticleSelectedListener的实例。
public static class FragmentA extends ListFragment {
    OnArticleSelectedListener mListener;
    ...
    @Override
    public void onAttach(Activity activity) {
        super.onAttach(activity);
        try {
            mListener = (OnArticleSelectedListener) activity;
        } catch (ClassCastException e) {
            throw new ClassCastException(activity.toString() + " must implement OnArticleSelectedListener");
        }
    }
    ...
}
如果这个Activity没有实现这个接口,那么Fragment会抛出ClassCastException异常。如果成功,那么mListener成员就会拥有Activity实现的OnArticleSelectedListener对象的引用,以便Fragment A能够通过OnArticleSelectedListener接口定义的回调方法和Activity共享事件。例如,如果ListFragment继承了Fragment A,那么用户每次点击列表项时,系统都会调用Fragment中的onListItemClick()方法,然后调用onArticleSelected()方法和Activity共享事件:
public static class FragmentA extends ListFragment {
    OnArticleSelectedListener mListener;
    ...
    @Override
    public void onListItemClick(ListView l, View v, int position, long id) {
        // Append the clicked item's row ID with the content provider Uri
        Uri noteUri = ContentUris.withAppendedId(ArticleColumns.CONTENT_URI, id);
        // Send the event and Uri to the host activity
        mListener.onArticleSelected(noteUri);
    }
    ...
}
传递给onListItemClick()的id参数是被点击项目的行ID,Activity(或其他的Fragment)使用这个ID从应用程序的ContentProvider对象中获取对应的文章。
2)给动作栏添加项目
Fragment通过实现onCreateOptionsMenu()方法给Activity的可选菜单(包括动作栏)提供菜单项,但是为了这个方法能够接受调用,必须在onCreate()方法中调用setHasOptionsMenu()方法来指示这个Fragment应该作为可选菜单的添加项(否则,这个Fragment不接受对onCreateOptionsMenu()方法的调用)。
然后,你把来自Fragment的要添加到可选菜单中项目追加到既存的菜单中。当菜单项被选择时,这个Fragment也接受onOptionsItemSelected()的回调。
你也能够通过调用registerForContextMenu()方法在Fragment布局中注册一个视图来提供一个上下文菜单。当用户打开上下文菜单时,Fragment会接受对onCreateContextMenu()方法的调用。当用户选择一个菜单项时,Fragment会接受对onContextItemSelected()方法的调用。
注意:尽管Fragment添加的每个菜单项都接受一个on-item-selected回调,但是当用户选择一个菜单项时,对应的Activity会首先受到相应的回调。如果Activity的on-item-selected回调的实现不处理被选择的项目,那么事件会被传递给Fragment的回调。这是真正的可选菜单和上下文菜单。
6.处理Fragment生命周期
管理Fragment的生命周期有点像管理Activity的生命周期,跟Activity一样,Fragment也存在三种状态:
Resumed
这种状态下,Fragment显示在正在运行的Activity中。
Paused
这种状态下,另一个Activity在前台,并且有焦点,但这个Fragment所在的Activity依然是可见的(它前面的Activity是部分透明或没有完全覆盖它)。
Stopped
这种状态下,Fragment是不可见的,既可以是持有它的Activity已经被终止,也可以是Fragment从Activity中被删除,但被添加到了回退堆栈中。被终止的Fragment依然存活着(所有的状态和成员信息被系统保留着)。但是,对用户它不再可见,并且如果Activity被杀死,它也会被杀死。
跟Activity一样,你也能使用Bundle对象保留Fragment的状态,这样,在Activity的进程被杀死时,并且在Activity被重建时,你需要使用这个对象来恢复Fragment的状态。你能够在Fragment的onSaveInstanceState()回调执行期间保存状态,并且在onCreate(),onCreateView()回调或onActivityCreated()回调期间恢复状态。关于保存状态的更多信息,请看Activity文档。
Activity和Fragment之间在生命周期中最显著的不同是在各自的回退堆栈中它们是如何存储的。在Activity被终止时,默认情况下,Activity被放到了通过系统来管理的Activity的回退堆栈(因此用户能够使用回退按钮向后导航)。但是,在删除Fragment的事务期间,只有通过调用addToBackStack()方法明确的请求要保存Fragment实例时,它才被放到由持有Fragment的Activity管理的回退堆栈中。
否则,管理Fragment的生命周期与管理Activity的生命周期非常类似。因此,尽管你也需要理解Activity的生命是如何影响Fragment的生命的,但是在管理Activity生命周期(managing the activity lifecycle)文章中介绍的内容同样适用Fragment。
图3. 在Activity生命周期影响之下的Fragment生命周期
destroy onDestroy()
onDetach
与Activity生命周期的协调
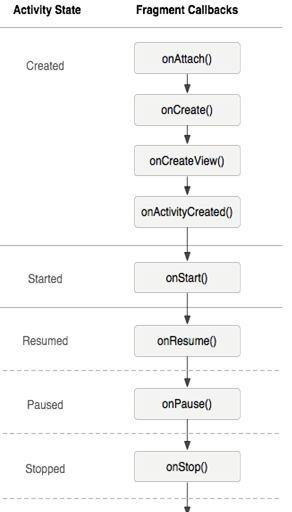
拥有Fragment的Activity的生命周期直接影响了其中的Fragment的生命周期,这样,针对Activity的每一个生命周期的回调都会有一个类似的针对Fragment的回调。例如,当Activity收到onPause()回调时,在Activity中每个Fragment都会收到onPause()回调。
但是,Fragment有几个额外的生命周期回调方法,用来处理跟Activity的交互,以便执行诸如创建和销毁Fragment的UI的动作。这些额外的回调方法如下:
onAttach()
当Fragment已经跟Activity关联上的时候,这个回调被调用。Activity会作为onAttach()回调方法的参数来传递。
onCreateView()
创建跟Fragment关联的视图层时,调用这个回调方法。
onActivityCreated()
当Activity的onCreate()方法执行完之后,调用这个回调方法。
onDestroyView()
当跟Fragment关联的视图层正在被删除时,调用这个回调方法。
onDetach()
当从Activity中解除Fragment的关联时,调用这个回调方法。
像图3中说明的那样,Fragment的生命周期流收到持有这些Fragment的Activity的影响,在这个图中,你能看到每个连续的Activity状态决定了Fragment的那个回调方法可以被调用。例如,当Activity已经收到了onCreate()的回调之后,在Activity中的Fragment就不会再接收onActivityCreated()以上的回调了。
一旦Activity到达了被恢复的状态,你就可以自由的给这个Activity添加和删除Fragment了,只有Activity在恢复态时,Fragment的生命周期才能独立的改变。
但是,当Activity离开恢复态时,Fragment会再次被推进Activity的生命周期中。
注意:除了onCreateView,其他的所有方法如果你重写了,必须调用父类对于该方法的实现
7.范例
下例中实验了上面所讲的所有内容。此例有一个activity,其含有两个fragment。一个显示莎士比亚剧的播放曲目,另一个显示选中曲目的摘要。此例还演示了如何跟据屏幕大小配置fragment
主activity创建layout。
@Override
protected void onCreate(Bundle savedInstanceState) {
    super.onCreate(savedInstanceState);

    setContentView(R.layout.fragment_layout);
}
主activity的fragment_layout.xml:
<LinearLayout xmlns:android="http://schemas.android.com/apk/res/android"
    android:orientation="horizontal"
    android:layout_width="match_parent" android:layout_height="match_parent">

    <fragment class="com.example.android.apis.app.FragmentLayout$TitlesFragment"
            android:id="@+id/titles" android:layout_weight="1"
            android:layout_width="0px" android:layout_height="match_parent" />

    <FrameLayout android:id="@+id/details" android:layout_weight="1"
            android:layout_width="0px" android:layout_height="match_parent"
            android:background="?android:attr/detailsElementBackground" />

</LinearLayout>
系统在activity加载此layout时初始化TitlesFragment(用于显示标题列表),TitlesFragment的右边是一个FrameLayout,用于存放显示摘要的fragment,但是现在它还是空的,fragment只有当用户选择了一项标题后,摘要fragment才会被放到FrameLayout中。
然而,并不是所有的屏幕都有足够的宽度来容纳标题列表和摘要。所以,上述layout只用于横屏,现把它存放于ret/layout-land/fragment_layout.xml
之外,当用于竖屏时,系统使用下面的layout,它存放于ret/layout/fragment_layout.xml:
<FrameLayout xmlns:android="http://schemas.android.com/apk/res/android"
    android:layout_width="match_parent" android:layout_height="match_parent">
    <fragment class="com.example.android.apis.app.FragmentLayout$TitlesFragment"
            android:id="@+id/titles"
            android:layout_width="match_parent" android:layout_height="match_parent" />
</FrameLayout>
这个layout只包含TitlesFragment。这表示当使用竖屏时,只显示标题列表。当用户选中一项时,程序会启动一个新的activity去显示摘要,而不是加载第二个fragment。
下一步,你会看到Fragment类的实现。第一个是TitlesFragment,它从ListFragment派生,大部分列表的功能由ListFragment提供。
当用户选择一个Title时,代码需要做出两种行为,一种是在同一个activity中显示创建并显示摘要fragment,另一种是启动一个新的activity。
public static class TitlesFragment extends ListFragment {
    boolean mDualPane;
    int mCurCheckPosition = 0;

    @Override
    public void onActivityCreated(Bundle savedInstanceState) {
        super.onActivityCreated(savedInstanceState);

        // Populate list with our static array of titles.
        setListAdapter(new ArrayAdapter<String>(getActivity(),
                android.R.layout.simple_list_item_activated_1, Shakespeare.TITLES));

        // Check to see if we have a frame in which to embed the details
        // fragment directly in the containing UI.
        View detailsFrame = getActivity().findViewById(R.id.details);
        mDualPane = detailsFrame != null && detailsFrame.getVisibility() == View.VISIBLE;

        if (savedInstanceState != null) {
            // Restore last state for checked position.
            mCurCheckPosition = savedInstanceState.getInt("curChoice", 0);
        }

        if (mDualPane) {
            // In dual-pane mode, the list view highlights the selected item.
            getListView().setChoiceMode(ListView.CHOICE_MODE_SINGLE);
            // Make sure our UI is in the correct state.
            showDetails(mCurCheckPosition);
        }
    }

    @Override
    public void onSaveInstanceState(Bundle outState) {
        super.onSaveInstanceState(outState);
        outState.putInt("curChoice", mCurCheckPosition);
    }

    @Override
    public void onListItemClick(ListView l, View v, int position, long id) {
        showDetails(position);
    }

    /**
     * Helper function to show the details of a selected item, either by
     * displaying a fragment in-place in the current UI, or starting a
     * whole new activity in which it is displayed.
     */
    void showDetails(int index) {
        mCurCheckPosition = index;

        if (mDualPane) {
            // We can display everything in-place with fragments, so update
            // the list to highlight the selected item and show the data.
            getListView().setItemChecked(index, true);

            // Check what fragment is currently shown, replace if needed.
            DetailsFragment details = (DetailsFragment)
                    getFragmentManager().findFragmentById(R.id.details);
            if (details == null || details.getShownIndex() != index) {
                // Make new fragment to show this selection.
                details = DetailsFragment.newInstance(index);

                // Execute a transaction, replacing any existing fragment
                // with this one inside the frame.
                FragmentTransaction ft = getFragmentManager().beginTransaction();
                if (index == 0) {
                    ft.replace(R.id.details, details);
                } else {
                    ft.replace(R.id.a_item, details);
                }
                ft.setTransition(FragmentTransaction.TRANSIT_FRAGMENT_FADE);
                ft.commit();
            }

        } else {
            // Otherwise we need to launch a new activity to display
            // the dialog fragment with selected text.
            Intent intent = new Intent();
            intent.setClass(getActivity(), DetailsActivity.class);
            intent.putExtra("index", index);
            startActivity(intent);
        }
    }
}
第二个fragment,DetailsFragment显示被选择的Title的摘要:
public static class DetailsFragment extends Fragment {
    /**
     * Create a new instance of DetailsFragment, initialized to
     * show the text at 'index'.
     */
    public static DetailsFragment newInstance(int index) {
        DetailsFragment f = new DetailsFragment();

        // Supply index input as an argument.
        Bundle args = new Bundle();
        args.putInt("index", index);
        f.setArguments(args);

        return f;
    }

    public int getShownIndex() {
        return getArguments().getInt("index", 0);
    }

    @Override
    public View onCreateView(LayoutInflater inflater, ViewGroup container,
            Bundle savedInstanceState) {
        if (container == null) {
            // We have different layouts, and in one of them this
            // fragment's containing frame doesn't exist.  The fragment
            // may still be created from its saved state, but there is
            // no reason to try to create its view hierarchy because it
            // won't be displayed.  Note this is not needed -- we could
            // just run the code below, where we would create and return
            // the view hierarchy; it would just never be used.
            return null;
        }

        ScrollView scroller = new ScrollView(getActivity());
        TextView text = new TextView(getActivity());
        int padding = (int)TypedValue.applyDimension(TypedValue.COMPLEX_UNIT_DIP,
                4, getActivity().getResources().getDisplayMetrics());
        text.setPadding(padding, padding, padding, padding);
        scroller.addView(text);
        text.setText(Shakespeare.DIALOGUE[getShownIndex()]);
        return scroller;
    }
}
如果当前的layout没有R.id.detailsView(它被用于DetailsFragment的容器),那么程序就启动DetailsActivity来显示摘要。
下面是DetailsActivity,它只是简单地嵌入DetailsFragment来显示摘要。
public static class DetailsActivity extends Activity {

    @Override
    protected void onCreate(Bundle savedInstanceState) {
        super.onCreate(savedInstanceState);

        if (getResources().getConfiguration().orientation
                == Configuration.ORIENTATION_LANDSCAPE) {
            // If the screen is now in landscape mode, we can show the
            // dialog in-line with the list so we don't need this activity.
            finish();
            return;
        }

        if (savedInstanceState == null) {
            // During initial setup, plug in the details fragment.
            DetailsFragment details = new DetailsFragment();
            details.setArguments(getIntent().getExtras());
            getFragmentManager().beginTransaction().add(android.R.id.content, details).commit();
        }
    }
}
注意这个activity在检测到是竖屏时会结束自己,于是主activity会接管它并显示出TitlesFragment和DetailsFragment。这可以在用户在竖屏时显示在TitleFragment,但用户旋转了屏幕,使显示变成了横屏


 705
705

 被折叠的 条评论
为什么被折叠?
被折叠的 条评论
为什么被折叠?
 到【灌水乐园】发言


