


1、建立sbt的目录结构
sbt奉行“约定优于配置”的原则,并且沿袭了Maven的目录结构
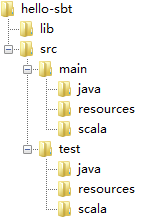
src/下的其他文件夹,以及隐藏文件夹将被无视。
2、Say Hello to sbt
在src/main/scala/下创建一个scala应用程序
object Hello extends App {
	println("Hello sbt!")
}
在项目根目录下打开一个控制台(shift+右键 > 在此处打开命令窗口)
E:\study\hello-sbt>sbt
[info] Set current project to default-483fed (in build file:/E:/study/hello-sbt/
> run
[info] Updating {file:/E:/study/hello-sbt/}default-483fed...
[info] Resolving org.scala-lang#scala-library;2.9.2 ...
[info] Done updating.
[info] Compiling 1 Scala source to E:\study\hello-sbt\target\scala-2.9.2\classes
...
[info] Running Hello
Hello sbt!
[success] Total time: 9 s, completed 2013-1-22 16:07:37
3、创建sbt配置文件
此时,项目下没有任何sbt配置文件,以下的设置都是默认的:
> name
[info] default-483fed
> version
[info] 0.1-SNAPSHOT
> scala-version
[info] 2.9.2name := "hello-sbt"
version := "1.0"
scalaVersion := "2.10.0"
然后执行
> reload
...
> name
[info] hello-sbt
> version
[info] 1.0
> scala-version
[info] 2.10.0
O(∩_∩)O~,修改成功。
只有build.sbt在项目根目录下,其他的.sbt文件要放在$root/project/下。.scala构建文件也要放在project/下,和.sbt结合使用。另外,project/下的.sbt文件并不等价于项目根目录下的.sbt。
4、设置sbt版本
在hello-sbt/project/下创建build.properties文件,内容如下:
sbt.version=0.12.0
然后reload一下(我用的sbt版本为0.12.2),结果如下:
> reload
[info] Loading project definition from E:\study\hello-sbt\project
[info] Updating {file:/E:/study/hello-sbt/project/}default-8c278e...
[info] Resolving org.scala-sbt#sbt;0.12.0 ...
.......
[info] Resolving org.scala-sbt#compiler-interface;0.12.0 ...
[info] Resolving org.scala-sbt#precompiled-2_8_2;0.12.0 ...
[info] Resolving org.scala-sbt#precompiled-2_10_0-m4;0.12.0 ...
[info] Done updating.
[info] Set current project to hello-sbt (in build file:/E:/study/hello-sbt/)
至于为什么要设置sbt版本,官方的解释是:
sbt发行版之间的源码是99%兼容的。尽管如此,设置sbt版本(在project/build.properties)可以避免一些潜在的混乱。
5、配置版本控制
很多人会把编译出来的class,或者构建工具生成的东西提交到版本控制系统里去。然后同步的时候就很痛苦,一堆没用的东西。
在项目根目录下创建一个.gitignore文件(或者其他VCS的等价文件,以后补充),内容为:
target/ignore文件的写法,参考特定的VCS系统。
好吧,虽然在第二节我们已经能够运行这个程序了,但是不能把项目导入到集成开发环境,也没什么意义吧,难道会有人用notepad++来开发一个项目吗?下一篇先看这个。
最后总结一下,这节出现的配置项有:
$root/build.sbt
	name
	version
	scalaVersion
(setting := "value")
必须以空行间隔

$root/project/build.properties
	sbt.version
(property = value)


 1199
1199

 被折叠的 条评论
为什么被折叠?
被折叠的 条评论
为什么被折叠?
 到【灌水乐园】发言


