 MySQL主从复制详解及实践


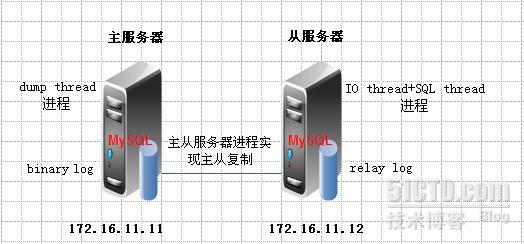
MySQL主从复制是由三个进程完成的,分别为主服务器上的dump thread和从服务器上的IO thread和SQL thraed进程,IO thread向dump thread发起请求,然后dump thread将主MySQL服务器上的二进制日志发送给IO thread,然后IO thread将二进制日志保存至relay log文件中,然后有SQL thread去逐条(SQL thread是单线程的)执行relay log文件中的日志并保存在本地数据目录中,下面来演示一下简单实现过程:
拓补图:
拓补图:
配置过程:
主服务器和从服务器安装mysql
- #tar xf mysql-5.5.24-linux2.6-i686.tar.gz -C /usr/local/
- #useradd -r mysql
- 创建一个逻辑分区/dev/sda5
- #pvcreate /dev/sda5
- #vgcreate myvg /dev/sda5
- #lvcreate -L 10G -n mydata myvg
- #mke2fs -j -L MYDATA /dev/myvg/mydata
- #vim /etc/fstab
- 添加如下行:
- LABEL=MYDATA /data/mydata ext3 defaults 0 0
- #mkdir -pv /data/mydata
- #mount -a
- #chown -R mysql:mysql /data/
- #cd /usr/local/
- #ln -sv mysql-5.5.24-linux2.6-i686 mysql
- #cd mysql
- #chown -R mysql:mysql .
- #scripts/mysql_install_db --datadir=/data/mydata/ --user=mysql
- 提供配置文件:
- #cp support-files/my-large.cnf /etc/my.cnf
- #vim /etc/my.cnf
- 添加如下行:
- datadir = /data/mydata
- 修改如下行:
- thread_concurrency = 2
- 为mysql提供sysv服务脚本:
- #cp support-files/mysql.server /etc/rc.d/init.d/mysqld
- #chkconfig --add mysqld
- #chkconfig mysqld on
- #chown -R root .
- #vim /etc/profile
- 添加如下行
- PATH=/usr/local/mysql/bin:$PATH
- #export PATH=/usr/local/mysql/bin:$PATH
- #service mysqld start
配置主mysql服务器:
- 创建具有复制权限的用户:
- # mysql
- mysql> GRANT REPLICATION SLAVE,REPLICATION CLIENT ON *.* TO repluser@'172.16.11.%' IDENTIFIED BY 'redhat';
- mysql> FLUSH PRIVILEGES;
- 查看二进制日志文件所在位置
- mysql> SHOW MASTER STATUS;
- +------------------+----------+--------------+------------------+
- | File | Position | Binlog_Do_DB | Binlog_Ignore_DB |
- +------------------+----------+--------------+------------------+
- | mysql-bin.000001 | 355 | | |
- +------------------+----------+--------------+------------------+
配置从mysql服务器:
- 修改配置文件
- # vim /etc/my.cnf
- server-id = 21 //修改与主服务器不同就型//
- 关闭二进制日志
- #log-bin=mysql-bin
- 添加中继日志
- relay-log=mysql-relay //日志名称可以随便取//
- 重启生效
- # service mysqld restart
- 验证一下配置生效情况
- # mysql
- mysql> SHOW GLOBAL VARIABLES LIKE '%log%';
- log_bin | OFF //确保二进制文件以关闭//
- relay_log | mysql-relay //确保中继日志已启动//
- mysql> SHOW GLOBAL VARIABLES LIKE 'server_id';
- +---------------+-------+
- | Variable_name | Value |
- +---------------+-------+
- | server_id | 21 |
- +---------------+-------+
- 启动从服务,并指定主服务器参数
- mysql> CHANGE MASTER TO MASTER_HOST='172.16.11.11',MASTER_USER='repluser',MASTER_PASSWORD='redhat',MASTER_LOG_FILE='mysql-bin.000001',MASTER_LOG_POS=355;
- 此时在从服务器的数据目录下会生成master.info文件,查看内容
- # cat /data/mydata/master.info
- 18
- mysql-bin.000001
- 355
- 172.16.11.11
- repluser
- redhat
- 3306
- 60
- 0
- 0
- 1800.000
- 0
- 因此有了master.info文件之后mysql重启之后就会知道从什么位置开始复制主服务器的二进制文件了;
- 阻止其它用户对从服务器写功能,但是管理员除外;
- mysql> SET GLOBAL read_only=1;
- 下面启动从服务器
- #mysql
- mysql> START SLAVE;
- 查看从服务器运行状况
- mysql> SHOW SLAVE STATUS\G
- *************************** 1. row ***************************
- Slave_IO_State: Waiting for master to send event
- Master_Host: 172.16.11.11
- Master_User: repluser
- Master_Port: 3306
- Connect_Retry: 60
- Master_Log_File: mysql-bin.000001
- Read_Master_Log_Pos: 355
- Relay_Log_File: mysql-relay.000002
- Relay_Log_Pos: 253
- Relay_Master_Log_File: mysql-bin.000001
- Slave_IO_Running: Yes //IO线程已正常启动//
- Slave_SQL_Running: Yes //SQL线程已正常启动//
- Replicate_Do_DB:
- Replicate_Ignore_DB:
- Replicate_Do_Table:
- Replicate_Ignore_Table:
- Replicate_Wild_Do_Table:
- Replicate_Wild_Ignore_Table:
- Last_Errno: 0
- Last_Error:
- Skip_Counter: 0
- Exec_Master_Log_Pos: 355
- Relay_Log_Space: 405
- Until_Condition: None
- Until_Log_File:
- Until_Log_Pos: 0
- Master_SSL_Allowed: No
- Master_SSL_CA_File:
- Master_SSL_CA_Path:
- Master_SSL_Cert:
- Master_SSL_Cipher:
- Master_SSL_Key:
- Seconds_Behind_Master: 0
- Master_SSL_Verify_Server_Cert: No
- Last_IO_Errno: 0
- Last_IO_Error:
- Last_SQL_Errno: 0
- Last_SQL_Error:
- Replicate_Ignore_Server_Ids:
- Master_Server_Id: 1
- 上面信息说明从服务器已正常启动;
以上主从服务器已经配置完成,下面验证一下
- 在主服务器上创建数据库testdb
- #mysql
- mysql> CREATE DATABASE testdb;
- mysql> SHOW DATABASES;
- +---------------------+
- | Database |
- +---------------------+
- | information_schema |
- | #mysql50#lost+found |
- | mysql |
- | performance_schema |
- | test |
- | testdb
- 在testdb上创建表t1
- mysql> use testdb;
- mysql> CREATE TABLE t1 (NAME VARCHAR(20));
- mysql> FLUSH PRIVILEGES
- mysql> SHOW TABLES;
- +------------------+
- | Tables_in_testdb |
- +------------------+
- | t1 |
- +------------------+
- 到从服务器上验证一下复制的效果
- #mysql
- mysql> SHOW DATABASES;
- +---------------------+
- | Database |
- +---------------------+
- | information_schema |
- | #mysql50#lost+found |
- | mysql |
- | performance_schema |
- | test |
- | testdb | //testdb已经复制成功
- +---------------------+
- mysql> use testdb;
- mysql> SHOW TABLES;
- +------------------+
- | Tables_in_testdb |
- +------------------+
- | t1 | //t1表已经存在
- +------------------+
- mysql> DESC t1;
- +-------+-------------+------+-----+---------+-------+
- | Field | Type | Null | Key | Default | Extra |
- +-------+-------------+------+-----+---------+-------+
- | NAME | varchar(20) | YES | | NULL | |
- +-------+-------------+------+-----+---------+-------+
转载于:https://blog.51cto.com/wjw7702/957779


 被折叠的 条评论
为什么被折叠?
被折叠的 条评论
为什么被折叠?
 到【灌水乐园】发言


