


 本文档提供了在Windows XP环境中使用IIS安装Bugzilla的详细步骤,包括MySQL数据库的配置、ActivePerl安装、Web服务器配置及Perl脚本配置等内容。
欢迎大家访问我的博客:http://blog.sina.com.cn/s/blog_65f374fa0100o1wz.html
在Windows XP下安装基于IIS的Bugzilla的详细步骤
经过半天的实验,终于将Bugzilla安装成功,老师给的参考网页,不是很详细,没有操作图片且部分有错误,现将我的操作过程分享一下,希望对大家有所帮助:
一、安装mysql:过程略 可以直接使用老师安装好的,只需要删除bugs表即可
二、删除老师创建的bugs表(重新安装mysql的无此步)
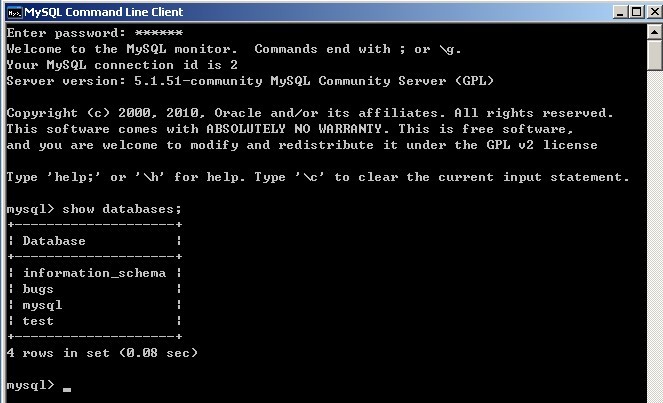
进入mysql客户端:点击程序,选择mysql的客户端,输入密码:123456(看自己所设)
执行如下命令:
show databases;
drop database bugs;
如图:

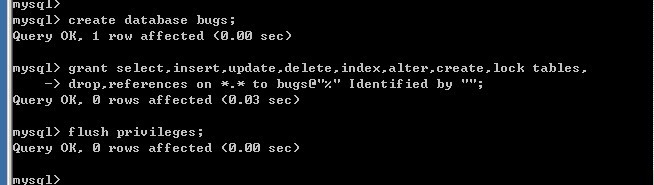
然后,我们需要在mysql中创建Bugzilla的用户以及数据库,主要三条命令为:
a、建立数据库bugs
create database bugs;
b、建立用户bugs,密码为空,对Bugs数据库具有一定权限
grant select,insert,update,delete,index,alter,create,lock tables,drop,references on *.* to bugs@"%" Identified by ""; //参考文献有错误!
c、从mysql数据库授权表中重新装载权限。
flush privileges;
结果如图:(这里我们建立的数据库名为Bugs,数据库用户名为Bugs,密码为空)
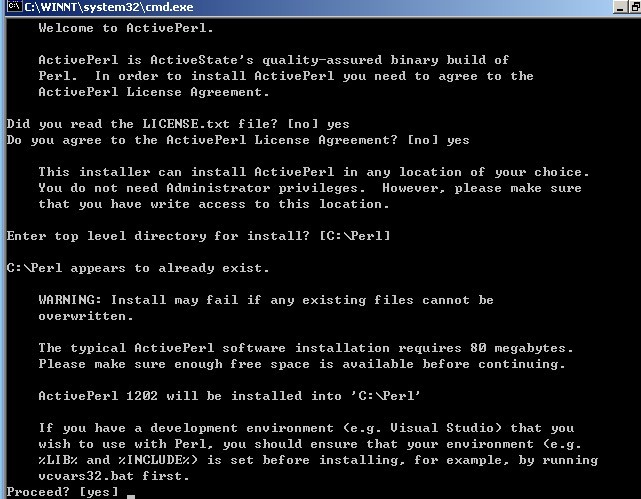
二、安装Activeperl。
双击ActivePerl-5.12.2.1202-MSWin32-x86-293621中Installer批处理文件,结果如图:
在键盘上上敲两次“yes” 后一直回车即可!它会自动安装到C:\perl目录。同时在系统变量Path中增加自己的C:\perl\bin路径信息。
安装过程中:

成功后提示:
按回车即退出!
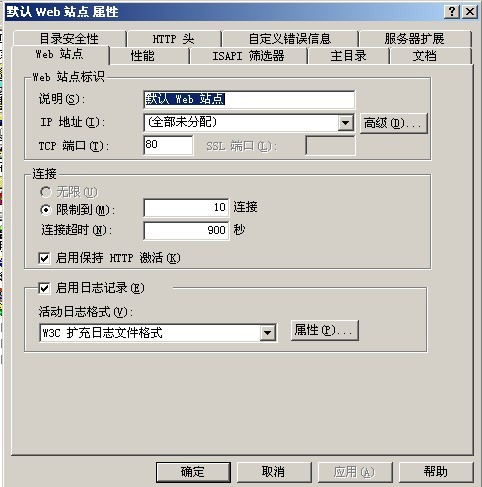
三、安装、配置WEB服务器。
针对IIS已经安装好的:
将鼠标指到我的电脑图标,单击右键,选择 管理,选择 服务和应用程序,选择 Internet信息服务选择 默认web站点,单击右键,选择属性 到达下图:
1.选择主目录如图: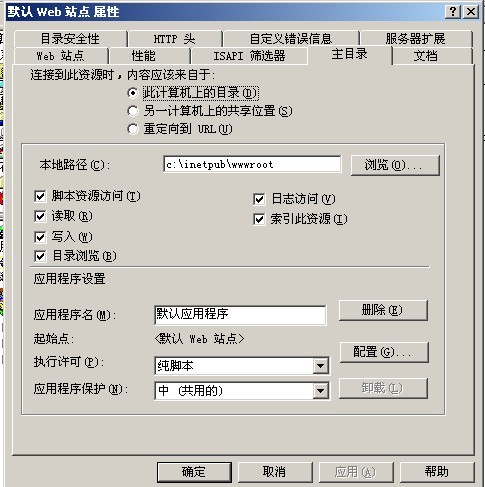
右击配置按钮 到达如下界面: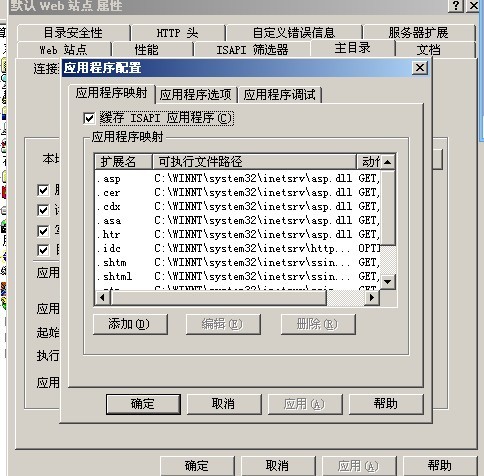
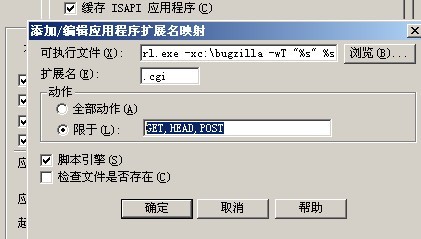
选择扩展名为.cgi的目录 单击编辑按钮 将动作限于GET,HEAD,POST如图: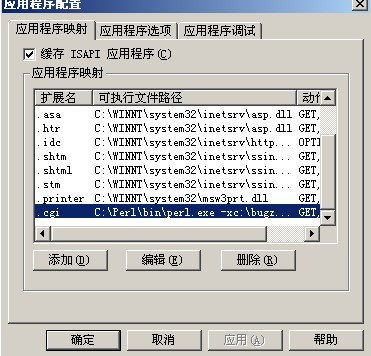
2.选择文档目录如图: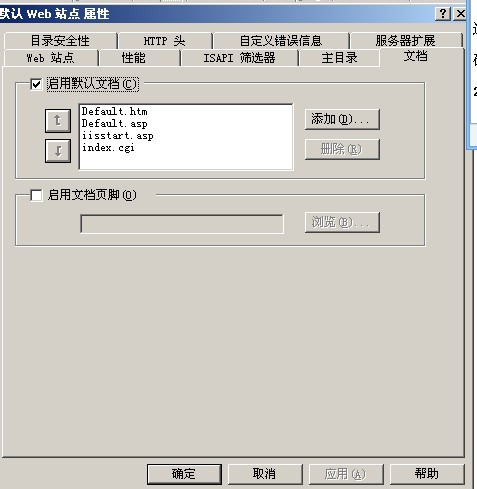
单击添加按钮 将index.cgi添加为默认文档,如图;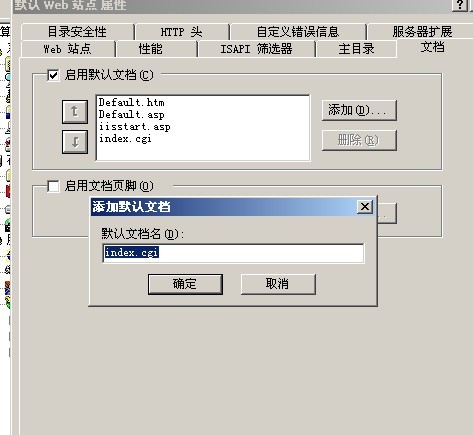
单击确定,配置完毕。
四、Perl脚本的安装以及Bugzilla的初步配置。
Bugzilla为我们准备了一个很好的脚本文件checksetup.pl来进行配置,我们随时可以运行chekcsetup.pl文件来进行服务器配置而不会对Bugzilla系统造成任何影响。
1、运行该脚本的方法是:
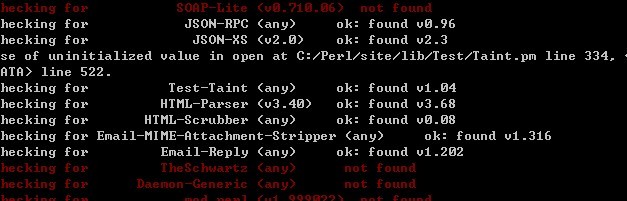
在命令行下进入Bugzilla的主目录,键入:perl checksetup.pl,运行后如图:

2、初次运行的时候,系统首先会验证perl模块是否足够,一般会缺少比较多的perl模块。如果我们是单独下载的每个perl模块进行安装,则需要使用ppm install <perl模块名.ppd>进行。将not found的模块安装:(不安装也可以,该版本)如图:
前面设置的密码为空,所以我们不用操作这步:
******************************************************************************************
3、当插件安装完后,再次运行perl checksetup.pl,系统会生成localconfig文件,此文件是包含了Bugzilla的一些配置信息,如果您的mysql安装到C:\mysql,所创建的数据库名称为bugs数据库用户为bugs,密码为空,那么不需要对localconfig文件进行任何修改,否则需要对localconfig的相应条目进行修改。
# What SQL database to use. Default is mysql. List of supported databases
# can be obtained by listing Bugzilla/DB directory - every module corresponds
# to one supported database and the name corresponds to a driver name.
$db_driver = 'mysql';
# The DNS name of the host that the database server runs on.
$db_host = 'localhost';
# The name of the database
$db_name = 'bugs';
# Who we connect to the database as.
$db_user = 'bugs';
# Enter your database password here. It's normally advisable to specify
# a password for your bugzilla database user.
# If you use apostrophe (') or a backslash (\) in your password, you'll
# need to escape it by preceding it with a '\' character. (\') or (\)
# (Far simpler just not to use those characters.)
$db_pass = '';
# Sometimes the database server is running on a non-standard port. If that's
# the case for your database server, set this to the port number that your
# database server is running on. Setting this to 0 means "use the default
# port for my database server."
$db_port =3306;
***************************************************************************************
4、修改好localconfig文件,再次运行perl checksetup.pl,如果不出意外的话,会顺利编译模板,然后建立数据库,最后提示输入超级用户信箱、用户姓名以及口令。输入后,Bugzilla基本安装完成,可以从web上来进行访问了。如图:
输入SMTP server 我输得是我的邮箱(应该不对,估计没什么影响!)

创建用户密码(密码至少六位),我第一次输少了: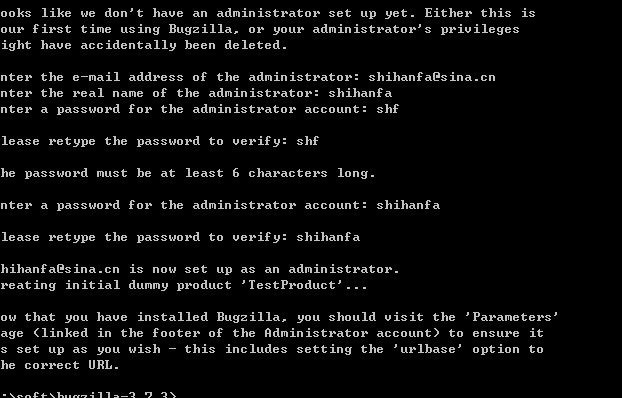
OK!
五、IE中输入http://localhost/Bugzilla/可以访问bugzilla
选择login 输入 上一步设的邮箱,密码即可 如图: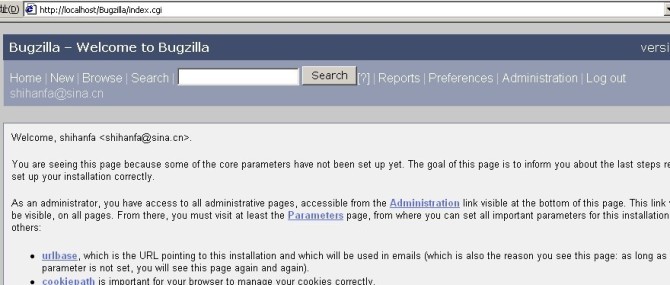
显示上面界面就登陆成功了!
对于使用方法,我暂时还不是很了解等琢磨一阵子再说吧!
终于写完了,啊 ?1点16了![]() 。。。 希望对大家有所帮助!睡觉了。。。。
。。。 希望对大家有所帮助!睡觉了。。。。
转载于:https://blog.51cto.com/shihanfa/416182


 被折叠的 条评论
为什么被折叠?
被折叠的 条评论
为什么被折叠?
 到【灌水乐园】发言


