


 本教程介绍如何使用卷积神经网络解决面部关键点检测挑战赛问题。通过Lasagne库和Theano实现不同网络架构,并探讨数据增强、动量调整等技巧。
December 17, 2014 | categories: Python, Deep Learning, Programming, Tutorial, Machine Learning | View Comments
This is a hands-on tutorial on deep learning. Step by step, we'll go about building a solution for the Facial Keypoint Detection Kaggle challenge. The tutorial introduces Lasagne, a new library for building neural networks with Python and Theano. We'll use Lasagne to implement a couple of network architectures, talk about data augmentation, dropout, the importance of momentum, and pre-training. Some of these methods will help us improve our results quite a bit.
I'll assume that you already know a fair bit about neural nets. That's because we won't talk about much of the background of how neural nets work; there's a few of good books and videos for that, like the Neural Networks and Deep Learning online book. Alec Radford's talk Deep Learning with Python's Theano library is a great quick introduction. Make sure you also check out Andrej Karpathy's mind-blowing ConvNetJS Browser Demos.
Tutorial Contents
Prerequisites
You don't need to type the code and execute it yourself if you just want to follow along. But here's the installation instructions for those who have access to a CUDA-capable GPU and want to run the experiments themselves.
I assume you have the CUDA toolkit, Python 2.7.x, numpy, pandas, matplotlib, and scikit-learn installed. To install the remaining dependencies, such as Lasagne and Theano run this command:
pip install -r https://raw.githubusercontent.com/dnouri/kfkd-tutorial/master/requirements.txt
(Note that for sake of brevity, I'm not including commands to create avirtualenv and activate it. But you should.)
If everything worked well, you should be able to find thesrc/lasagne/examples/ directory in your virtualenv and run the MNIST example. This is sort of the "Hello, world" of neural nets. There's ten classes, one for each digit between 0 and 9, and the input is grayscale images of handwritten digits of size 28x28.
cd src/lasagne/examples/
python mnist.py
This command will start printing out stuff after thirty seconds or so. The reason it takes a while is that Lasagne uses Theano to do the heavy lifting; Theano in turn is a "optimizing GPU-meta-programming code generating array oriented optimizing math compiler in Python," and it will generate C code that needs to be compiled before training can happen. Luckily, we have to pay the price for this overhead only on the first run.
Once training starts, you'll see output like this:
Epoch 1 of 500
  training loss:            1.352731
  validation loss:          0.466565
  validation accuracy:              87.70 %
Epoch 2 of 500
  training loss:            0.591704
  validation loss:          0.326680
  validation accuracy:              90.64 %
Epoch 3 of 500
  training loss:            0.464022
  validation loss:          0.275699
  validation accuracy:              91.98 %
...
If you let training run long enough, you'll notice that after about 75 epochs, it'll have reached a test accuracy of around 98%.
If you have a GPU, you'll want to configure Theano to use it. You'll want to create a ~/.theanorc file in your home directory that looks something like this:
[global]
floatX = float32
device = gpu0 [lib] cnmem = 1
(Should any of the instructions in this tutorial not work for you, submit a bug report here.)
The data
The training dataset for the Facial Keypoint Detection challenge consists of 7,049 96x96 gray-scale images. For each image, we're supposed learn to find the correct position (the x and y coordinates) of 15 keypoints, such as left_eye_center, right_eye_outer_corner, mouth_center_bottom_lip, and so on.
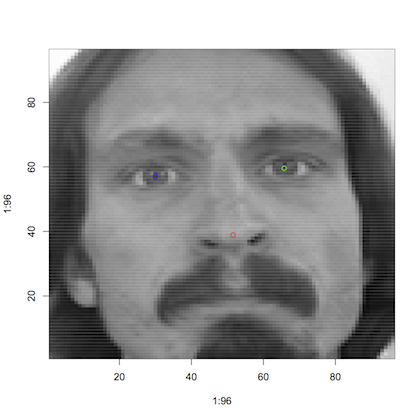
An example of one of the faces with three keypoints marked.
An interesting twist with the dataset is that for some of the keypoints we only have about 2,000 labels, while other keypoints have more than 7,000 labels available for training.
Let's write some Python code that loads the data from the CSV files provided. We'll write a function that can load both the training and the test data. These two datasets differ in that the test data doesn't contain the target values; it's the goal of the challenge to predict these. Here's our load() function:
# file kfkd.py
import os

import numpy as np from pandas.io.parsers import read_csv from sklearn.utils import shuffle FTRAIN = '~/data/kaggle-facial-keypoint-detection/training.csv' FTEST = '~/data/kaggle-facial-keypoint-detection/test.csv' def load(test=False, cols=None): """Loads data from FTEST if *test* is True, otherwise from FTRAIN.  Pass a list of *cols* if you're only interested in a subset of the  target columns.  """ fname = FTEST if test else FTRAIN df = read_csv(os.path.expanduser(fname)) # load pandas dataframe # The Image column has pixel values separated by space; convert # the values to numpy arrays: df['Image'] = df['Image'].apply(lambda im: np.fromstring(im, sep=' ')) if cols: # get a subset of columns df = df[list(cols) + ['Image']] print(df.count()) # prints the number of values for each column df = df.dropna() # drop all rows that have missing values in them X = np.vstack(df['Image'].values) / 255. # scale pixel values to [0, 1] X = X.astype(np.float32) if not test: # only FTRAIN has any target columns y = df[df.columns[:-1]].values y = (y - 48) / 48 # scale target coordinates to [-1, 1] X, y = shuffle(X, y, random_state=42) # shuffle train data y = y.astype(np.float32) else: y = None return X, y X, y = load() print("X.shape == {}; X.min == {:.3f}; X.max == {:.3f}".format( X.shape, X.min(), X.max())) print("y.shape == {}; y.min == {:.3f}; y.max == {:.3f}".format( y.shape,