


 本文介绍PHP GD库的基本使用方法,包括如何生成验证码图片、绘制3D饼图及添加弧线干扰素等技巧。文章详细讲解了创建画布、准备颜色、填充背景、绘制图形等步骤。
php课程 8-29 gd库能够画哪些东西
一、总结
一句话总结:文字,点,线,圆,弧线,矩形,各种形状都是可以的,和html5中的canva能画的东西很像,使用也很像,参数怎么记呢,参数完全不用记,要用脑子。
1、点干扰素如何生成?
随机坐标+画点

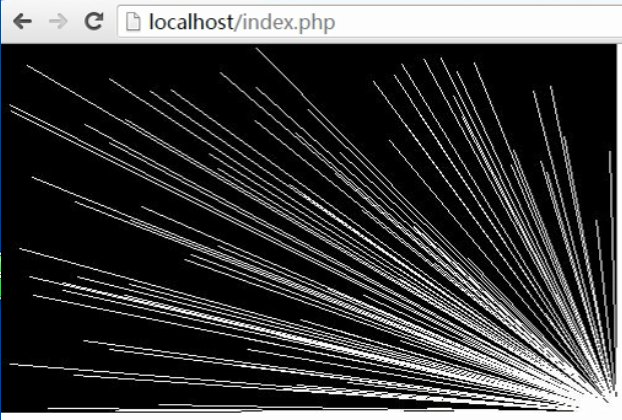
2、线干扰素如何生成?
随机起点和终点+画线
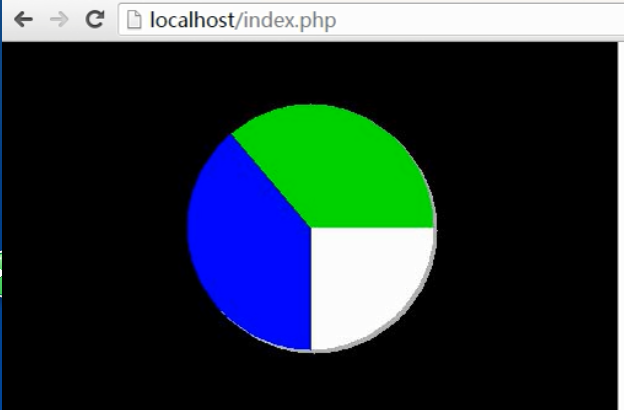
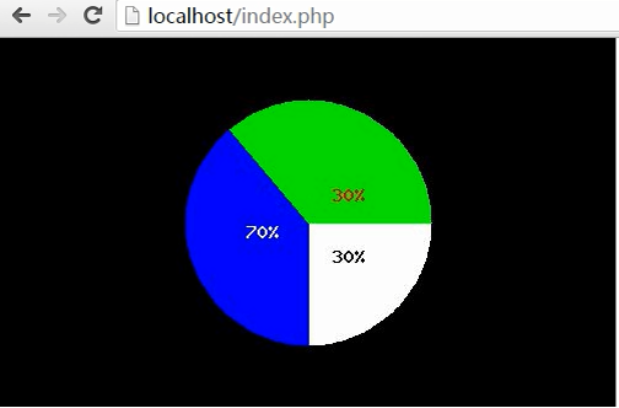
3、如何画饼图?
多个扇形(用不同的颜色,其实就是画扇形控制角度)拼成一个圆
25 // 4.在画布上画图像或文字
26 imagefilledarc($img,250,150,200,200,0,90,$white,IMG_ARC_PIE);
27 imagefilledarc($img,250,150,200,200,90,230,$blue,IMG_ARC_PIE);
28 imagefilledarc($img,250,150,200,200,230,360,$green,IMG_ARC_PIE);

4、如何画3D饼图?
在原来画好的饼图下面加阴影,也就是再画一个灰色的饼图,放在原图下面,略有偏移
16 // 3d饼图
17 $k=250;
18 $j=150;
19 for($i=0;$i<10;$i++){
20     $k+=0.3;
21     $j+=0.3;
22     imagefilledarc($img,$k,$j,200,200,0,360,$gray,IMG_ARC_PIE);
23 }
24
25 // 4.在画布上画图像或文字
26 imagefilledarc($img,250,150,200,200,0,90,$white,IMG_ARC_PIE);
27 imagefilledarc($img,250,150,200,200,90,230,$blue,IMG_ARC_PIE);
28 imagefilledarc($img,250,150,200,200,230,360,$green,IMG_ARC_PIE);
5、如何在图片上面写文字?
imagettftext,不要使用另外两种画字的函数,比如imagestring(),比如imagechar()
20 //画字
21 imagettftext($img,20,0,20,35,$white,'ms.ttf',$str);

6、imagettftext的注意事项是什么?
参数的第一个坐标是字体左下角的坐标,和别的函数不同,别的函数一般都是左上角
7、php如何生成验证码图片?
画文字+干扰素(可以用弧形干扰素)
20 //画字
21 imagettftext($img,20,0,20,35,$white,'ms.ttf',$str);
22
23 //干扰素
24 for($i=0;$i<30;$i++){
25     imagearc($img,mt_rand(0,150),mt_rand(0,50),mt_rand(0,150),mt_rand(0,50),mt_rand(0,360),mt_rand(0,360),$white);
26 }

二、gd库能够画哪些东西
1、相关知识
php中gd画图的场景:
1.验证码
2.缩放
3.裁剪
4.水印
php中创建图像的六个步骤:
1.创建画布资源
$img=imagecreatetruecolor(500,300);
2.准备颜色
$black=imagecolorallocate($img,0,0,0);
$white=imagecolorallocate($img,255,255,255);
$red=imagecolorallocate($img,255,0,0);
$green=imagecolorallocate($img,0,255,0);
$blue=imagecolorallocate($img,0,0,255);
3.填充画布
imagefill($img,0,0,$black);
4.在画布上画图像或文字
imagefilledellipse($img,250,150,200,200,$white);
5.输出最终图像或保存最终图像
header('content-type:image/jpeg');
1)图片从浏览器上输出
imagejpeg($img);
2)把图片保存到本地
imagejpeg($img,'jin.jpg');
6.释放画布资源
imagedestroy($img);
绘制图像:
• imagefill(); //区域填充
• imagesetpixel(); //画一个像素
• imageline(); //画一条线
• imagerectangle(); //画一个矩形
• imagefilledrectangle(); //画一矩形并填充
• imagepolygon(); //画一个多边形
• imagefilledpolygon(); //画一个多边形并填充
• imageellipse(); //画一个椭圆
• imagefilledellipse(); //画一个椭圆并填充
• imagearc(); //画一个椭圆弧
• imagefilledarc(); //画一个椭圆弧并填充
• imagestring(); //水平地画一行字符串
• imagestringup(); //垂直地画一行字符串
• imagechar(); //水平地画一个字符
• imagecharup(); //垂直地画一个字符
• imagettftext(); //用truetype字符向图像画一个字符串
2、代码
验证码
 1 <?php
 2 // 1.创建画布资源
 3 $img=imagecreatetruecolor(150,50);
 4
 5 // 2.准备颜色
 6 $black=imagecolorallocate($img,0,0,0);
 7 $white=imagecolorallocate($img,255,255,255);
 8 $red=imagecolorallocate($img,255,0,0);
 9 $green=imagecolorallocate($img,0,255,0);
10 $blue=imagecolorallocate($img,0,0,255);
11 $gray=imagecolorallocate($img,180,180,180);
12
13 // 3.填充画布
14 imagefill($img,0,0,$black);
15
16 $arr=array_merge(range(0,9),range(a,z),range(A,Z));
17 shuffle($arr);
18 $str=join(' ',array_slice($arr,0,4));
19
20 //画字
21 imagettftext($img,20,0,20,35,$white,'ms.ttf',$str);
22
23 //干扰素
24 for($i=0;$i<30;$i++){
25     imagearc($img,mt_rand(0,150),mt_rand(0,50),mt_rand(0,150),mt_rand(0,50),mt_rand(0,360),mt_rand(0,360),$white);
26 }
27
28 // 5.输出最终图像或保存最终图像
29 header('content-type:image/png');
30
31 // 图片从浏览器上输出
32 imagepng($img);
33
34 // 把图片保存到本地
35 // imagejpeg($img,'jin.jpg');
36
37 // 6.释放画布资源
38 imagedestroy($img);
39
40  ?>
3d饼图
 1 <?php
 2 // 1.创建画布资源
 3 $img=imagecreatetruecolor(500,300);
 4
 5 // 2.准备颜色
 6 $black=imagecolorallocate($img,0,0,0);
 7 $white=imagecolorallocate($img,255,255,255);
 8 $red=imagecolorallocate($img,255,0,0);
 9 $green=imagecolorallocate($img,0,255,0);
10 $blue=imagecolorallocate($img,0,0,255);
11 $gray=imagecolorallocate($img,180,180,180);
12
13 // 3.填充画布
14 imagefill($img,0,0,$black);
15
16 // 3d饼图
17 $k=250;
18 $j=150;
19 for($i=0;$i<10;$i++){
20     $k+=0.3;
21     $j+=0.3;
22     imagefilledarc($img,$k,$j,200,200,0,360,$gray,IMG_ARC_PIE);
23 }
24
25 // 4.在画布上画图像或文字
26 imagefilledarc($img,250,150,200,200,0,90,$white,IMG_ARC_PIE);
27 imagefilledarc($img,250,150,200,200,90,230,$blue,IMG_ARC_PIE);
28 imagefilledarc($img,250,150,200,200,230,360,$green,IMG_ARC_PIE);
29
30
31 // 5.输出最终图像或保存最终图像
32 header('content-type:image/jpeg');
33
34 // 图片从浏览器上输出
35 imagejpeg($img);
36
37 // 把图片保存到本地
38 // imagejpeg($img,'jin.jpg');
39
40 // 6.释放画布资源
41 imagedestroy($img);
42
43  ?>
弧线干扰素
 1 <?php
 2 // 1.创建画布资源
 3 $img=imagecreatetruecolor(500,300);
 4
 5 // 2.准备颜色
 6 $black=imagecolorallocate($img,0,0,0);
 7 $white=imagecolorallocate($img,255,255,255);
 8 $red=imagecolorallocate($img,255,0,0);
 9 $green=imagecolorallocate($img,0,255,0);
10 $blue=imagecolorallocate($img,0,0,255);
11
12 // 3.填充画布
13 imagefill($img,0,0,$black);
14
15 // 4.在画布上画图像或文字
16 for($i=0;$i<50;$i++){
17     imagearc($img,mt_rand(0,500),mt_rand(0,300),mt_rand(0,300),mt_rand(0,300),mt_rand(0,360),mt_rand(0,360),$white);
18 }
19
20 // 5.输出最终图像或保存最终图像
21 header('content-type:image/jpeg');
22
23 // 图片从浏览器上输出
24 imagejpeg($img);
25
26 // 把图片保存到本地
27 // imagejpeg($img,'jin.jpg');
28
29 // 6.释放画布资源
30 imagedestroy($img);
31
32  ?>


 被折叠的 条评论
为什么被折叠?
被折叠的 条评论
为什么被折叠?
 到【灌水乐园】发言


