


注意:先大致浏览全文,如果还行再仔细看 代码下载链接放到最后了 用的servlet实现的 文章中用的springmvc如果对spring不熟悉,看代码就好了。代码配置文件可以使用来优化,工具类写好没用
不管是不是开发者账号,都可以在测试号中拿到所有的开发权限,这样就可以进行相关的操作了。所以接下来的总结都是在测试号中进行的。
首先微信绑定是要设置服务器接口配置,回调域名的以及确认页面,这样才能拿到openid以及相对详尽的信息。
1.准备工作:
(1).设置服务器接口配置
如图:

servlet
WechatValidate在java中是一个servlet,然后微信服务器会向这一个servlet发一个get请求(如果配置文本消息也会向这一个servlet发送post(xml格式)请求),具体的验证代码:
@Override
	protected void doGet(HttpServletRequest req, HttpServletResponse resp)
			throws ServletException, IOException {

		String signature = req.getParameter("signature");
		String timestamp = req.getParameter("timestamp");
		/***/
		System.out.println("=================================");
		System.out.println(timestamp);
		String nonce = req.getParameter("nonce");
		String echostr = req.getParameter("echostr");
		String token = "viakiba";//这里是和配置里面一致

		//验证配置
		String signCompar = Sha1.getSHA1(token, timestamp, nonce);

		PrintWriter pw = resp.getWriter();

		if(signCompar.equals(signature)){
			pw.print(echostr);
		}
	}
Sha1文件如下
import java.security.MessageDigest;
import java.security.NoSuchAlgorithmException;
import java.util.Arrays;
public class Sha1 {

	public static String getSHA1(String token, String timestamp, String nonce)  {
        String[] array = new String[] { token, timestamp, nonce };
        StringBuffer sb = new StringBuffer();
        // 字符串排序
        Arrays.sort(array);
        for (int i = 0; i < 3; i++) {
            sb.append(array[i]);
        }
        String str = sb.toString();
        // SHA1签名生成
        try {
			MessageDigest md = MessageDigest.getInstance("SHA-1");
			md.update(str.getBytes());
			byte[] digest = md.digest();
			StringBuffer hexstr = new StringBuffer();
			String shaHex = "";
			for (int i = 0; i < digest.length; i++) {
			    shaHex = Integer.toHexString(digest[i] & 0xFF);
			    if (shaHex.length() < 2) {
			        hexstr.append(0);
			    }
			    hexstr.append(shaHex);
			}
			System.out.println(hexstr);
			return hexstr.toString();
		} catch (NoSuchAlgorithmException e) {
			return null;
		}
}

}
注意web.xml中配置servlet路径
<servlet>
  	<servlet-name>vk</servlet-name>
  	<servlet-class>haust.viakiba.servlet.Vk</servlet-class>
  </servlet>
  <servlet-mapping>
  	<servlet-name>vk</servlet-name>
  	<url-pattern>/WechatValidate</url-pattern>
  </servlet-mapping>
(2)配置回调域名:

注意:
不必为这种一级域名,比如wechat.viakiba.cn也是可以的,那个redirecturi要在这个域名下面,如( 我的链接是 http://viakiba.cn/auth/entranceUser.action,那么上面就写 viakiba 。如果是: http://wechat.viakiba.cn/auth/entranceUser.action 那么可以写 wechat.viakiba.cn ,也可以写 viakiba.cn),只要域名可以指向项目的部署的服务器就行。这里,80端口可以访问tomcat的项目。具体的tomcat配置如下:
server.xml 文件:
<?xml version='1.0' encoding='utf-8'?>
<Server port="8005" shutdown="SHUTDOWN">
  <Listener className="org.apache.catalina.startup.VersionLoggerListener" />

  <!--APR library loader. Documentation at /docs/apr.html -->
  <Listener className="org.apache.catalina.core.AprLifecycleListener" SSLEngine="on" />
  <!--Initialize Jasper prior to webapps are loaded. Documentation at /docs/jasper-howto.html -->
  <Listener className="org.apache.catalina.core.JasperListener" />
  <!-- Prevent memory leaks due to use of particular java/javax APIs-->
  <Listener className="org.apache.catalina.core.JreMemoryLeakPreventionListener" />
  <Listener className="org.apache.catalina.mbeans.GlobalResourcesLifecycleListener" />
  <Listener className="org.apache.catalina.core.ThreadLocalLeakPreventionListener" />
  <!-- Global JNDI resources
       Documentation at /docs/jndi-resources-howto.html
  -->
  <GlobalNamingResources>
    <Resource name="UserDatabase" auth="Container"
              type="org.apache.catalina.UserDatabase"
              description="User database that can be updated and saved"
              factory="org.apache.catalina.users.MemoryUserDatabaseFactory"
              pathname="conf/tomcat-users.xml" />
  </GlobalNamingResources>
  <Service name="Catalina">
    <!--useBodyEncodingForURI="true" URIEncoding="UTF-8"    地址栏传中文  这里配置80端口-->
    <Connector port="80" protocol="HTTP/1.1"
               connectionTimeout="20000"
               redirectPort="8443" useBodyEncodingForURI="true" URIEncoding="UTF-8"/>

    <Connector port="8009" protocol="AJP/1.3" redirectPort="8443" />
    <Engine name="Catalina" defaultHost="viakiba">
      <Realm className="org.apache.catalina.realm.LockOutRealm">

        <Realm className="org.apache.catalina.realm.UserDatabaseRealm"
               resourceName="UserDatabase"/>
      </Realm>
      <!-- 这里配置域名,这样通过域名就可以访问项目了 -->
      <Host name="viakiba.cn"  appBase="webapps"
            unpackWARs="true" autoDeploy="true">
            <!-- 这里配置默认项目,配置后,无论域名后跟不跟项目名都可以访问 -->
			<Context path="" docBase="/wechatvk" debug="0" reloadable="true"></Context>
            <!-- 这里配置虚拟目录,一般图片存储需求不大,不需要图片服务器的这么做,而不是放到webroot 下面,要不然每次部署都要移动目录 -->
			<Context path="/image" docBase="D:/images"  reloadable="true"></Context>
      </Host>
	  <Host name="www.viakiba.cn"  appBase="webapps"
            unpackWARs="true" autoDeploy="true">
			<Context path="" docBase="/wechatvk"  reloadable="true"></Context>
			<Context path="/image" docBase="D:/images"  reloadable="true"></Context>
      </Host>
    </Engine>
  </Service>
</Server>
微信开发,内网穿透工具:
ngrock
2.取openid
文档:https://mp.weixin.qq.com/wiki?t=resource/res_main&id=mp1421140842&token=&lang=zh_CN
urlencoding: http://tool.chinaz.com/tools/urlencode.aspx
(1)scope=snsapi_base(仅拿到openid)
获取code:
首先要知道微信公众号的appid和appsecret
测试号的如下:

首先要让用户点击一个实现拼接好的链接,这样才能拿到code参数
这个链接特点如下:
1.appid=APPID: 把APPID更换成测试号的。我的如下:wx32f1fdf5edf36bfb
2.redirect_uri=REDIRECT_URI:把需要跳转到的链接写上,我在java web中使用了springmvc框架,所以我的路径如下:http://viakiba.cn/auth/entranceUser.action (web.xml配置拦截.action后缀的请求)
如图(也可以使用servlet):
将http://viakiba.cn/auth/entranceUser.action 链接进行urlEncoding编码:编码工具(urlencoding: http://tool.chinaz.com/tools/urlencode.aspx)
我的结果如下:
http%3a%2f%2fviakiba.cn%2fauth%2fentranceUser.action
3.scope=SCOPE:这里使用snsapi_base去替换即scope=snsapi_base。这样,将看不到授权页面,静默跳转。
授权页面 例子如下:

此时拼接好的链接,整体如下:
https://open.weixin.qq.com/connect/oauth2/authorize?appid=wx32f1fdf5edf36bfb&redirect_uri=http%3a%2f%2fviakiba.cn%2fauth%2fentranceUser.action&response_type=code&scope=snsapi_base&state=STATE#wechat_redirect
未修改的参数默认即可 参数顺序必须如此,不可调换顺序
这是请求会带着code参数重定向到刚才配置的链接的(http://viakiba.cn/auth/entranceUser.action )方法中,这是同果request的getParameter方法是可以拿到的(和取地址栏参数的方式一致)。我使用的springmvc,自动封装到参数中:

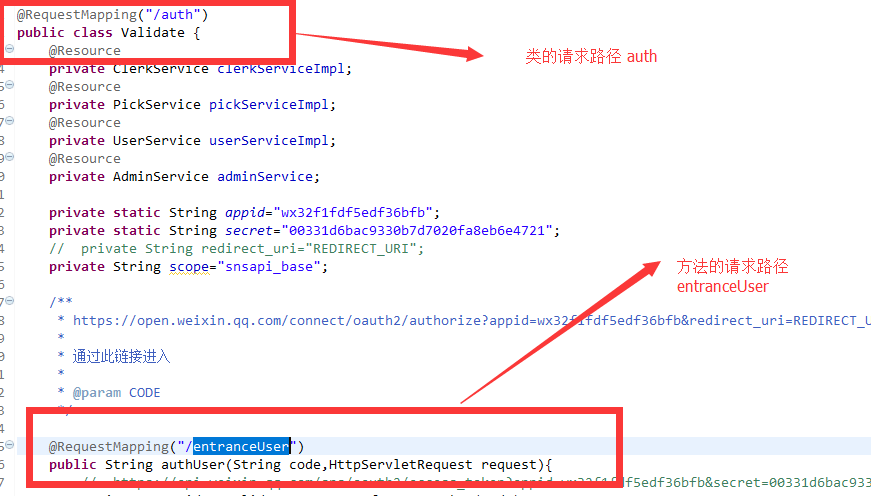
方法代码如下:
@RequestMapping("/entranceUser")
	public String authUser(String code,HttpServletRequest request){
		//  https://api.weixin.qq.com/sns/oauth2/access_token?appid=wx32f1fdf5edf36bfb&secret=00331d6bac9330b7d7020fa8eb6e4721&code=CODE&grant_type=authorization_code
		String wcopenid = Validate.getUserInfoAccessToken(code);
		request.getSession().setAttribute("wcopenid",wcopenid);
		System.out.println("code##########va"+code);
		System.out.println("openid********va"+wcopenid);
		User user=userServiceImpl.getUserByOpenid(wcopenid);
		if(user==null){
			return "querykey";
		}
		request.getSession().setAttribute("user",user);
		return "redirect:/user/getUserOrderList.action";
	}
Validate.getUserInfoAccessToken()方法是取openid的方法:
public static String getUserInfoAccessToken(String code) {
		String access_token_uri = "https://api.weixin.qq.com/sns/oauth2/access_token?appid="+appid+"&secret="+secret+"&code="+code+"&grant_type=authorization_code";
        String openid = WcUtils.loadJson(access_token_uri);
        /*
         { "access_token":"ACCESS_TOKEN",
		 "expires_in":7200,
		 "refresh_token":"REFRESH_TOKEN",
		 "openid":"OPENID",
		 "scope":"SCOPE" }
         */
        Openid parse = JSON.parseObject(openid,Openid.class);
        //拿到id
        openid = parse.getOpenid();
        return openid;
    }
url的解释:
appid=APPID:wx32f1fdf5edf36bfb
secret=SECRET:00331d6bac9330b7d7020fa8eb6e4721
不懂看上面的截图
code=CODE:上一步请求时拿到的code
然后loadjson是一个工具类,这里使用的时发送get请求,还有一个post请求:
package com.xdailiao.utils.wcutil;
import java.io.BufferedReader;
import java.io.IOException;
import java.io.InputStream;
import java.io.InputStreamReader;
import java.io.OutputStreamWriter;
import java.net.HttpURLConnection;
import java.net.URL;
import java.net.URLConnection;
public class WcUtils {
	//返回json字符串  get
	public static String loadJson (String url) {
		 StringBuilder json = new StringBuilder();  //stringbuffer更好
		 try {
			 System.out.println("进入get请求。。。。。。accessToken");
		     URL urlObject = new URL(url);
		     URLConnection uc = urlObject.openConnection();
		     BufferedReader in = new BufferedReader(new InputStreamReader(uc.getInputStream(),"utf-8"));
		     String inputLine = null;
		     while ( (inputLine = in.readLine()) != null) {
		           json.append(inputLine);
		     	}
		     in.close();
		     } catch (Exception e) {
		       e.printStackTrace();
		     	}
		     return json.toString();
	 }

	//返回json字符串  post
	public static String loadJson(String strURL,String params){
		System.out.println(strURL);
        System.out.println(params);
        try {
            URL url = new URL(strURL);// 创建连接
            HttpURLConnection connection = (HttpURLConnection) url
                    .openConnection();
            connection.setDoOutput(true);
            connection.setDoInput(true);
            connection.setUseCaches(false);
            connection.setInstanceFollowRedirects(true);
            connection.setRequestMethod("POST"); // 设置请求方式
            connection.setRequestProperty("Accept", "application/json"); // 设置接收数据的格式
            connection.setRequestProperty("Content-Type", "application/json"); // 设置发送数据的格式
            connection.connect();
            OutputStreamWriter out = new OutputStreamWriter(
                    connection.getOutputStream(), "UTF-8"); // utf-8编码
            out.append(params);
            out.flush();
            out.close();
            // 读取响应
            int length = (int) connection.getContentLength();// 获取长度
            InputStream is = connection.getInputStream();
            if (length != -1) {
                byte[] data = new byte[length];
                byte[] temp = new byte[512];
                int readLen = 0;
                int destPos = 0;
                while ((readLen = is.read(temp)) > 0) {
                    System.arraycopy(temp, 0, data, destPos, readLen);
                    destPos += readLen;
                }
                String result = new String(data, "UTF-8"); // utf-8编码
                System.out.println(result);
                return result;
            }
        } catch (IOException e) {
            // TODO Auto-generated catch block
            e.printStackTrace();
        }
        return "error"; // 自定义错误信息
	}
}
其实,这里拿到的json字符串,可以使用fastjson工具包中的JSON.praseObject(json,Map.class);转为map,通过access_token得到ACCESS_TOKEN,通过openid得到openid。我这里封装的对象。
具体的json转换请百度。
这是拿到accesstoken其实可以接着拿到接下来的用户的信息的比如头像,昵称一类的。这和snsapi_userinfo唯一的区别,没有授权这一步,也就是用户无感知。但是拿到的信息是可以一致的。
此时id就拿到了,用户对于一个公众号来是不变的。所以,简单的绑定,进展到这就行了。不必往下做了。
测试号仅对于此表中的用户有效:

snsapi_base(包括openid,用户头像,地区,昵称等信息)
那么接下来使用
snsapi_base模式拿到用户信息,因为上面已经再拿到openid的时候拿到了access_token一级refresh_token所以接下来使用access_token,以及openid拿到用户信息
/**
	 * 拿到用户详细信息
	 * @param code
	 * @return
	 */
	public static String getUserinfo(String access_token,String openid) {
		String json = UrlReq.loadJson("https://api.weixin.qq.com/sns/userinfo?access_token="+access_token+"&openid="+openid+"&lang=zh_CN ");

		return json;
	}
其他:
refresh 我的理解是可以服务器在一定时间内,可以刷新拿到用户的微信信息做到与微信信息的同步(30天)
上述代码:
请到:http://download.youkuaiyun.com/detail/meryhuang/9688127
或者联系:QQ:892645423
(2)scope=snsapi_userinfo
代码同 scope=snsapi_base 配置也和上面一致。只需吧引导链接scope=snsapi_userinfo即可。这是点击链接会先进入确认登陆页面。


 325
325

 被折叠的 条评论
为什么被折叠?
被折叠的 条评论
为什么被折叠?
 到【灌水乐园】发言


