dotnet的移除-->安装 升级

之所以要升级dotnet 是因为项目中报了如下错误
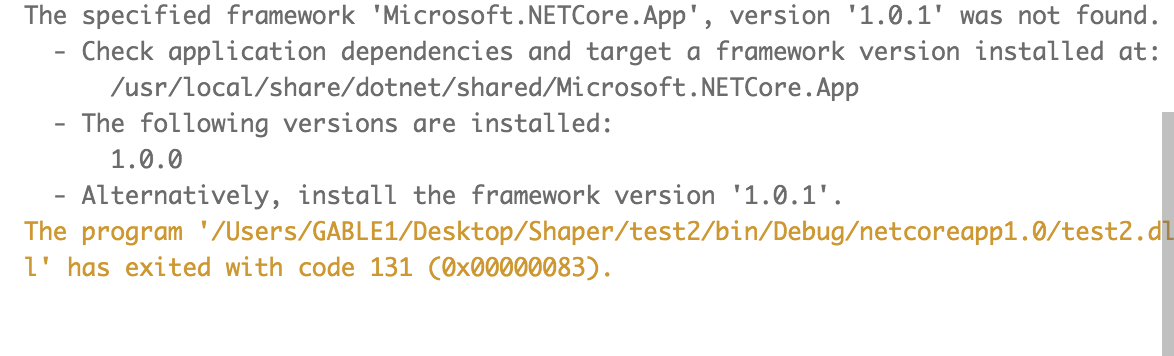
意思就是版本低了

为了升级 我先要把之前的移除掉(用脚本移除)

#!/usr/bin/env bash
#
# Copyright (c) .NET Foundation and contributors. All rights reserved.
# Licensed under the MIT license. See LICENSE file in the project root for full license information.
#

DIR="$( cd "$( dirname "${BASH_SOURCE[0]}" )" && pwd )"

current_user=$(whoami)
if [ $current_user != "root" ]; then
    echo "$(basename "$0") uninstallation script requires superuser privileges to run"
    exit 1
fi

# this is the common suffix for all the dotnet pkgs
dotnet_pkg_name_suffix="com.microsoft.dotnet"
dotnet_install_root="/usr/local/share/dotnet"
dotnet_path_file="/etc/paths.d/dotnet"

remove_dotnet_pkgs(){
    installed_pkgs=($(pkgutil --pkgs | grep $dotnet_pkg_name_suffix))

    for i in "${installed_pkgs[@]}"
    do
        echo "Removing dotnet component - \"$i\""
        pkgutil --force --forget "$i"
    done
}

remove_dotnet_pkgs
[ "$?" -ne 0 ] && echo "Failed to remove dotnet packages." && exit 1

echo "Deleting install root - $dotnet_install_root"
rm -r "$dotnet_install_root"
rm "$dotnet_path_file"

echo "dotnet packages removal succeeded."
exit 0

运行脚本的过程 遇到了权限问题

1.Mac新手不会制作脚本文件,没关系打开文本编辑器 把上面的脚本代码粘贴进去,另存为xx.sh文件,.sh文件代表的就是shell文件,保存之后如果不知道怎么在Terminal里执行,可以直接把文件拖到里面回车进行执行。
2.你还有可能遇到 permission denied: ./xx.sh,权限不够 修改脚本文件的权限 
chmod 777 + 脚本文件夹路径
3.即便权限修改成功了,你还有可能会遇到 xx.sh uninstallation script requires superuser privileges to run,没关系 我们可以在脚本文件前面加上sudo 超级权限。 sudo+ 脚本文件夹路径

成功之后到官网下载安装就行了

参考:http://www.jianshu.com/p/b836f04d5817

转载于:https://www.cnblogs.com/dlwj/p/5913284.html

<?xml version="1.0" encoding="utf-8"?> <Wix xmlns="http://wixtoolset.org/schemas/v4/wxs"> <!-- 定义产品信息 --> <Package Name="My Application" Manufacturer="Your Company" Version="1.0.0.0" UpgradeCode="PUT-GUID-HERE"> <!-- 替换为唯一GUID --> <!-- 安装流程定义 --> <MajorUpgrade DowngradeErrorMessage="A newer version is already installed." /> <MediaTemplate EmbedCab="yes" /> <!-- 定义功能(组件组) --> <Feature Id="ProductFeature" Title="Main Application" Level="1"> <ComponentGroupRef Id="ProductComponents" /> <ComponentGroupRef Id="ShortcutComponents" /> </Feature> <!-- 安装目录结构 --> <StandardDirectory Id="ProgramFilesFolder"> <Directory Id="INSTALLFOLDER" Name="MyApp" /> </StandardDirectory> <!-- 开始菜单目录 --> <StandardDirectory Id="ProgramMenuFolder"> <Directory Id="ProgramMenuDir" Name="MyApp" /> </StandardDirectory> <!-- 桌面目录 --> <StandardDirectory Id="DesktopFolder" /> </Package> <!-- 文件组件 --> <Fragment> <ComponentGroup Id="ProductComponents" Directory="INSTALLFOLDER"> <!-- 主文件 --> <Component> <File Source="example.txt" /> </Component> <!-- 添加更多文件 --> <Component> <File Source="readme.txt" /> </Component> </ComponentGroup> </Fragment> <!-- 快捷方式组件 --> <Fragment> <ComponentGroup Id="ShortcutComponents"> <!-- 开始菜单快捷方式 --> <Component Directory="ProgramMenuDir"> <Shortcut Id="StartMenuShortcut" Name="My Application" Target="[INSTALLFOLDER]example.txt" /> <RemoveFolder Id="RemoveProgramMenuDir" On="uninstall" /> </Component> <!-- 桌面快捷方式 --> <Component Directory="DesktopFolder"> <Shortcut Id="DesktopShortcut" Name="My Application" Target="[INSTALLFOLDER]example.txt" /> </Component> </ComponentGroup> </Fragment> </Wix> 你帮我看一下错误主要在什么地方,帮我修改一下,并帮我添加——选择安装目录和增加桌面快捷方式的功能
最新发布
07-29
评论
添加红包

请填写红包祝福语或标题

红包个数最小为10个

红包金额最低5元

当前余额3.43前往充值 >
需支付:10.00
成就一亿技术人!
领取后你会自动成为博主和红包主的粉丝 规则
hope_wisdom
发出的红包
实付
使用余额支付
点击重新获取
扫码支付
钱包余额 0

抵扣说明:

1.余额是钱包充值的虚拟货币,按照1:1的比例进行支付金额的抵扣。
2.余额无法直接购买下载,可以购买VIP、付费专栏及课程。

余额充值