轻轻松松上手vue、vue-router、axios、express
写在前面
vue是一个很优秀的库,但是你可能只是想在个别页面用到vue,并不是把vue作为技术栈来使用,或者你是一个初学者,想迅速的入门vue,那这篇文章可能是对你有帮助的
本篇文章不打算用webpack、不打算用vue-cli脚手架等工具,只教你如果通过简单的引入对应js文件来使用vue和vue常用组件
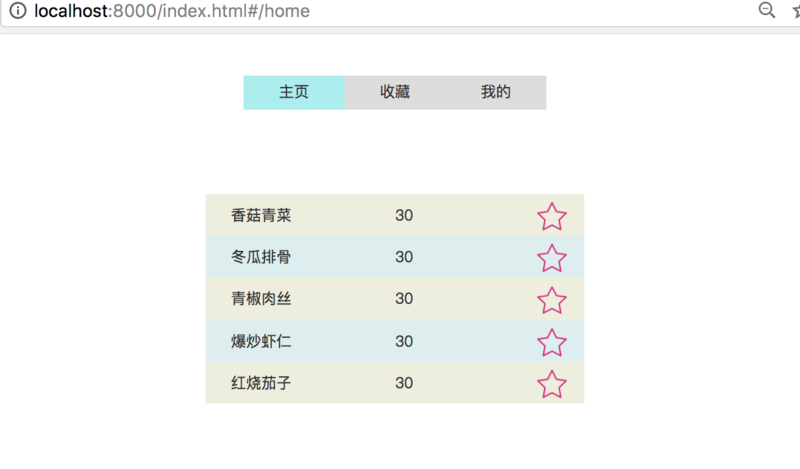
本文要实现的效果
用express返回一段数据,用axios请求这段数据,然后用vue渲染出来,用vue-router切换页面

代码解释
首先在用express返回一个食物列表,然后在vue的mounted方法获取到数据,在注册3个组件,用vue-router进行切换,并把获取到的数据传入到home这个组件中去.本文把vue、vue-router、axios、express用最简单的方式结合在一起,大家能搞懂他们的基本用法就好。
demo地址
vue
基础阅读
vue其实没什么好写的,因为都被大家写透了,所以列了几篇文章给大家看一下,有兴趣就跟着练一练。
第一个是vue官网,只需要先看一下它的基础部分,第二个是你可以把它当做是官网的重复,看一遍只当复习了,第三个是几个简单vue小例子,有兴趣就做一做,没兴趣也要至少也要把代码过一遍,当然如果觉得一切都是so easy就不用看啦。
用vue实现一个列表,并增加收藏功能
<!DOCTYPE html>
<html>

<head>
    <meta http-equiv="Content-Type" content="text/html; charset=UTF-8" />
    <title>vue-demo1</title>
    <script src="https://unpkg.com/vue"></script>
    <style>
    * {
        padding: 0px;
        margin: 0px;
    }

    ul,
    li {
        list-style: none;
    }

    .list {
        width: 450px;
        margin: 100px auto;
    }

    .list li {
        height: 50px;
        line-height: 50px;
        background-color: #dee;
    }

    .list span {
        display: inline-block;
    }

    .list .name {
        padding-left: 30px;
        text-align: left;
        width: 150px;
    }

    .list img {
        width: 40px;
        height: 40px;
        margin-left: 100px;
        vertical-align: middle;
    }

    .list .price {
        width: 100px;
        text-align: center;
    }

    li.bgActive {
        background-color: #eed;
    }
    </style>
</head>

<body>
    <div id="list">
        <food-list :foodlist="foodList"></food-list>
    </div>
    <script>
    Vue.component('foodList', {
        template: `
                        <ul class="list">
                            <li v-for="(item,index) in foodlist" :class="{bgActive:index % 2 != 1}">
                                <span v-text="item.name" class="name"></span>
                                <span class="price">30</span>
                                <img :src="imgSrc(item)" alt="" @click="shouchangClick(item)">
                            </li>
                        </ul>
                    `,
        props: ['foodlist'],
        methods: {
            imgSrc: function(item) {
                if (item.isSelect) {
                    return './img/shouchang_fill.png'

                } else {
                    return './img/shouchang.png'

                }
            },
            shouchangClick: function(item) {
                item.isSelect = !item.isSelect
            }
        },
    });
    var foodList = [{ name: '香菇青菜', isSelect: false }, { name: '冬瓜排骨', isSelect: false }, { name: '青椒肉丝', isSelect: false }, { name: '爆炒虾仁', isSelect: false }, { name: '红烧茄子', isSelect: false }]
    new Vue({
        el: list,
        data: {
            foodList
        }
    })
    </script>
</body>

</html>
express
搭建简单的服务器环境
在这里使用express,是为了演示axios的用法,为了足够简单,这里只是用express返回一段数据并把根目录直接设置成静态文件目录即可
const express = require('express')
const app = express()
app.use(express.static(__dirname))
const foodlist = [{ name: '香菇青菜', isSelect: false }, { name: '冬瓜排骨', isSelect: false }, { name: '青椒肉丝', isSelect: false }, { name: '爆炒虾仁', isSelect: false }, { name: '红烧茄子', isSelect: false }]
app.get('/foodlist', function(req, res) {
    res.send(foodlist)
})
app.listen(8000)http://localhost:8000/index.html 会正常显示index.html
http://localhost:8000/foodlist 会返回foodlist这个数组
axios
用vue中使用axios
<!DOCTYPE html>
<html>

<head>
    <meta http-equiv="Content-Type" content="text/html; charset=UTF-8" />
    <title>vue-demo1</title>
    <script src="https://unpkg.com/vue"></script>
    <script src="https://unpkg.com/axios/dist/axios.min.js"></script>
    <style>
    * {
        padding: 0px;
        margin: 0px;
    }

    ul,
    li {
        list-style: none;
    }

    .list {
        width: 450px;
        margin: 100px auto;
    }

    .list li {
        height: 50px;
        line-height: 50px;
        background-color: #dee;
    }

    .list span {
        display: inline-block;
    }

    .list .name {
        padding-left: 30px;
        text-align: left;
        width: 150px;
    }

    .list img {
        width: 40px;
        height: 40px;
        margin-left: 100px;
        vertical-align: middle;
    }

    .list .price {
        width: 100px;
        text-align: center;
    }

    li.bgActive {
        background-color: #eed;
    }
    </style>
</head>

<body>
    <div id="list">
        <food-list :foodlist="foodList"></food-list>
    </div>
    <script>
    Vue.component('foodList', {
        template: `
                        <ul class="list">
                            <li v-for="(item,index) in foodlist" :class="{bgActive:index % 2 != 1}">
                                <span v-text="item.name" class="name"></span>
                                <span class="price">30</span>
                                <img :src="imgSrc(item)" alt="" @click="shouchangClick(item)">
                            </li>
                        </ul>
                    `,
        props: ['foodlist'],
        methods: {
            imgSrc: function(item) {
                if (item.isSelect) {
                    return './img/shouchang_fill.png'

                } else {
                    return './img/shouchang.png'

                }
            },
            shouchangClick: function(item) {
                item.isSelect = !item.isSelect
            }
        },
    });
    var foodList = []
    new Vue({
        el: list,
        data: {
            foodList
        },
        mounted: function() {
            _this = this
            axios.get('/foodlist')
                .then(function(res) {
                    _this.foodList = res.data
                })
                .catch(function(error) {
                    console.log(error)
                });
        }
    })
    </script>
</body>

</html>通过http://localhost:8000/index.html ,这个时候网页中的数据已经是通过axios请求到服务器数据了
vue-router
资料
为了更好的理解前端路由的存在,你需要看这篇文章:前端:你要懂的单页面应用和多页面应用
这篇文章可以让你快速入门vue-router vue-router 60分钟快速入门
直接看代码
<!DOCTYPE html>
<html>

<head>
    <meta http-equiv="Content-Type" content="text/html; charset=UTF-8" />
    <title>vue-demo1</title>
    <script src="https://unpkg.com/vue"></script>
    <script src="https://unpkg.com/vue-router"></script>
    <script src="https://unpkg.com/axios/dist/axios.min.js"></script>
    <style>
    * {
        padding: 0px;
        margin: 0px;
    }

    ul,
    li {
        list-style: none;
    }

    #linkList {
        width: 360px;
        height: 40px;
        margin: 50px auto;
    }

    #linkList li {
        width: 120px;
        height: 40px;
        line-height: 40px;
        background-color: #ddd;
        text-align: center;
        font-size: 18px;
        float: left;
    }

    #linkList li:hover {
        cursor: pointer;
    }

    #linkList li.router-link-active {
        background-color: #aee;
    }

    .list {
        width: 450px;
        margin: 100px auto;
    }

    .list li {
        height: 50px;
        line-height: 50px;
        background-color: #dee;
    }

    .list span {
        display: inline-block;
    }

    .list .name {
        padding-left: 30px;
        text-align: left;
        width: 150px;
    }

    .list img {
        width: 40px;
        height: 40px;
        margin-left: 100px;
        vertical-align: middle;
    }

    .list .price {
        width: 100px;
        text-align: center;
    }

    li.bgActive {
        background-color: #eed;
    }
    </style>
</head>

<body>
    <div id="app">
        <ul id="linkList">
            <router-link to="/home" tag="li">主页</router-link>
            <router-link to="/shoucang" tag="li">收藏</router-link>
            <router-link to="/me" tag="li">我的</router-link>
        </ul>
        <router-view :foodlist="foodList"></router-view>
    </div>
    <script>
    const home = {
        template: `
                            <ul class="list">
                                <li v-for="(item,index) in foodlist" :class="{bgActive:index % 2 != 1}">
                                    <span v-text="item.name" class="name"></span>
                                    <span class="price">30</span>
                                    <img :src="imgSrc(item)" alt="" @click="shouchangClick(item)">
                                </li>
                            </ul>
                        `,
        props: ['foodlist'],
        methods: {
            imgSrc: function(item) {
                if (item.isSelect) {
                    return './img/shouchang_fill.png'

                } else {
                    return './img/shouchang.png'

                }
            },
            shouchangClick: function(item) {

                item.isSelect = !item.isSelect
            }
        }

    }
    const shouchang = {
        template: '<div style="text-align:center">收藏</div>'
    }
    const me = {
        template: '<div style="text-align:center">我的</div>'
    }

    const routes = [
        { path: '/home', component: home },
        { path: '/shoucang', component: shouchang },
        { path: '/me', component: me }
    ]
    const router = new VueRouter({
        routes
    })
    var foodList = []
    new Vue({
        el: "#app",
        data: {
            foodList
        },
        router,
        mounted: function() {
            _this = this
            axios.get('/foodlist')
                .then(function(res) {
                    _this.foodList = res.data
                })
                .catch(function(error) {
                    console.log(error)
                });
        }
    })
    </script>
</body>

</html>


 本文介绍如何不使用复杂工具,仅通过引入JS文件的方式实现Vue、Vue-router、Axios和Express的基本运用。涵盖用Express提供数据、Axios获取数据、Vue渲染数据及Vue-router实现页面切换等内容。


 9295
9295

 被折叠的 条评论
为什么被折叠?


