


 本文介绍如何在Java项目中引入Spring框架2.5版本,并通过实例演示配置过程及简单应用。主要内容包括:导入Spring包、配置web.xml、创建applicationContext.xml文件等步骤。
1) 导入spring包。下载spring-framework-2.5.6并解压后,在spring-framework-2.5.6"dist目录下找到spring.jar,引入到工程中。
说明:spring.jar是包含有完整发布的单个jar包,spring.jar中包含除了 spring-mock.jar里所包含的内容外其它所有jar包的内容,因为只有在开发环境下才会用到spring-mock.jar来进行辅助测试,正式应用系统中是用不得这些类的。除了spring.jar文件,Spring还包括有其它13个独立的jar包,各自包含着对应的Spring组件,用户可以根据自己的需要来选择组合自己的jar包,而不必引入整个spring.jar的所有类文件。这里,为了使用方便,我们引入整个spring.jar。
2) 配置web.xml文件。Jar包引入完成后,就开始配置spring了,首先修改web.xml文件,增加如下代码:
 <!--
<!--  * 从类路径下加载spring的配置文件, 多个配置文件可以用逗号和空格区分
 * classpath: 关键字特指类路径下加载-->
 <context-param>
 <param-name>contextConfigLocation</param-name>
 <param-value>
 classpath*:spring/applicationContext*.xml
 </param-value>
 </context-param>
在这里,我们指定了spring配置文件的路径,即WEB-INF/classes/spring目录下的所有以applicationContext开头命名的xml文件。
3) 在src下面新建applicationContext.xml文件。首先给这个文件加上spring的标头:
 <?xml version="1.0" encoding="UTF-8"?>
 <beans xmlns="http://www.springframework.org/schema/beans"
 xmlns:xsi="http://www.w3.org/2001/XMLSchema-instance"
 xmlns:aop="http://www.springframework.org/schema/aop"
 xmlns:tx="http://www.springframework.org/schema/tx"
 xsi:schemaLocation="http://www.springframework.org/schema/beans http://www.springframework.org/schema/beans/spring-beans-2.5.xsd
 http://www.springframework.org/schema/aop http://www.springframework.org/schema/aop/spring-aop-2.5.xsd
 http://www.springframework.org/schema/tx http://www.springframework.org/schema/tx/spring-tx-2.5.xsd">
 </beans>
注意:标头是2.5的 不要引入2.0, 错了可能Spring就不能正确加载。
5.2 示例
Spring基本配置完毕,让我们建个示例来测试一下吧,首先在test.spring包下创建两个java文件:TUser.java、SpringTest.java。
TUser.java:
 package test.spring;
2

3
 public class TUser implements java.io.Serializable {
4
 private String username;
5
 private String allname;
6
 private String address;
7

8
 public String getUsername() {
9
 return this.username;
10
 }
}11
 public void setUsername(String username) {
12
 this.username = username;
13
 }
}14
 public String getAllname() {
15
 return this.allname;
16
 }
}17
 public void setAllname(String allname) {
18
 this.allname = allname;
19
 }
}20
 public String getAddress() {
21
 return this.address;
22
 }
}23
 public void setAddress(String address) {
24
 this.address = address;
25
 }
}26
 }
}27

SpringTest.java:
 package test.spring;
2

3
 import org.springframework.context.ApplicationContext;
4
 import org.springframework.context.support.ClassPathXmlApplicationContext;
5

6
 public class SpringTest {
7
 public static void main( String[] args ) {
8
 //加载spring配置文件,初始化IoC容器
9
 ApplicationContext ac = new ClassPathXmlApplicationContext("spring/applicationContext.xml");
10
 //从容器 接管Bean
11
 TUser user = (TUser) ac.getBean("TUser");
12
 //输出欢迎信息
13
 System.out.println( "Hello:" + user.getUsername() + ";u is in " + user.getAddress() + " ; and u is " + user.getAllname() );
14
 }
}15
 }
}16

创建完毕后,就剩最后一步了,在applicationContext.xml中配置一个bean,在xml中增加如下代码:
 <bean id="TUser" class="test.spring.TUser">
 <property name="username" value="小张"></property>
 <property name="allname" value="张三"></property>
 <property name="address" value="青岛市"></property>
 </bean>
好了,下面运行一下吧,右键单击SpringTest.java选择run as àJava Application,运行结果如下:
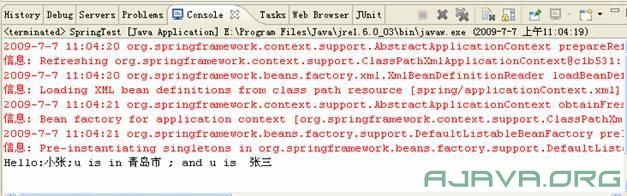
如果你的运行结果和上面一样,且没有异常,则说明Spring配置成功了。是不是很简单?不要骄傲,重要的是Spring与Hibernate、Struts的整合。继续吧!
转载于:https://blog.51cto.com/4925054/884311


 7096
7096

 被折叠的 条评论
为什么被折叠?
被折叠的 条评论
为什么被折叠?
 到【灌水乐园】发言


