


 本文详细介绍如何在Windows Server基础设施中使用Visual Studio 2008搭建FluorineFX服务,实现Flex应用程序与.NET服务的集成。从安装FluorineFX到创建服务库、数据对象直至测试服务,步骤清晰明了。
If you have a windows server infrastructure and want to build Flex applications, what is the best way to integrate them? This is the first in what will be a series about setting up .Net services as a back end for Flex applications.
After reading the documentation and forums for FluorineFX, I felt like a tutorial that bridged the whole process was in order. Most of these steps are available within the FluorineFX docs or forums, but I figured it would be helpful to bring it all together to present my take on it, and particularly to put together a simple ActionScript 3 Flex app that consumes the .net service created. FluorineFX makes it really very easy to get AMF and RPC set up to allow ASPX services to be used as a back end for a flex application, but it has several steps. Today I’m posting Part I: setting up the .net service using Visual Studio 2008.
0) Download and execute the FlourineFX installer from http://www.fluorinefx.com/download.html.
This will install a couple of project templates in VS 2008
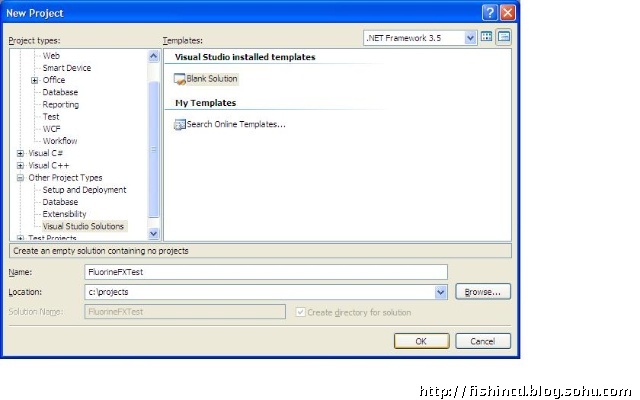
1) Create an empty solution in VS 2008
2) Add the FluorineFX service library
Add a new project to the solution (Right click on the solution in the solution explorer and select Add->New Project. Select the FluorineFx ServiceLibrary template. Note that after creating the project you may have to access its project properties and select the .net 3.5 as the target framework if you require it. On mine it defaulted to framework version 2.0.

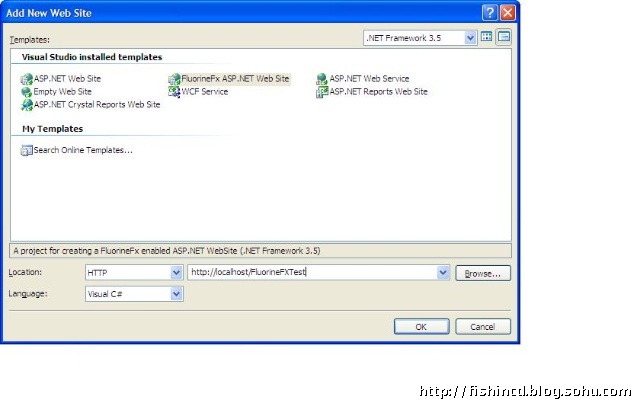
3) Add the ASPX-hosted web service
Click File->Add->New Web Site. Select the FluorineFX ASP.NET Web Site template, and select the location of the site.
4) Add the data project
Next I’m adding a project to hold our data objects. This is useful because we may use an ORM or keep our business objects separate or just to keep things clean. Right click the solution in the solution explorer pane, and select Add->New Project. Select the Class Library template

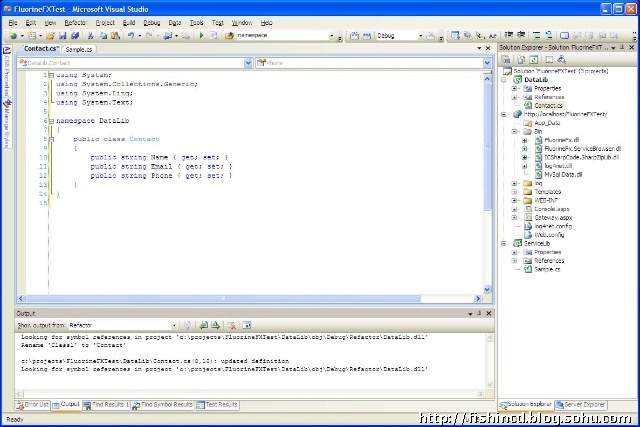
5) Add a class whose instances we want to send to flex
I’m going to add a very simple Contact object with which to test passing objects to flex. So first right-click and rename the automatically created class file from Class1 to Contact. Then add the following to the class file:
Contact.cs
using System;

namespace DataLib
{
    public class Contact
    {
        public string Name { get; set; }
        public string Email{ get; set; }
        public string Phone{ get; set; }
    }
}
6) Add a reference from the Service Library to the data project
Right click on the Service Library project and select Add Reference. Select your data library class from the Projects tab.
7) Add our service methods to Sample.cs
Add the following methods to the class created in our ServiceLib project. This will allow us to test sending a single object and an array of objects to flex. Note the use of FluorineFx.AMF3.ArrayCollection. This is used in place of ArrayList because it translates directly into the ActionScript ArrayCollection type.
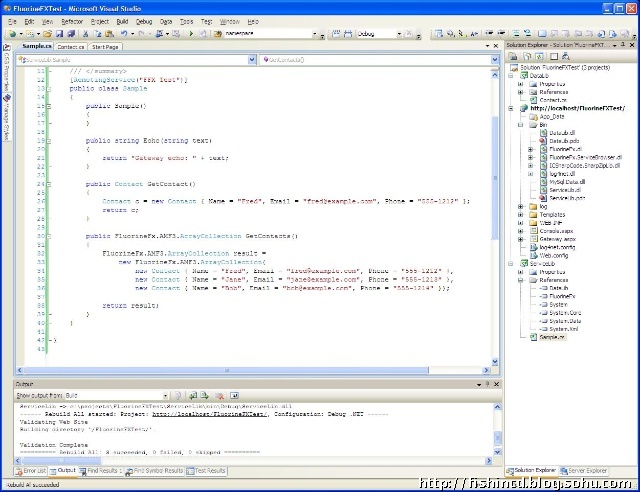
public Contact GetContact()
        {
            Contact c = new Contact { Name = "Fred", Email = "fred@example.com", Phone = "555-1212" };
            return c;
        }

        public FluorineFx.AMF3.ArrayCollection GetContacts()
        {
            FluorineFx.AMF3.ArrayCollection result =
                new FluorineFx.AMF3.ArrayCollection{
                    new Contact { Name = "Fred", Email = "fred@example.com", Phone = "555-1212" },
                    new Contact { Name = "Jane", Email = "jane@example.com", Phone = "555-1213" },
                    new Contact { Name = "Bob", Email = "bob@example.com", Phone = "555-1214" }};

            return result;
        }
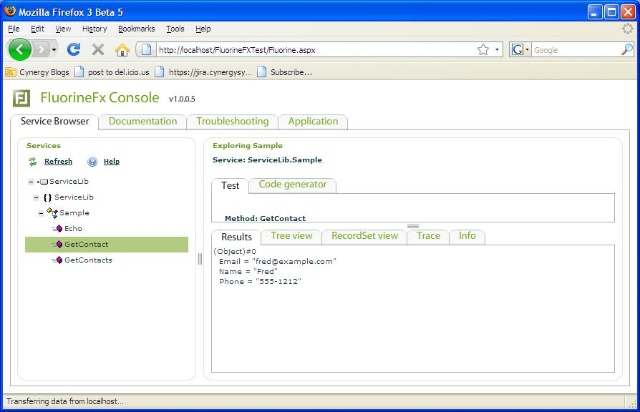
8) Test with the service browser
Build the solution, then open a web browser to the FluorineFX service browser for this service: http://localhost/\[service folder]/Fluorine.aspx. If you’re using the VS Development Web Server, you will need to add the port number to localhost. Navigate to the service methods and click the Call button to test.


 被折叠的 条评论
为什么被折叠?
被折叠的 条评论
为什么被折叠?
 到【灌水乐园】发言


