


 本文详细介绍如何在Linux环境下安装和配置Keepalived服务,包括依赖安装、Keepalived安装及配置、服务启动与验证过程。同时,文章还提供了解决Centos7下firewalld对KeepalivedVIP问题的方法。

1. 安装依赖
su - root
yum -y install kernel-devel*
yum -y install openssl-*
yum -y install popt-devel
yum -y install lrzsz
yum -y install openssh-clients
2. 安装keepalived
2.1. 上传
1、cd /usr/local
2、rz
–y
3、选择keepalived安装文件
2.2. 解压
tar –zxvf keepalived-1.2.2.tar.gz
2.3. 重命名
mv keepalived-1.2.2 keepalived
2.4. 安装keepalived
1、
cd keepalived
2、执行命令
./configure --prefix=/usr/local/keepalived -enable-lvs-syncd --enable-lvs --with-kernel-dir=/lib/modules/2.6.32-431.el6.x86_64/build
3、编译
make
4、安装
make install
2.5. 配置服务和加入开机启动
cp /usr/local/keepalived/etc/rc.d/init.d/keepalived /etc/init.d/
cp /usr/local/keepalived/etc/sysconfig/keepalived /etc/sysconfig/
mkdir -p /etc/keepalived
cp /usr/local/keepalived/etc/keepalived/keepalived.conf /etc/keepalived/
ln -s /usr/local/keepalived/sbin/keepalived /sbin/
chkconfig keepalived on
2.6. 修改配置文件
1、 vi /etc/keepalived/keepalived.conf
2、 详解:
! Configuration File for keepalived #master
global_defs {
notification_email {
#acassen@firewall.loc
#failover@firewall.loc
#sysadmin@firewall.loc
}
notification_email_from Alexandre.Cassen@firewall.loc
#smtp_server 192.168.200.1
#smtp_connect_timeout 30
router_id LVS_DEVEL
}
vrrp_instance VI_1 {
state MASTER #MASTER 是默认主,从机BACKUP
interface eth1 #网卡名称
virtual_router_id 51
priority 200 #权重,越大的成为MASTER
advert_int 1
authentication {
auth_type PASS
auth_pass 1111
}
virtual_ipaddress {
192.168.56.70 #虚拟IP,主从机子都保持一致
#192.168.200.17
#192.168.200.18
}
}
3. 按照上面步骤安装备机器
注意:备的配置文件不相同。
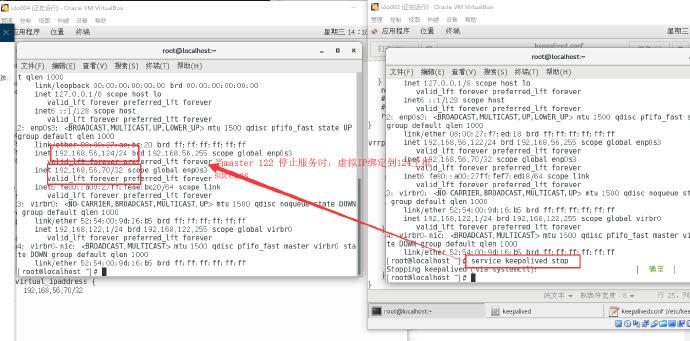
4. 两台机器启动keepalived:
service keepalived start
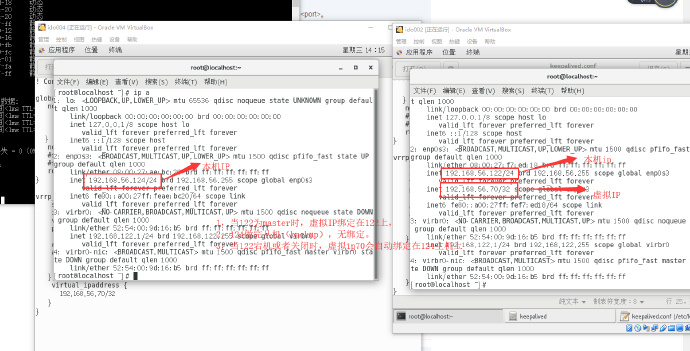
5. 验证
ip a
问题解决:
Centos7-firewalld解决keepalived的VIP问题
firewalld 防火墙
语法命令如下:启用区域端口和协议组合firewall-cmd [--zone=] --add-port=[-]/ [--timeout=]
此举将启用端口和协议的组合。 端口可以是一个单独的端口 或者是一个端口范围 -。 协议可以是 tcp 或 udp。
查看 firewalld 状态systemctl status firewalld
开启 firewalld systemctl start firewalld
开放端口// --permanent 永久生效,没有此参数重启后失效firewall-cmd --zone=public --add-port=80/tcp --permanent
firewall-cmd --zone=public --add-port=1000-2000/tcp --permanent
keepalived的VIP问题firewall-cmd --direct --permanent --add-rule ipv4 filter INPUT 0 --in-interface ens33 --destination 224.0.0.18 --protocol vrrp -j ACCEPT
重新载入firewall-cmd --reload
查看firewall-cmd --zone=public --query-port=80/tcp
删除firewall-cmd --zone=public --remove-port=80/tcp --permanent
iptables 防火墙也可以还原传统的管理方式使用 iptablessystemctl stop firewalld systemctl mask firewalld
安装 iptables-servicesyum install iptables-services
设置开机启动systemctl enable iptables
操作命令systemctl stop iptables systemctl start iptables systemctl restart iptables systemctl reload iptables
保存设置service iptables save
开放某个端口 在 /etc/sysconfig/iptables 里添加-A RH-Firewall-1-INPUT -m state --state NEW -m tcp -p tcp --dport 8080 -j ACCEPT


 293
293

 被折叠的 条评论
为什么被折叠?
被折叠的 条评论
为什么被折叠?
 到【灌水乐园】发言


