多线程
1>进程
2>线程
/*
进程:正在进行中的程序(直译),其实就是该应用程序在内存中分配的空间。
线程:是在进程中负责程序执行的一条路径。负责程序执行的。
在进程中至少有一个线程在运行。
多线程:当有多部分代码需要同时运行时,就需要开辟多条执行路径来完成。
这时该程序就是多线程程序。
多线程解决了,让多部门代码同时运行的问题。
3>多线程存在的意义。
4>线程的创建方式
5>多线程的特性
/*
通过api文档发现Thread类中描述中。
有两种创建方式。
1,继承Thread类,并复写run方法。
每一个线程都应该有自己的任务,而且任务都会定义在指定的位置上。
主线程的任务都定义在main方法中。
自定义线程的任务都定义在了run方法中。
Thread t = new Thread();
t.start();//这种开启只能调用Thread类中自己的run方法。而该run方法中并未定义自定义的内容。
我还需要创建线程,还要让线程执行自定义的任务。
所以可以复写run方法。前提必须是继承Thread类。
而继承了Thread后,该子类对象就是线程对象。
~~~~~~~~~~
*/
class Demo extends Thread
{
private String name;
Demo(String name)
{
this.name = name;
}
public void run()
{
for(int x=0; x<10; x++)
{
System.out.println("name...."+x+"....."+name);
}
}
}
class ThreadDemo
{
public static void main(String[] args)
{
//创建线程对象。
Demo d1 = new Demo("小强");
Demo d2 = new Demo("旺财");
//开启线程。让线程运行起来。
d1.start();
d2.start();
d1.run();
d2.run();
}
}
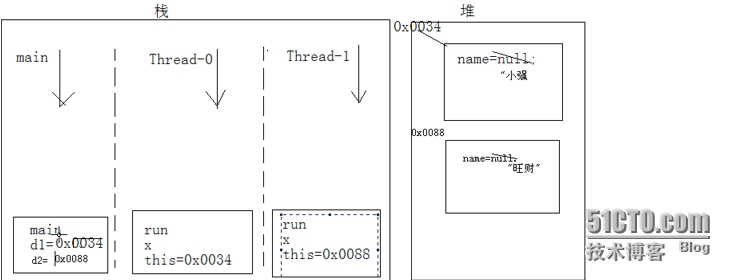
多线程内存图:
/*
调用run方法和调用start方法的区别?
如何定义线程名称。如果将线程名称打印在控制台上。
class Demo extends Thread
{
//private String name;
Demo(String name)
{
//this.name = name;
super(name);
}
public void run()
{
//System.out.println(3/0);
for(int x=0; x<10; x++)
{
System.out.println("name="+"::::"+getName());
}
}
}
class ThreadDemo2
{
public static void main(String[] args)
{
Demo d1 = new Demo("小强");
Demo d2 = new Demo("旺财");
d1.start();
d2.start();
//int[] arr = new int[2];
//System.out.println(arr[2]);
//System.out.println("over");
System.out.println(Thread.currentThread().getName());
}
}
-----------
JVM中的多线程了解。
jvm中也一样是多线程程序,
只要有一个线程负责着程序的执行。
又有一个线程负责着垃圾的回收。
这个是同时进行的。
结论:
每一个线程都有自己的运行代码,这个称之为线程的任务。
对于每一个线程便于识别都有自己的名称。
比如负责从主函数执行程序代码的线程,称之为 主线程。main thread.
主线程运行的代码都定义在主函数中。
负责收垃圾的线程:垃圾回收线程。
发现运行结果不一样。
多线程的随机性造成的,因为cpu的快速切换的原因。
final finally finalize
*/
class Test extends Object
{
/*
重写了垃圾回收器调用的方法
*/
public void finalize()
{
System.out.println("test ok");
}
}
class Demo
{
public static void main(String[] args)
{
new Test();
new Test();
new Test();
new Test();
new Test();
System.gc();//调用了一次垃圾回收器。
System.out.println("Hello World!1");
System.out.println("Hello World!2");
System.out.println("Hello World!3");
System.out.println("Hello World!4");
}
}
创建线程方式一
1.子类覆盖父类中的run方法,将线程运行的代码存放在run中。
2.建立子类对象的同时线程也被创建。
3.通过调用start方法开启线程。
例
~~~~~~~~~~~~~~~~~~~~~~~~~~~~~~
*/
创建线程方式二
实现Runnable接口
1>子类覆盖接口中的run方法。
2>通过Thread类创建线程,并将实现了Runnable接口的子类对象作为参数传递给Thread类的构造函数。
3>Thread类对象调用start方法开启线程。
思考:为什么要给Thread类的构造函数传递Runnable的子类对象?
线程安全问题
导致安全问题的出现的原因:
1>多个线程访问出现延迟。
2>线程随机性 。
注:线程安全问题在理想状态下,不容易出现,但一旦出现对软件的影响是非常大的。
/*
创建线程的第二种方式。实现Runnable接口。
1,实现Runnable接口。
2,覆盖run方法。
3,通过Thread类创建线程对象。
4,将Runnable接口的子类对象作为实参传递给Thread类中的构造函数。
因为要让线程去运行指定的对象的run方法。
5,调用start方法开启线程,并运行Runnable接口子类的run方法。
第二种实现Runnable接口创建线程思想:
将线程任务和线程对象进行解耦,将线程任务单独封装成对象。
另,实现Runnable接口可以避免单继承的局限性。
所以建议创建多线程,都是用实现Runnable接口的方式。
*/
class Ticket implements Runnable
{
private int num = 100;
public void run()
{
while(true)
{
if(num>0)
{
//try{Thread.sleep(10);}catch(InterruptedException e){}//让线程在这里小睡,导致 了 0 -1 等错误票的产生。
//出现了线程安全问题。
System.out.println(Thread.currentThread().getName()+"..sale:"+num--);
}
}
}
}
class ThreadDemo3_Ticket_Runnable
{
public static void main(String[] args)
{
Ticket t = new Ticket();
Thread t1 = new Thread(t);
Thread t2 = new Thread(t);
Thread t3 = new Thread(t);
Thread t4 = new Thread(t);
t1.start();
t2.start();
t3.start();
t4.start();
}
}
/*
class Thread
{
private Runnable target;
Thread()
{
}
Thread(Runnable target)
{
this.target = target;
}
public void run()
{
if(target!=null){
target.run();
}
}
public void start()
{
run();
}
}
class Student impl Runnable
{
public void run(){}
}
Student stu = new Student();
Thread t = new Thread(stu);
t.start();
*/
/*
线程安全问题。
原因:
1,多个线程在同时处理共享数据。
2,线程任务中的有多条代码在操作共享数据。
安全问题成因就是:一个线程在通过多条操作共享数据的过程中,其他线程参与了共享数据的操作。
导致到了数据的错误。
想要知道你的多线程程序有没有安全问题:
只要看线程任务中是否有多条代码在处理共享数据。
解决:
一个线程在通过多条语句操作共享数据的过程中,不允许其他线程参与运算。就哦了。
如何代码体现呢?
Java中提供了同步代码块进行引起安全问题的代码封装。
格式:
synchronized(对象)
{
//需要被同步的代码;
}
同步:
好处:解决了多线程的安全问题。
弊端:降低了效率。
同步的前提:
1,至少有两个线程在同步中。
2,必须保证同步使用的是同一个锁。
*/
class Ticket implements Runnable
{
private int num = 100;
Object obj = new Object();
public void run()
{
while(true)
{
synchronized(obj)
{
if(num>0)
{
try{Thread.sleep(10);}catch(InterruptedException e){}//让线程在这里小睡,导致了 0 -1 等错误票的产生。
//出现了线程安全问题。
System.out.println(Thread.currentThread().getName()+"..sale:"+num--);
}
}
}
}
}
class ThreadDemo4_Ticket_Safe
{
public static void main(String[] args)
{
Ticket t = new Ticket();
Thread t1 = new Thread(t);
Thread t2 = new Thread(t);
Thread t3 = new Thread(t);
Thread t4 = new Thread(t);
t1.start();
t2.start();
t3.start();
t4.start();
}
}
同步(synchronized)
格式:
synchronized(对象)
{
需要同步的代码;
}
同步可以解决安全问题的根本原因就在那个对象上。
该对象如同锁的功能。
同步的特点
同步的前提:
1>同步需要两个或者两个以上的线程。
2>多个线程使用的是同一个锁。
未满足这两个条件,不能称其为同步。
同步的弊端:
当线程相当多时,因为每个线程都会去判断同步上的锁,这是很耗费资源的,无形中会降低程序的运行效率.
同步函数
格式:
在函数上加上synchronized修饰符即可。
思考:同步函数用的是哪个锁呢?
程序验证。
线程间通信
思考1:wait(),notify(),notifyAll(),用来操作线程为什么定义在了Object类中?
1>这些方法存在与同步中。
2>使用这些方法时必须要标识所属的同步的锁。
3>锁可以是任意对象,所以任意对象调用的方法一定定义Object类中。
思考2:wait(),sleep()有什么区别?
wait():释放cpu执行权,释放锁。
sleep():释放cpu执行权,不释放锁
停止线程
1>定义循环结束标记
因为线程运行代码一般都是循环,只要控制了循环即可。
2>使用interrupt(中断)方法
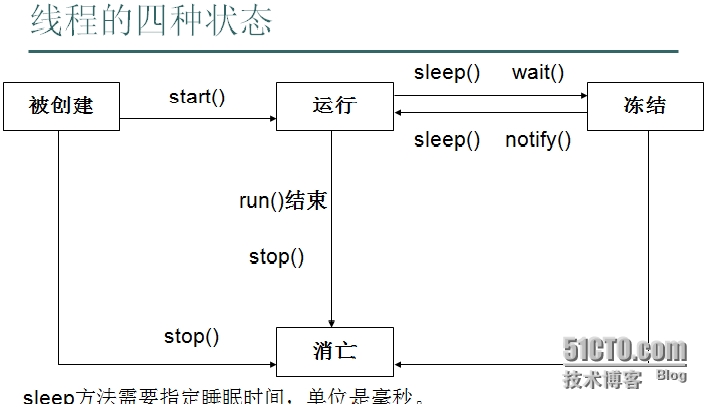
该方法是结束线程的冻结状态,使线程回到运行状态中来。
注:stop方法已经过时不再使用
线程类的其他方法
1>setPriority(int num)
2>setDaemon(boolean b)
3>join()
4>自定义线程名称
5>toString()
/*
线程安全问题。
原因:
1,多个线程在同时处理共享数据。
2,线程任务中的有多条代码在操作共享数据。
安全问题成因就是:一个线程在通过多条操作共享数据的过程中,其他线程参与了共享数据的操作。
导致到了数据的错误。
想要知道你的多线程程序有没有安全问题:
只要看线程任务中是否有多条代码在处理共享数据。
解决:
一个线程在通过多条语句操作共享数据的过程中,不允许其他线程参与运算。就哦了。
如何代码体现呢?
Java中提供了同步代码块进行引起安全问题的代码封装。
格式:
synchronized(对象)
{
//需要被同步的代码;
}
同步:
好处:解决了多线程的安全问题。
弊端:降低了效率。
同步的前提:
1,至少有两个线程在同步中。
2,必须保证同步使用的是同一个锁。
*/
class Ticket implements Runnable
{
private int num = 100;
Object obj = new Object();
public void run()
{
while(true)
{
synchronized(obj)
{
if(num>0)
{
try{Thread.sleep(10);}catch(InterruptedException e){}//让线程在这里小睡,导致了 0 -1 等错误票的产生。
//出现了线程安全问题。
System.out.println(Thread.currentThread().getName()+"..sale:"+num--);
}
}
}
}
}
class ThreadDemo4_Ticket_Safe
{
public static void main(String[] args)
{
Ticket t = new Ticket();
Thread t1 = new Thread(t);
Thread t2 = new Thread(t);
Thread t3 = new Thread(t);
Thread t4 = new Thread(t);
t1.start();
t2.start();
t3.start();
t4.start();
}
}
/*
静态同步函数使用的锁是什么?
就是所在类的 类名.class 字节码文件对象。
*/
class Ticket implements Runnable
{
private static int num = 100;
boolean flag = true;
Object obj = new Object();
public void run()
{
if(flag)
{
while(true)
{
synchronized(Ticket.class)//super.getClass()
{
if(num>0)
{
try{Thread.sleep(10);}catch(InterruptedException e){}
System.out.println(Thread.currentThread().getName()+"..obj:"+num--);
}
}
}
}
else
while(true)
{
this.sale();
}
}
public static synchronized/**/ void sale()//static同步函数。
{
if(num>0)
{
try{Thread.sleep(10);}catch(InterruptedException e){}
System.out.println(Thread.currentThread().getName()+"..func:"+num--);
}
}
}
class ThreadDemo5_Ticket_StaticLock
{
public static void main(String[] args)
{
Ticket t = new Ticket();
Thread t1 = new Thread(t);
Thread t2 = new Thread(t);
//Thread t3 = new Thread(t);
//Thread t4 = new Thread(t);
t1.start();
try{Thread.sleep(10);}catch(InterruptedException e){}
t.flag = false;
t2.start();
//t3.start();
//t4.start();
}
}
//饿汉式
class Single
{
private static final Single s = new Single();
private Single(){}
public static Single getInstance()
{
return s;
}
}
//懒汉式
/*
加同步关键字,解决的是安全问题。
加双重判断,是为了提高效率。
*/
class Single
{
private static Single s = null;
private Single(){}
public static Single getInstance()
{
if(s==null)
{
synchronized(Single.class)
{
if(s==null)
{
//-->0
s = new Single();
}
}
}
return s;
}
}
class ThreadDemo6_Single
{
public static void main(String[] args)
{
}
}
/*
同步的另一个弊端:
容易引发死锁。
开发时,尽量避免同步嵌套的情况。
*/
class Ticket implements Runnable
{
private int num = 100;
boolean flag = true;
Object obj = new Object();
public void run()
{
if(flag)
{
while(true)
{
synchronized(obj)
{
sale();
}
}
}
else
while(true)
{
this.sale();
}
}
public synchronized/**/ void sale()//同步函数。
{
synchronized(obj)
{
if(num>0)
{
try{Thread.sleep(10);}catch(InterruptedException e){}
System.out.println(Thread.currentThread().getName()+"..sale:"+num--);
}
}
}
}
class ThreadDemo7_Ticket_DeadLock
{
public static void main(String[] args)
{
Ticket t = new Ticket();
Thread t1 = new Thread(t);
Thread t2 = new Thread(t);
t1.start();
try{Thread.sleep(10);}catch(InterruptedException e){}
t.flag = false;
t2.start();
}
}
class Demo implements Runnable
{
private boolean flag;
Demo(boolean flag)
{
this.flag = flag;
}
public void run()
{
if(flag)
{
while(true)
{
synchronized(MyLock.LOCKA)
{
System.out.println("if locka");
synchronized(MyLock.LOCKB)
{
System.out.println("if lockb");
}
}
}
}
else
{
while(true)
{
synchronized(MyLock.LOCKB)
{
System.out.println("else lockb");
synchronized(MyLock.LOCKA)
{
System.out.println("else locka");
}
}
}
}
}
}
class MyLock
{
public static final Object LOCKA = new Object();
public static final Object LOCKB = new Object();
}
class ThreadDemo8_DeadLock
{
public static void main(String[] args)
{
Demo d1 = new Demo(true);
Demo d2 = new Demo(false);
Thread t1 = new Thread(d1);
Thread t2 = new Thread(d2);
t1.start();
t2.start();
}
}
/*
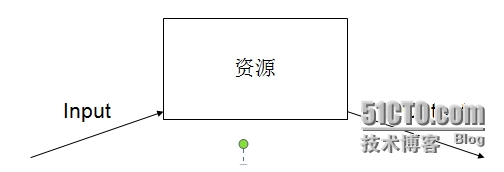
多线程间通信:多个线程处理同一资源,但是处理动作却不同。
wait():可以让当前处于等待,这时的线程被临时存储到的线程池中。
notify():唤醒线程池中任意一个等待的线程。
notifyAll():唤醒线程池中所有的等待线程。
这些方法在使用时,必须要定义在同步中,必须被所属同步的锁对象来调用。
*/
//创建一个资源描述。资源中有name sex。用于存储数据。
class Resource
{
String name;
String sex;
//定义标记,用于判断资源中是否有数据。
boolean flag;
}
//需要定义一个输入任务描述。既然是线程任务,必须实现Runnable接口。
class Input implements Runnable
{
private Resource r;
//private Object obj = new Object();
Input(Resource r)
{
this.r = r;
}
//覆盖run方法。
public void run()
{
int x = 0;
while(true)
{
synchronized(r)
{
if(r.flag)
try{r.wait();}catch(Exception e){}
//输入任务中必然要处理资源。要给资源中的name sex赋值。
//需要对象。对象确定吗?不确定,传递进来就哦了。输入任务一创建对象就必须有资源。
//完全可以在构造时明确资源对象。
if(x==0)
{
r.name = "zhangsan";
r.sex = "man";
}
else
{
r.name = "小花";
r.sex = "女女女女女";
}
//赋值后,将标记改为true,说明有值。
r.flag = true;
//唤醒等待的线程。
r.notify();
}
x = (x+1)%2;
}
}
}
//需要定义一个输出任务描述。既然是线程任务,必须实现Runnable接口。
class Output implements Runnable
{
private Resource r;
//private Object obj = new Object();
Output(Resource r)
{
this.r = r;
}
public void run()
{
while(true)
{
synchronized(r)
{
if(!r.flag)//资源中没有数据就等待。
try{r.wait();}catch(Exception e){}
System.out.println(r.name+"...."+r.sex);
//将标记改为false.
r.flag = false;
//唤醒等待的线程。其实就是唤醒了输入线程。
r.notify();
}
}
}
}
class ThreadDemo_Resource
{
public static void main(String[] args)
{
//1,创建资源的对象。
Resource r = new Resource();
//2,创建任务对象。
Input in = new Input(r);
Output out = new Output(r);
//3,创建线程对象。
Thread t1 = new Thread(in);
Thread t2 = new Thread(out);
//4,启动并运行线程。
t1.start();
t2.start();
}
}
class Resource
{
private String name;
private String sex;
//定义标记,用于判断资源中是否有数据。
private boolean flag;
//对外提供方法访问这些属性。
public synchronized void set(String name,String sex)
{
if(flag)
try{this.wait();}catch(Exception e){}
this.name = name;
this.sex = sex;
flag = true;
this.notify();
}
//对外提供获取方法。
public synchronized void out()
{
if(!flag)
try{this.wait();}catch(Exception e){}
System.out.println(name+"::::"+sex);
flag = false;
this.notify();
}
}
//需要定义一个输入任务描述。既然是线程任务,必须实现Runnable接口。
class Input implements Runnable
{
private Resource r;
//private Object obj = new Object();
Input(Resource r)
{
this.r = r;
}
//覆盖run方法。
public void run()
{
int x = 0;
while(true)
{
if(x==0)
{
r.set("zhangsan","man");
}
else
{
r.set("小花","女女女女女");
}
x = (x+1)%2;
}
}
}
//需要定义一个输出任务描述。既然是线程任务,必须实现Runnable接口。
class Output implements Runnable
{
private Resource r;
//private Object obj = new Object();
Output(Resource r)
{
this.r = r;
}
public void run()
{
while(true)
{
r.out();
}
}
}
class ThreadDemo2_Resource
{
public static void main(String[] args)
{
//1,创建资源的对象。
Resource r = new Resource();
//2,创建任务对象。
Input in = new Input(r);
Output out = new Output(r);
//3,创建线程对象。
Thread t1 = new Thread(in);
Thread t2 = new Thread(out);
//4,启动并运行线程。
t1.start();
t2.start();
}
}
/*
单生产者和单消费者。等待唤醒机制。
*/
class Resource
{
//定义一个商品都有名字。
private String name;
//定义一个商品的编号。
private int count = 1;
//定义用来判断是否有商品的标记。
private boolean flag = false;
public synchronized void set(String name)
{
if(flag)
try{wait();}catch(Exception e){}
this.name = name+"--"+count;
count++;
System.out.println(Thread.currentThread().getName()+"---生产了,"+this.name);
//将标记改为true。
flag = true;
notify();//唤醒等待的线程。
}
public synchronized void get()
{
if(!flag)
try{wait();}catch(Exception e){}
System.out.println(Thread.currentThread().getName()+"-------消费了....."+this.name);
flag = false;
notify();
}
}
//定义生产者的任务。
class Producer implements Runnable
{
private Resource r;
Producer(Resource r)
{
this.r = r;
}
public void run()
{
while(true)
{
r.set("蛋糕");
}
}
}
//定义消费者的任务。
class Consumer implements Runnable
{
private Resource r;
Consumer(Resource r)
{
this.r = r;
}
public void run()
{
while(true)
{
r.get();
}
}
}
class ThreadDemo_Producer_Consumer
{
public static void main(String[] args)
{
Resource r = new Resource();
Producer pro = new Producer(r);
Consumer con = new Consumer(r);
Thread t1 = new Thread(pro);
Thread t2 = new Thread(con);
t1.start();
t2.start();
}
}
/*
多生产者和多消费者。等待唤醒机制。
产生了两个问题:
1,出现了多次连续生产,未消费,或者一个商品被消费多次。
必须要每一个被唤醒的线程判断一次标记,所以将if判断改为while判断。
2,出现了死锁。
本方唤醒了本方,导致了所以的线程都等待了。
解决方式就是,唤醒所有等待的线程。这样既唤醒了本方也唤醒对方。
虽然解决了多生产消费的问题,但是有些低效。
*/
class Resource
{
//定义一个商品都有名字。
private String name;
//定义一个商品的编号。
private int count = 1;
//定义用来判断是否有商品的标记。
private boolean flag = false;
public synchronized void set(String name)//
{
while(flag)
try{wait();}catch(Exception e){}//t1,t2
this.name = name+"--"+count;//蛋糕1 蛋糕2 蛋糕3
count++;
System.out.println(Thread.currentThread().getName()+"---生产了,"+this.name);//生产蛋糕1 生产蛋糕2 生产蛋糕3
//将标记改为true。
flag = true;
notifyAll();//唤醒等待的线程。
}
public synchronized void get()//
{
while(!flag)
try{wait();}catch(Exception e){}//t3.t4
System.out.println(Thread.currentThread().getName()+"-------消费了....."+this.name);//消费蛋糕1
flag = false;
notifyAll();
}
}
//定义生产者的任务。
class Producer implements Runnable
{
private Resource r;
Producer(Resource r)
{
this.r = r;
}
public void run()
{
while(true)
{
r.set("蛋糕");
}
}
}
//定义消费者的任务。
class Consumer implements Runnable
{
private Resource r;
Consumer(Resource r)
{
this.r = r;
}
public void run()
{
while(true)
{
r.get();
}
}
}
class ThreadDemo_Producer_Consumer2
{
public static void main(String[] args)
{
Resource r = new Resource();
Producer pro = new Producer(r);
Consumer con = new Consumer(r);
//创建两个生产者线程。
Thread t1 = new Thread(pro);
Thread t2 = new Thread(pro);
//创建两个消费者线程。
Thread t3 = new Thread(con);
Thread t4 = new Thread(con);
t1.start();
t2.start();
t3.start();
t4.start();
}
}
import java.util.concurrent.locks.*;
class Resource
{
//定义一个商品都有名字。
private String name;
//定义一个商品的编号。
private int count = 1;
//定义用来判断是否有商品的标记。
private boolean flag = false;
//根据jdk1.5 版本的特性,创建一个锁对象。比同步的隐式锁操作要更加的面向对象。提供了显示的锁操作。
final Lock lock = new ReentrantLock();//互斥锁。
//通过lock锁获取监视器方法对象。Condition 负责生产者的监视操作。
final Condition producer = lock.newCondition();
//在创建一个监视器方法对象。负责消费者的监视操作。
final Condition consumer = lock.newCondition();
public void set(String name)//
{
//通过锁对象进行显示的获取锁操作。
lock.lock();
try
{
while(flag)
try{producer.await();}catch(Exception e){}//t1,t2
this.name = name+"--"+count;//蛋糕1 蛋糕2 蛋糕3
count++;
System.out.println(Thread.currentThread().getName()+"---生产了,"+this.name);//生产蛋糕1 生产蛋糕2 生产蛋糕3
//将标记改为true。
flag = true;
consumer.signal();//唤醒等待的线程。
}
finally{
//释放锁。
lock.unlock();//定义在finally中,要求一定被释放。
}
}
public void get()//
{
lock.lock();
try
{
while(!flag)
try{consumer.await();}catch(Exception e){}//t3.t4
System.out.println(Thread.currentThread().getName()+"------++++++-消费了....."+this.name);//消费蛋糕1
flag = false;
producer.signal();
}
finally
{
lock.unlock();
}
}
}
//定义生产者的任务。
class Producer implements Runnable
{
private Resource r;
Producer(Resource r)
{
this.r = r;
}
public void run()
{
while(true)
{
r.set("蛋糕");
}
}
}
//定义消费者的任务。
class Consumer implements Runnable
{
private Resource r;
Consumer(Resource r)
{
this.r = r;
}
public void run()
{
while(true)
{
r.get();
}
}
}
class ThreadDemo_Producer_Consumer3
{
public static void main(String[] args)
{
Resource r = new Resource();
Producer pro = new Producer(r);
Consumer con = new Consumer(r);
//创建两个生产者线程。
Thread t1 = new Thread(pro);
Thread t2 = new Thread(pro);
//创建两个消费者线程。
Thread t3 = new Thread(con);
Thread t4 = new Thread(con);
t1.start();
t2.start();
t3.start();
t4.start();
}
}
sleep和wait的区别?
1,sleep必须指定时间,wait可以指定可以不指定。
2,sleep和wait都可以让线程处于冻结状态,释放执行权。(相同点)
3,持有锁的线程执行sleep,不释放锁,持有锁的线程执行到wait释放锁。
4,sleep到时间会自动醒,wait没有指定时间,只能被其他线程通过notify唤醒。
class
{
public static void main(String[] args)
{
System.out.println("Hello World!");
}
}
class BoundedBuffer {
final Lock lock = new ReentrantLock();
final Condition notFull = lock.newCondition();
final Condition notEmpty = lock.newCondition();
final Object[] items = new Object[100];
int putptr, takeptr, count;
public void put(Object x) throws InterruptedException {
lock.lock();
try {
while (count == items.length)
notFull.await();
items[putptr] = x;
if (++putptr == items.length) putptr = 0;
++count;
notEmpty.signal();
} finally {
lock.unlock();
}
}
public Object take() throws InterruptedException {
lock.lock();
try {
while (count == 0)
notEmpty.await();
Object x = items[takeptr];
if (++takeptr == items.length) takeptr = 0;
--count;
notFull.signal();
return x;
} finally {
lock.unlock();
}
}
class Demo implements Runnable
{
private String name;
Demo(String name)
{
this.name = name;
}
public void run()
{
for(int x=0; x<40; x++)
{
System.out.println(Thread.currentThread().getName()+"...."+x+"...."+name);
Thread.yield();
}
}
}
class ThreadDemo_Join
{
public static void main(String[] args) throws Exception
{
Demo d1 = new Demo("小强");
Demo d2 = new Demo("旺财");
Thread t1 = new Thread(d1);
Thread t2 = new Thread(d2);
t1.start();
//调用了t1.join();方法。
t2.start();
t1.join();//主线程等待t1线程终止。
/*for(int x=0; x<20; x++)
{
System.out.println("main......"+x);
}
*/
}
}
转载于:https://blog.51cto.com/dodowolf/1436142


 本文详细介绍了多线程的基本概念、创建方式及其特性,并深入探讨了多线程中的安全问题及解决方案,包括同步机制、死锁预防以及线程间的通信机制。


 被折叠的 条评论
为什么被折叠?


