


自动生成章节目录索引(只支持一级)
一个好的博文除了博文的质量要好以外,好的组织结构也能让读者阅读的更加舒服与方便,我看园子里面有一些园友的博文都是分章节的,并且在博文的前面都带有章节的目录索引,点击索引之后会跳转到相应的章节阅读,并且还可以回到目录顶端,其中 Fish Li 的博文就是这种组织,当然这种结构如果是在写博文的时候人工设置那是非常麻烦的,无疑是增加了写作人的工作量。如果能自动生成章节索引岂不是节省了一大堆工作量。本来想通过FireBug看看Fish Li源码是怎么实现的,但是好像js是加密过的。那我就自己动手了,其实也没多少代码,很简单。
//生成目录索引列表
function GenerateContentList()
{
var jquery_h3_list = $('#cnblogs_post_body h3');//如果你的章节标题不是h3,只需要将这里的h3换掉即可
if(jquery_h3_list.length>0)
{
content += '
';if($('#cnblogs_post_body').length != 0 )
{
$($('#cnblogs_post_body')[0]).prepend(content);
}
}
}
GenerateContentList();
使用方法:登录到博客园之后,打开博客园的后台管理,切换到“设置”选项卡,将上面的代码,粘贴到 “页脚HTML代码” 区保存即可。
注意:上述js代码中提取的h3作为章节的标题,如果你的标题不是h3请在代码注释的地方自行修改。该代码除了在文章的最开始生成目录索引之外,还会在每一个章节最后右下角(也就是下一个章节标题的右上角)会生成一个“回到顶部”的链接,以方便读者回到目录。本篇文章的目录结构就是自动生成的效果,如果你觉得有用,就赶快试用一下吧。
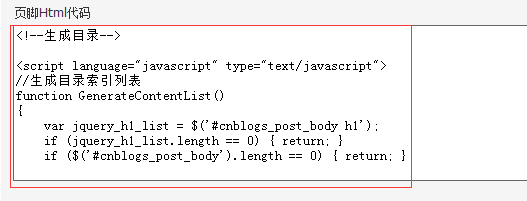
自动生成三级目录
//生成目录索引列表
function GenerateContentList()
{
var jquery_h1_list = $('#cnblogs_post_body h1');
if (jquery_h1_list.length == 0) { return; }
if ($('#cnblogs_post_body').length == 0) { return; }
var content = '';
content += '
content += '
阅读目录(Content)
';// 一级目录 start
content += '
- ';
for (var i = 0; i < jquery_h1_list.length; i++)
{
var go_to_top = '
';$(jquery_h1_list[i]).before(go_to_top);
// 一级目录的一条
var li_content = '
' + $(jquery_h1_list[i]).text() + '';var nextH1Index = i + 1;
if (nextH1Index == jquery_h1_list.length) { nextH1Index = 0; }
var jquery_h2_list = $(jquery_h1_list[i]).nextUntil(jquery_h1_list[nextH1Index], "h2");
// 二级目录 start
if (jquery_h2_list.length > 0)
{
//li_content +='
- ';
li_content += '
- ';
}
for (var j = 0; j < jquery_h2_list.length; j++)
{
var go_to_top2 = '
';$(jquery_h2_list[j]).before(go_to_top2);
// 二级目录的一条
li_content +='
' + $(jquery_h2_list[j]).text() + '';var nextH2Index = j + 1;
var next;
if (nextH2Index == jquery_h2_list.length)
{
if (i + 1 == jquery_h1_list.length)
{
next = jquery_h1_list[0];
}
else
{
next = jquery_h1_list[i + 1];
}
}
else
{
next = jquery_h2_list[nextH2Index];
}
var jquery_h3_list = $(jquery_h2_list[j]).nextUntil(next, "h3");
// 三级目录 start
if (jquery_h3_list.length > 0)
{
li_content += '
- ';
}
for (var k = 0; k < jquery_h3_list.length; k++)
{
var go_to_third_Content = '
';$(jquery_h3_list[k]).before(go_to_third_Content);
// 三级目录的一条
li_content += '
' + $(jquery_h3_list[k]).text() + '';}
if (jquery_h3_list.length > 0)
{
li_content += '
';}
li_content += '';
// 三级目录 end
}
if (jquery_h2_list.length > 0)
{
li_content +='
';}
li_content +='';
// 二级目录 end
content += li_content;
}
// 一级目录 end
content += '
';content += '
$($('#cnblogs_post_body')[0]).prepend(content);
}
GenerateContentList();
levels of contents
如何使用(How to Use)
把上述JS代码复制到“页脚Html代码”里。
在写博客的时候,给每个章节的标题设置“标题1”或“标题2”或“标题3”格式。
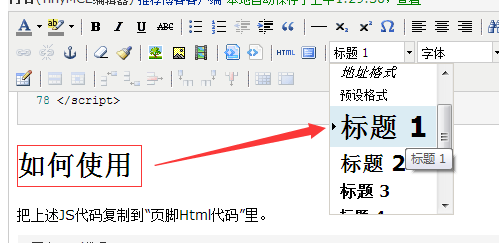
然后一切就绪,欣赏效果吧。
示例(Demo)
脚本之家小编注:为了seo考虑,不建议大量用h1,一个页面可以存在多个h2,h3,h4,所以脚本之家网站采用的是h2,h3,h4实现三级目录。
补充:
脚本之家小编从别的地方看到的相关文章可以当个参考
* {
margin: 0;
padding: 0;
word-break: break-all;
}
#toc {
width: 200px;
position: fixed;
left: 0;
top: 0;
}
#toc a.active {
color: red;
}
#content {
margin-left: 200px;
}
$(document).ready(function () {
for (var i = 0; i < 50; ++i) {
$(".seg-content").append("
一个段落而已
")}
(function () {
var segs = [];
$(".seg-begin").each(function (idx, node) {
segs.push(node)
var link = $("").attr("href", "#" + $(node).attr("name")).html($(node).children("h1").html())
if (!idx) {
link.addClass("active")
}
var row = $("
").append(link)$("#toc ul").append(row)
})
$(window).bind("scroll", function() {
var scrollTop = $(this).scrollTop()
var topSeg = null
for (var idx in segs) {
var seg = segs[idx]
if (seg.offsetTop > scrollTop) {
continue
}
if (!topSeg) {
topSeg = seg
} else if (seg.offsetTop >= topSeg.offsetTop) {
topSeg = seg
}
}
if (topSeg) {
$("#toc a").removeClass("active")
var link = "#" + $(topSeg).attr("name")
console.log('#toc a[href="' + link + '" rel="external nofollow" rel="external nofollow" ]')
$('#toc a[href="' + link + '" rel="external nofollow" rel="external nofollow" ]').addClass("active")
// console.log($(topSeg).children("h1").text())
}
})
})()
})
具体的使用可以参考下面的文章。


 被折叠的 条评论
为什么被折叠?
被折叠的 条评论
为什么被折叠?
 到【灌水乐园】发言


