


linux服务器硬盘格式化挂载:
请根据以下步骤对数据盘进行分区以及格式化,并挂载分区使数据盘可用。
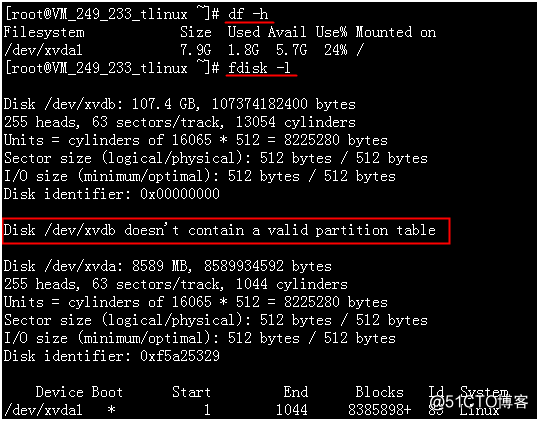
1.1 查看数据盘信息
登录Linux云服务器后,可以使用“fdisk -l”命令查看数据盘相关信息。
使用“df -h”命令,无法看到未分区和格式化的数据盘。
1.2 数据盘分区
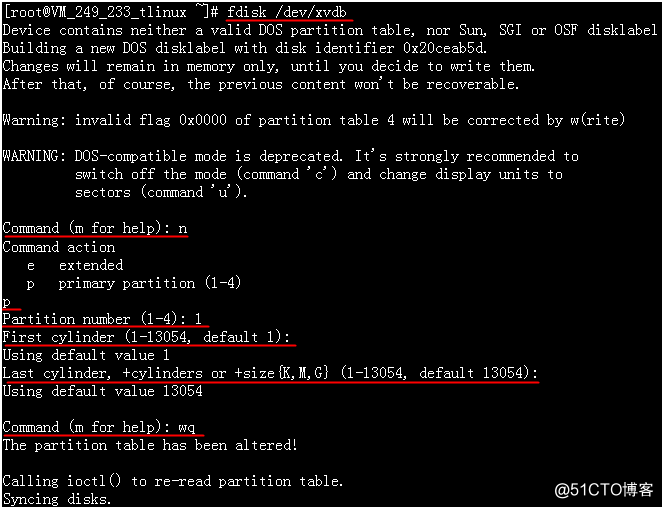
执行以下命令,对数据盘进行分区。
fdisk /dev/xvdb
按照界面的提示,依次输入“n”(新建分区)、“p”(新建扩展分区)、“1”(使用第1个主分区),两次回车(使用默认配置),输入“wq”(保存分区表),开始分区。
这里是以创建1个分区为例,开发者也可以根据自己的需求创建多个分区。
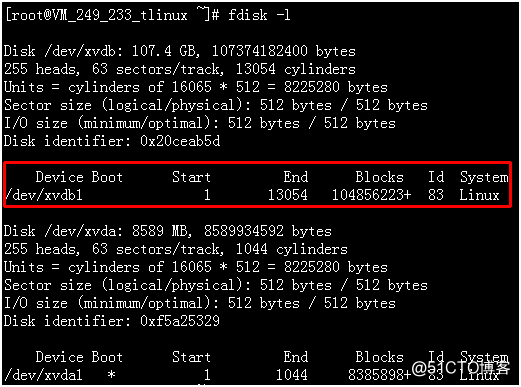
1.3 查看新分区
使用“fdisk -l”命令,即可查看到,新的分区xvdb1已经创建完成。
1.4 格式化新分区
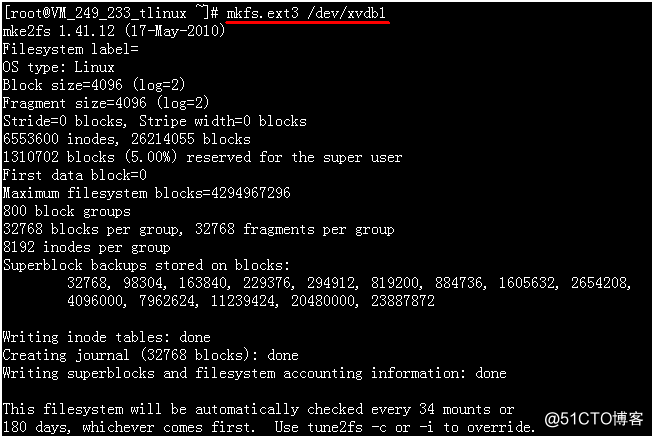
在进行分区格式化时,开发者可以自行决定文件系统的格式,如ext2、ext3等。
这里以“ext3”为例:
使用下面的命令对新分区进行格式化。
mkfs.ext3 /dev/xvdb1
1.5 挂载新分区
使用命令“mkdir /mydata”创建mydata目录,再通过“mount /dev/xvdb1 /mydata”命令手动挂载新分区后,用“df -h”命令查看,出现以下信息说明挂载成功,即可以查看到数据盘了。

1.6 添加分区信息
如果希望云服务器在重启或开机时能自动挂载数据盘,必须将分区信息添加到/etc/fstab中。如果没有添加,则云服务器重启或开机后,都不能自动挂载数据盘。
使用“echo '/dev/xvdb1 /mydata ext3 defaults 0 0' >> /etc/fstab”命令添加分区信息后,使用“cat /etc/fstab”命令查看,出现以下信息表示添加分区信息成功。

2.腾讯云服务器硬盘扩充,新空间增加到已有分区空间中:
线上业务服务器1T硬盘,日志量太大,需要扩充到2T硬盘,关机购买硬盘以后启动开始在原有盘上面开始扩充:
2.1 [root@VM_0_17_centos ~]# fdisk -l
Disk /dev/vda: 53.7 GB, 53687091200 bytes, 104857600 sectors
Units = sectors of 1 * 512 = 512 bytes
Sector size (logical/physical): 512 bytes / 512 bytes
I/O size (minimum/optimal): 512 bytes / 512 bytes
Disk label type: dos
Disk identifier: 0x000c7a75
Device Boot Start End Blocks Id System
/dev/vda1 * 2048 104857599 52427776 83 Linux
Disk /dev/vdb: 2147.5 GB, 2147483648000 bytes, 4194304000 sectors
Units = sectors of 1 * 512 = 512 bytes
Sector size (logical/physical): 512 bytes / 512 bytes
I/O size (minimum/optimal): 512 bytes / 512 bytes
Disk label type: dos
Disk identifier: 0x947d4eff
Device Boot Start End Blocks Id System
/dev/vdb1 2048 2097151999 1048574976 83 Linux
2.2查看原来1T磁盘:
df -h
Filesystem Size Used Avail Use% Mounted on
/dev/vda1 50G 4.1G 43G 9% /
devtmpfs 16G 0 16G 0% /dev
tmpfs 16G 24K 16G 1% /dev/shm
tmpfs 16G 300K 16G 1% /run
tmpfs 16G 0 16G 0% /sys/fs/cgroup
/dev/vdb1 985G 150G 785G 17% /data
tmpfs 3.2G 0 3.2G 0% /run/user/0
2.3卸载原硬盘:
umount /data/
[root@VM_0_17_centos ~]# df -h
Filesystem Size Used Avail Use% Mounted on
/dev/vda1 50G 4.1G 43G 9% /
devtmpfs 16G 0 16G 0% /dev
tmpfs 16G 24K 16G 1% /dev/shm
tmpfs 16G 300K 16G 1% /run
tmpfs 16G 0 16G 0% /sys/fs/cgroup
tmpfs 3.2G 0 3.2G 0% /run/user/0
2.4确认卸载:
[root@VM_0_17_centos ~]# fdisk -l
Disk /dev/vda: 53.7 GB, 53687091200 bytes, 104857600 sectors
Units = sectors of 1 * 512 = 512 bytes
Sector size (logical/physical): 512 bytes / 512 bytes
I/O size (minimum/optimal): 512 bytes / 512 bytes
Disk label type: dos
Disk identifier: 0x000c7a75
Device Boot Start End Blocks Id System
/dev/vda1 * 2048 104857599 52427776 83 Linux
Disk /dev/vdb: 2147.5 GB, 2147483648000 bytes, 4194304000 sectors
Units = sectors of 1 * 512 = 512 bytes
Sector size (logical/physical): 512 bytes / 512 bytes
I/O size (minimum/optimal): 512 bytes / 512 bytes
Disk label type: dos
Disk identifier: 0x947d4eff
Device Boot Start End Blocks Id System
/dev/vdb1 2048 2097151999 1048574976 83 Linux
2.5 开始格盘:
按照界面的提示,一次输入”p”(查看已有分区信息), ”d”(删除需要扩容的分区)、“n”(新建分区)、“p”(新建主分区)、“1”(使用第1个主分区,必须保持与需要扩容的分区一样),两次回车(使用默认配置),输入“w”(保存分区表),开始分区。
这里是以创建1个分区为例,用户也可以根据自己的需求扩容多个分区。
[root@VM_0_17_centos ~]# fdisk /dev/vdb
Welcome to fdisk (util-linux 2.23.2).
Changes will remain in memory only, until you decide to write them.
Be careful before using the write command.
Command (m for help): p
Disk /dev/vdb: 2147.5 GB, 2147483648000 bytes, 4194304000 sectors
Units = sectors of 1 * 512 = 512 bytes
Sector size (logical/physical): 512 bytes / 512 bytes
I/O size (minimum/optimal): 512 bytes / 512 bytes
Disk label type: dos
Disk identifier: 0x947d4eff
Device Boot Start End Blocks Id System
/dev/vdb1 2048 2097151999 1048574976 83 Linux
Command (m for help): d
Selected partition 1
Partition 1 is deleted
Command (m for help): n
Partition type:
p primary (0 primary, 0 extended, 4 free)
e extended
Select (default p): p
Partition number (1-4, default 1): 1
First sector (2048-4194303999, default 2048):
Using default value 2048
Last sector, +sectors or +size{K,M,G} (2048-4194303999, default 4194303999):
Using default value 4194303999
Partition 1 of type Linux and of size 2 TiB is set
Command (m for help): w
The partition table has been altered!
Calling ioctl() to re-read partition table.
Syncing disks.
[root@VM_0_17_centos ~]# fdisk -l
Disk /dev/vda: 53.7 GB, 53687091200 bytes, 104857600 sectors
Units = sectors of 1 * 512 = 512 bytes
Sector size (logical/physical): 512 bytes / 512 bytes
I/O size (minimum/optimal): 512 bytes / 512 bytes
Disk label type: dos
Disk identifier: 0x000c7a75
Device Boot Start End Blocks Id System
/dev/vda1 * 2048 104857599 52427776 83 Linux
Disk /dev/vdb: 2147.5 GB, 2147483648000 bytes, 4194304000 sectors
Units = sectors of 1 * 512 = 512 bytes
Sector size (logical/physical): 512 bytes / 512 bytes
I/O size (minimum/optimal): 512 bytes / 512 bytes
Disk label type: dos
Disk identifier: 0x947d4eff
Device Boot Start End Blocks Id System
/dev/vdb1 2048 4194303999 2097150976 83 Linux
2.6确认磁盘,使用“fdisk –l /dev/vdb1”命令,即可查看到,新的分区vdb1已经创建并扩容完成:
[root@VM_0_17_centos ~]# fdisk -l /dev/vdb1
Disk /dev/vdb1: 2147.5 GB, 2147482599424 bytes, 4194301952 sectors
Units = sectors of 1 * 512 = 512 bytes
Sector size (logical/physical): 512 bytes / 512 bytes
I/O size (minimum/optimal): 512 bytes / 512 bytes
2.7 再使用e2fsck -f /dev/xvdc1检查扩容的分区是否ok
[root@VM_0_17_centos /]# e2fsck -f /dev/vd
vda vda1 vdb vdb1
[root@VM_0_17_centos /]# e2fsck -f /dev/vdb1
e2fsck 1.42.9 (28-Dec-2013)
/dev/vdb1 is mounted.
e2fsck: Cannot continue, aborting.
似乎看到一个报错,不过后面查看扩充成功了,是不是成功了半信半疑的。。
2.8 使用resize2fs /dev/xvdc1命令扩容分区:
resize2fs /dev/vdb
vdb vdb1
[root@VM_0_17_centos /]# resize2fs /dev/vdb1
resize2fs 1.42.9 (28-Dec-2013)
Filesystem at /dev/vdb1 is mounted on /data; on-line resizing required
old_desc_blocks = 125, new_desc_blocks = 250
The filesystem on /dev/vdb1 is now 524287744 blocks long.
df -h
Filesystem Size Used Avail Use% Mounted on
/dev/vda1 50G 4.1G 43G 9% /
devtmpfs 16G 0 16G 0% /dev
tmpfs 16G 24K 16G 1% /dev/shm
tmpfs 16G 300K 16G 1% /run
tmpfs 16G 0 16G 0% /sys/fs/cgroup
/dev/vdb1 2.0T 150G 1.7T 8% /data
tmpfs 3.2G 0 3.2G 0% /run/user/0
2.9 挂载/data盘,写入/etc/fstab 不过做扩充时候是自动写进去的,重启过正常,数据没丢。。
cat /etc/fstab
/dev/vda1 / ext3 noatime,acl,user_xattr 1 1
proc /proc proc defaults 0 0
sysfs /sys sysfs noauto 0 0
debugfs /sys/kernel/debug debugfs noauto 0 0
devpts /dev/pts devpts mode=0620,gid=5 0 0
/dev/disk/bd/virtio-diskt1 /data ext4 defaults,nofail 0 1


 1602
1602

 被折叠的 条评论
为什么被折叠?
被折叠的 条评论
为什么被折叠?
 到【灌水乐园】发言


