


 本文介绍了如何基于Android自定义ViewGroup实现动态浮动标签的功能,包括在onMeasure中处理wrap_content的测量逻辑,以及在onLayout中布局每个子View。代码示例展示了如何动态添加标签并实现点击监听,适用于流式布局的场景。
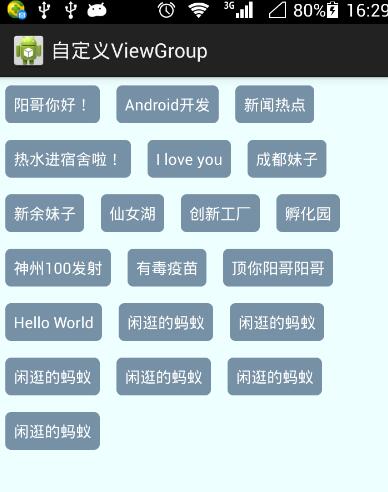
前面在学习鸿洋大神的一些自定义的View文章,看到了自定义ViewGroup实现浮动标签,初步看了下他的思路以及结合自己的思路完成了自己的浮动标签的自定义ViewGroup。目前实现的可以动态添加标签、可点击。效果图如下:
1、思路
首先在onMeasure方法中测量ViewGroup的宽和高,重点是处理当我们自定义的ViewGroup设置为wrap_content的情况下,如何去测量其大小的问题。当我们自定义的ViewGroup设置为wrap_content时,我们需要让子View先去测量自己,当子View测量完后,再通过子View的getMeasuredWidth和getMeasureHeight方法获得其子View的宽和高。每次在测量一个子View之前,都需要判断如果加入该子View,当前行是否能够容纳下该子View,如果不能,则需要新开一行,并记录下当前行的最大高度。
在onLayout方法中,核心人物是给每个子View摆放位置,也就是为该ViewGroup中每个子View找到盒子模型上面的两个点也就是左上角和右下角,即点(l,t)和点(r,b),确定了两个点,子View的位置也就确定了。
2、实现 基本思路有了就可以尝试实现了,代码如下:
自定义的ViewGroup:
/**
* 流式标签(动态的,根据传入的数据动态添加标签)
*/
public class DynamicTagFlowLayout extends ViewGroup {
private List mTags = new ArrayList();
public DynamicTagFlowLayout(Context context, AttributeSet attrs, int defStyle) {
super(context, attrs, defStyle);
}
public DynamicTagFlowLayout(Context context, AttributeSet attrs) {
super(context, attrs);
}
public DynamicTagFlowLayout(Context context) {
super(context);
}
@Override
protected void onMeasure(int widthMeasureSpec, int heightMeasureSpec) {
int widthMode = MeasureSpec.getMode(widthMeasureSpec);
int widthSize = MeasureSpec.getSize(widthMeasureSpec);
int heightMode = MeasureSpec.getMode(heightMeasureSpec);
int heightSize = MeasureSpec.getSize(heightMeasureSpec);
//当前ViewGroup的总高度
int totalHeight= 0;
//所有行中的最大宽度
int maxLineWidth = 0;
//当前行的最大高度
int lineMaxHeight = 0;
//当前行的总宽度
int currentLineWidth = 0;
//每个childView所占用的宽度
int childViewWidthSpace = 0;
//每个childView所占用的高度
int childViewHeightSpace = 0;
int count = getChildCount();
MarginLayoutParams layoutParams;
for(int i = 0; i < count; i++){
View child = getChildAt(i);
if(child.getVisibility() != View.GONE){//只有当这个View能够显示的时候才去测量
//测量每个子View,以获取子View的宽和高
measureChild(child, widthMeasureSpec, heightMeasureSpec);
layoutParams = (MarginLayoutParams) child.getLayoutParams();
childViewWidthSpace = child.getMeasuredWidth() + layoutParams.leftMargin + layoutParams.rightMargin;
childViewHeightSpace = child.getMeasuredHeight() + layoutParams.topMargin + layoutParams.bottomMargin;
if(currentLineWidth + childViewWidthSpace > widthSize){//表示如果当前行再加上现在这个子View,就会超出总的规定宽度,需要另起一行
totalHeight += lineMaxHeight;
if(maxLineWidth < currentLineWidth){//如果行的最长宽度发生了变化,更新保存的最长宽度
maxLineWidth = currentLineWidth;
}
currentLineWidth = childViewWidthSpace;//另起一行后,需要重置当前行宽
lineMaxHeight = childViewHeightSpace;
}else{//表示当前行可以继续添加子元素
currentLineWidth += childViewWidthSpace;
if(lineMaxHeight < childViewHeightSpace){
lineMaxHeight = childViewHeightSpace;
}
}
}
}
setMeasuredDimension(widthMode == MeasureSpec.EXACTLY ? widthSize : maxLineWidth, heightMode == MeasureSpec.EXACTLY ? heightSize : totalHeight);
}
@Override
protected void onLayout(boolean changed, int l, int t, int r, int b) {
//当前是第几行
int currentLine = 1;
//存放每一行的最大高度
List lineMaxHeightList = new ArrayList();
//每个childView所占用的宽度
int childViewWidthSpace = 0;
//每个childView所占用的高度
int childViewHeightSpace = 0;
//当前行的最大高度
int lineMaxHeight = 0;
//当前行的总宽度
int currentLineWidth = 0;
int count = getChildCount();
MarginLayoutParams layoutParams;
for(int i = 0; i < count; i++){
int cl= 0, ct = 0, cr = 0, cb = 0;
View child = getChildAt(i);
if(child.getVisibility() != View.GONE){//只有当这个View能够显示的时候才去测量
layoutParams = (MarginLayoutParams) child.getLayoutParams();
childViewWidthSpace = child.getMeasuredWidth() + layoutParams.leftMargin + layoutParams.rightMargin;
childViewHeightSpace = child.getMeasuredHeight() + layoutParams.topMargin + layoutParams.bottomMargin;
System.out.println("getWidth()---->"+getWidth());
if(currentLineWidth + childViewWidthSpace > getWidth()){//表示如果当前行再加上现在这个子View,就会超出总的规定宽度,需要另起一行
lineMaxHeightList.add(lineMaxHeight);//此时先将这一行的最大高度加入到集合中
//新的一行,重置一些参数
currentLine++;
currentLineWidth = childViewWidthSpace;
lineMaxHeight = childViewHeightSpace;
cl = layoutParams.leftMargin;
if(currentLine > 1){
for(int j = 0; j < currentLine - 1; j++){
ct += lineMaxHeightList.get(j);
}
ct += layoutParams.topMargin ;
}else{
ct = layoutParams.topMargin;
}
}else{//表示当前行可以继续添加子元素
cl = currentLineWidth + layoutParams.leftMargin;
if(currentLine > 1){
for(int j = 0; j < currentLine - 1; j++){
ct += lineMaxHeightList.get(j);
}
ct += layoutParams.topMargin;
}else{
ct = layoutParams.topMargin;
}
currentLineWidth += childViewWidthSpace;
if(lineMaxHeight < childViewHeightSpace){
lineMaxHeight = childViewHeightSpace;
}
}
cr = cl + child.getMeasuredWidth();
cb = ct + child.getMeasuredHeight();
child.layout(cl, ct, cr, cb);
}
}
}
@Override
public LayoutParams generateLayoutParams(AttributeSet attrs) {
return new MarginLayoutParams(getContext(), attrs);
}
public void setTags(List tags){
if(tags!= null){
mTags.clear();
mTags.addAll(tags);
for(int i = 0; i < mTags.size(); i++){
TextView tv = new TextView(getContext());
MarginLayoutParams lp = new MarginLayoutParams(MarginLayoutParams.WRAP_CONTENT, MarginLayoutParams.WRAP_CONTENT);
lp.setMargins(15, 15, 15, 15);
// lp.width = MarginLayoutParams.WRAP_CONTENT;
// lp.height = MarginLayoutParams.WRAP_CONTENT;
tv.setLayoutParams(lp);
tv.setBackgroundResource(R.drawable.tv_bg);
/*
* setPadding一定要在setBackgroundResource后面使用才有效!!!
* http://stackoverflow.com/questions/18327498/setting-padding-for-textview-not-working
*/
tv.setPadding(15, 15, 15, 15);
tv.setTextColor(Color.WHITE);
tv.setText(mTags.get(i));
tv.setOnClickListener(new OnClickListener() {
@Override
public void onClick(View v) {
if(listener != null){
listener.onClick(v);
}
}
});
addView(tv);
}
requestLayout();
}
}
private OnTagItemClickListener listener;
public interface OnTagItemClickListener{
public void onClick(View v);
}
public void setOnTagItemClickListener(OnTagItemClickListener l){
listener = l;
}
}
MainActivity:
public class MainActivity extends Activity {
private DynamicTagFlowLayout dynamicTagFlowLayout;
List tags = new ArrayList();
@Override
protected void onCreate(Bundle savedInstanceState) {
super.onCreate(savedInstanceState);
setContentView(R.layout.activity_dynamic_tagflowlayout);
dynamicTagFlowLayout = (DynamicTagFlowLayout) findViewById(R.id.dynamic_tag);
dynamicTagFlowLayout.setOnTagItemClickListener(new OnTagItemClickListener() {
@Override
public void onClick(View v) {
TextView tv = (TextView) v;
Toast.makeText(MainActivity.this, tv.getText().toString(), Toast.LENGTH_SHORT).show();
}
});
initData();
dynamicTagFlowLayout.setTags(tags);
}
private void initData() {
tags.add("阳哥你好!");
tags.add("Android开发");
tags.add("新闻热点");
tags.add("热水进宿舍啦!");
tags.add("I love you");
tags.add("成都妹子");
tags.add("新余妹子");
tags.add("仙女湖");
tags.add("创新工厂");
tags.add("孵化园");
tags.add("神州100发射");
tags.add("有毒疫苗");
tags.add("顶你阳哥阳哥");
tags.add("Hello World");
tags.add("闲逛的蚂蚁");
tags.add("闲逛的蚂蚁");
tags.add("闲逛的蚂蚁");
tags.add("闲逛的蚂蚁");
tags.add("闲逛的蚂蚁");
tags.add("闲逛的蚂蚁");
}
}
以上就是本文的全部内容,希望对大家的学习有所帮助,也希望大家多多支持脚本之家。


 290
290

 被折叠的 条评论
为什么被折叠?
被折叠的 条评论
为什么被折叠?
 到【灌水乐园】发言


