


 本文介绍了一个使用Spring Boot实现的简单用户管理系统。该系统包括用户实体定义、存储库接口及其实现、控制器方法等关键部分。通过具体代码展示了如何进行用户的增删查改操作。
1.准备
http://start.spring.io/ 这里地址去直接生成你需要的项目信息,如何你本身ide以及集成了springboot 那么可以直接生成项目信息
需要的知识:java,spring,springmvc,thymelafe
2开始
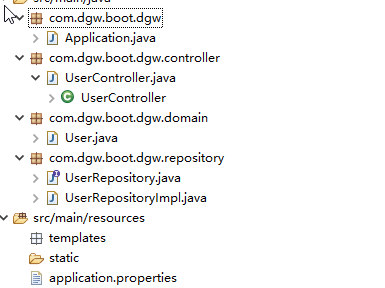
根据图片项目结构信息可以推断,我们需要写下面几个类:
 1 package com.dgw.boot.dgw.domain;
 2
 3 /**
 4  * @author DGW-PC
 5  * @data   2018年7月17日
 6  */
 7 public class User{
 8
 9     private Long id;
10     private String name;
11     private String email;
12
13     public User() {
14
15     }
16
17     public User(Long id, String name, String email) {
18         this.id = id;
19         this.name = name;
20         this.email = email;
21     }
22
23     @Override
24     public String toString() {
25         return "User [id=" + id + ", name=" + name + ", email=" + email + "]";
26     }
27
28     public Long getId() {
29         return id;
30     }
31
32     public void setId(Long id) {
33         this.id = id;
34     }
35
36     public String getName() {
37         return name;
38     }
39
40     public void setName(String name) {
41         this.name = name;
42     }
43
44     public String getEmail() {
45         return email;
46     }
47
48     public void setEmail(String email) {
49         this.email = email;
50     }
51 }
Dao beans
public interface UserRepository {

    User savaOrUpdateUser(User user);

    void deleteUser(long id);

    User getUserById(long id);

    List<User> listUsre();


}

@Repository
public class UserRepositoryImpl implements UserRepository {

    private static AtomicLong count=new AtomicLong();
    private ConcurrentMap<Long, User> useMap=new ConcurrentHashMap<>();

    @Override
    public User savaOrUpdateUser(User user) {
        Long id = user.getId();
        if(id==null) {
            id=count.incrementAndGet();
            user.setId(id);
        }
        this.useMap.put(id, user);
        return user;
    }

    @Override
    public void deleteUser(long id) {
        this.useMap.remove(id);
    }

    @Override
    public User getUserById(long id) {
        return this.useMap.get(id);
    }

    @Override
    public List<User> listUsre() {
        return new ArrayList<>(this.useMap.values());
    }

}
控制器:
 1 /**
 2      * 从 用户存储库 获取用户列表
 3      * @return
 4      */
 5     private List<User> getUserlist() {
 6          return userRepository.listUser();
 7     }
 8
 9     /**
10      * 查询所用用户
11      * @return
12      */
13     @GetMapping
14     public ModelAndView list(Model model) {
15         model.addAttribute("userList", getUserlist());
16         model.addAttribute("title", "用户管理");
17         return new ModelAndView("users/list", "userModel", model);
18     }
19
20     /**
21      * 根据id查询用户
22      * @param message
23      * @return
24      */
25     @GetMapping("{id}")
26     public ModelAndView view(@PathVariable("id") Long id, Model model) {
27         User user = userRepository.getUserById(id);
28         model.addAttribute("user", user);
29         model.addAttribute("title", "查看用户");
30         return new ModelAndView("users/view", "userModel", model);
31     }
32
33     /**
34      * 获取 form 表单页面
35      * @param user
36      * @return
37      */
38     @GetMapping("/form")
39     public ModelAndView createForm(Model model) {
40         model.addAttribute("user", new User());
41         model.addAttribute("title", "创建用户");
42         return new ModelAndView("users/form", "userModel", model);
43     }
44
45     /**
46      * 新建用户
47      * @param user
48      * @param result
49      * @param redirect
50      * @return
51      */
52     @PostMapping
53     public ModelAndView create(User user) {
54          user = userRepository.saveOrUpateUser(user);
55         return new ModelAndView("redirect:/users");
56     }
57
58     /**
59      * 删除用户
60      * @param id
61      * @return
62      */
63     @GetMapping(value = "delete/{id}")
64     public ModelAndView delete(@PathVariable("id") Long id, Model model) {
65         userRepository.deleteUser(id);
66
67         model.addAttribute("userList", getUserlist());
68         model.addAttribute("title", "删除用户");
69         return new ModelAndView("users/list", "userModel", model);
70     }
71
72     /**
73      * 修改用户
74      * @param user
75      * @return
76      */
77     @GetMapping(value = "modify/{id}")
78     public ModelAndView modifyForm(@PathVariable("id") Long id, Model model) {
79         User user = userRepository.getUserById(id);
80
81         model.addAttribute("user", user);
82         model.addAttribute("title", "修改用户");
83         return new ModelAndView("users/form", "userModel", model);
84     }


 1875
1875

 被折叠的 条评论
为什么被折叠?
被折叠的 条评论
为什么被折叠?
 到【灌水乐园】发言


