


 本文深入探讨了Linux系统中execve系统调用的工作原理及其在加载和启动可执行程序中的作用。通过对编译链接过程的学习,了解了ELF可执行文件格式,并通过编程实践掌握了动态链接库的不同使用方式。
郑斌+ 原创作品转载请注明出处 + 《Linux内核分析》MOOC课程http://mooc.study.163.com/course/USTC-1000029000
实验要求:
- 理解编译链接的过程和ELF可执行文件格式,详细内容参考本周第一节;
- 编程使用exec*库函数加载一个可执行文件,动态链接分为可执行程序装载时动态链接和运行时动态链接,编程练习动态链接库的这两种使用方式,详细内容参考本周第二节;
- 使用gdb跟踪分析一个execve系统调用内核处理函数sys_execve ,验证您对Linux系统加载可执行程序所需处理过程的理解,详细内容参考本周第三节;推荐在实验楼Linux虚拟机环境下完成实验。
- 特别关注新的可执行程序是从哪里开始执行的?为什么execve系统调用返回后新的可执行程序能顺利执行?对于静态链接的可执行程序和动态链接的可执行程序execve系统调用返回时会有什么不同?
- 根据本周所学知识分析exec*函数对应的系统调用处理过程,撰写一篇署名博客,并在博客文章中注明“真实姓名(与最后申请证书的姓名务必一致) + 原创作品转载请注明出处 + 《Linux内核分析》MOOC课程http://mooc.study.163.com/course/USTC-1000029000 ”,博客内容的具体要求如下:
- 题目自拟,内容围绕对Linux内核如何装载和启动一个可执行程序;
- 可以结合实验截图、ELF可执行文件格式、用户态的相关代码等;
- 博客内容中需要仔细分析新可执行程序的执行起点及对应的堆栈状态等。
- 总结部分需要阐明自己对“Linux内核装载和启动一个可执行程序”的理解
实验环境:
在实验楼的linux下环境进行。
实验过程:
按照视频指导,更新menu后用test.c覆盖test_exec.c
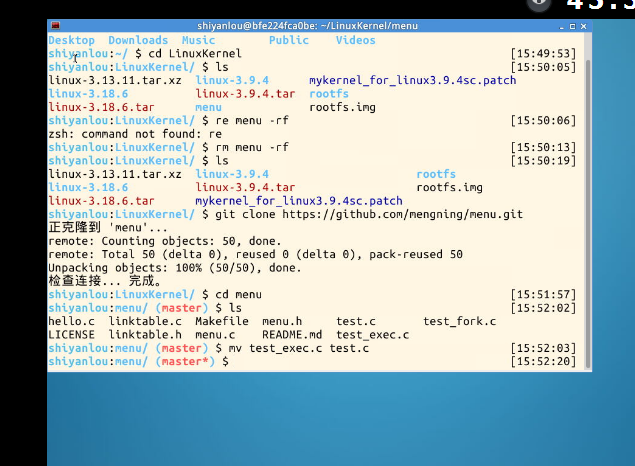
然后打开test.c
//shitf+G 直接到文件尾的快捷键很好用啊啊啊啊,感谢老师- -。
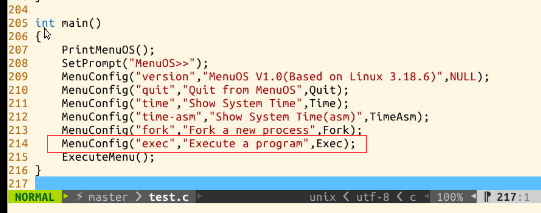
可以看到添加了exec命令,执行一个程序的功能。
其函数内容为
 1 int Exec(int argc, char * argv[])
 2 {
 3     int pid;
 4     /* fork another process */
 5     pid = fork();
 6     if (pid<0)
 7     {
 8         /* error occurred */
 9         fprintf(stderr,"Fork Failed!");
10         exit(-1);
11     }
12     else if (pid==0)
13     {
14         /*   child process   */
15         execlp("/bin/ls","ls",NULL);
16     }
17     else
18     {
19         /*     parent process  */
20         /* parent will wait for the child to complete*/
21         wait(NULL);
22         printf("Child Complete!");
23         exit(0);
24     }
25 }
由于在Makefile中做了修改。编译的时候执行了hello.c
并把init 和 hello 放到了rootfs.img目录下,所以在执行exec命令的时候就相当于自动了加载了hello这个程序。
如下所示:

下面是通过gdb进行跟踪分析。
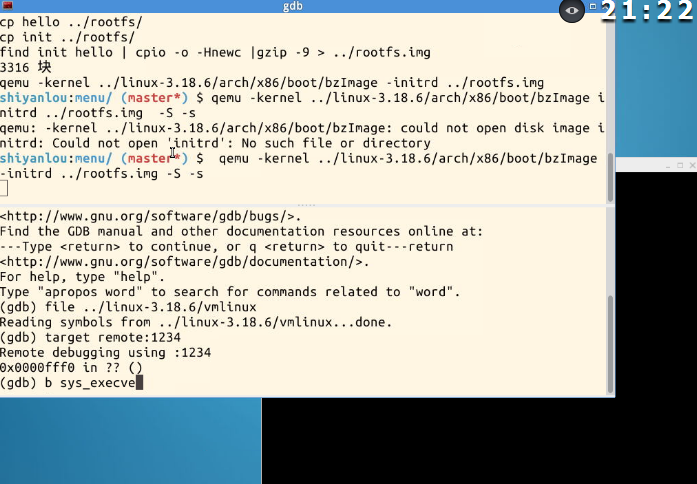
设置b sys_execve ,b load_elf_binary 等断点后,在MenuOS中输入exec进行调试分析。
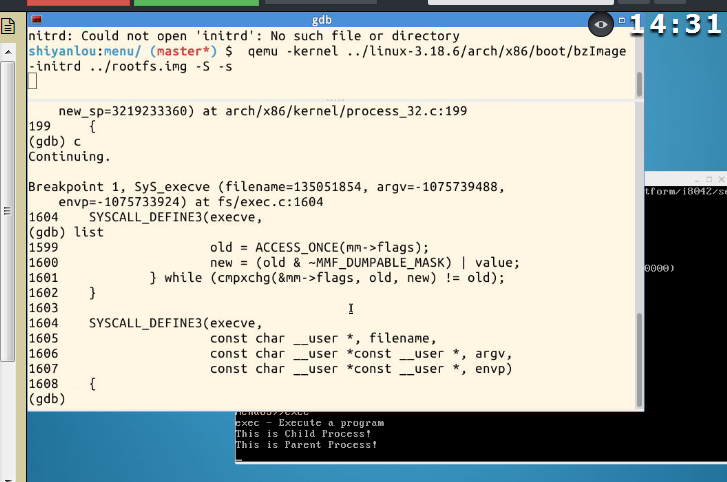
gdb首先在sys_execve处停下来。
//调试时再按s可以进入到函数内部 类似于VC调试C语言的F11?.
继续执行后会在load_elf_binary处停止下来

然后是start_thread函数。
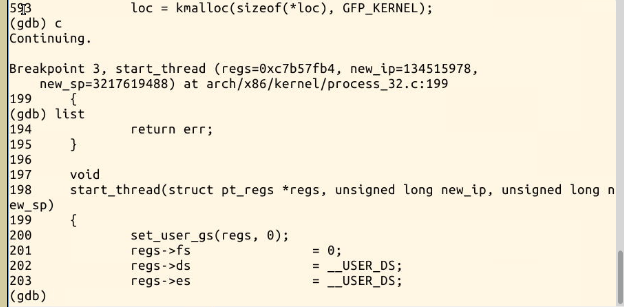
此时可以通过po new_ip和新窗口的 readelf -h helloc查看入口地址是否一致。

可以看到hello的入口地址和new_ip的值都是0x8048d0a 。说明对hello程序链接到了执行程序中。

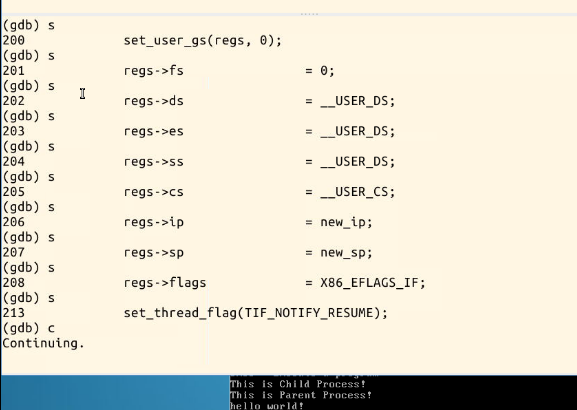
继续单步执行可以看到把new_ip复制给了regs-> ip(就是eip吧?做题做错了T-T,)
之后继续执行看可以看到MenuOS界面输出了相应的hello world。
实验总结:
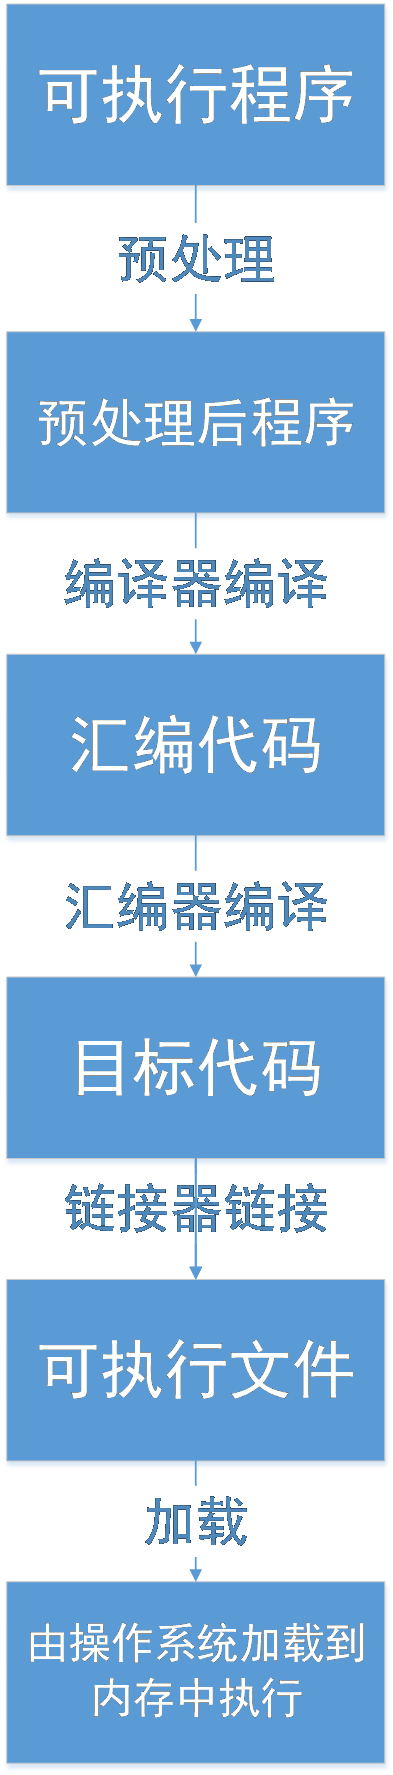
linux系统中,可执行程序一般要经过预处理、编译、汇编、链接、执行等步骤。
具体流程如下图所示:
如下示例代码演示了过程
shiyanlou:~/ $ cd Code                                                [9:27:05]
shiyanlou:Code/ $ vi hello.c                                          [9:27:14]
shiyanlou:Code/ $ gcc -E -o hello.cpp hello.c -m32                    [9:34:55]
shiyanlou:Code/ $ vi hello.cpp                                        [9:35:04]
shiyanlou:Code/ $ gcc -x cpp-output -S -o hello.s hello.cpp -m32      [9:35:21]
shiyanlou:Code/ $ vi hello.s                                          [9:35:28]
shiyanlou:Code/ $ gcc -x assembler -c hello.s -o hello.o -m32         [9:35:58]
shiyanlou:Code/ $ vi hello.o                                          [9:38:44]
shiyanlou:Code/ $ gcc -o hello hello.o -m32                           [9:39:37]
shiyanlou:Code/ $ vi hello                                            [9:39:44]
shiyanlou:Code/ $ gcc -o hello.static hello.o -m32 -static            [9:40:21]
shiyanlou:Code/ $ ls -l                                               [9:41:13]
-rwxrwxr-x 1 shiyanlou shiyanlou   7292  3\u6708 23 09:39 hello
-rw-rw-r-- 1 shiyanlou shiyanlou     64  3\u6708 23 09:30 hello.c
-rw-rw-r-- 1 shiyanlou shiyanlou  17302  3\u6708 23 09:35 hello.cpp
-rw-rw-r-- 1 shiyanlou shiyanlou   1020  3\u6708 23 09:38 hello.o
-rw-rw-r-- 1 shiyanlou shiyanlou    470  3\u6708 23 09:35 hello.s
-rwxrwxr-x 1 shiyanlou shiyanlou 733254  3\u6708 23 09:41 hello.static
gcc 编译时几个参数 -E 预处理,功能为替换宏定义等 -S汇编为汇编代码
-x assembler 处理成机器码,二进制文件 -o 链接成可执行文件 .o已经是二进制的机器文件 .o文件经过ld操作链接成可执行文件.out,就可以加载到内存中执行了。
-x none filename
关掉上一个选项,也就是让gcc根据文件名后缀,自动识别文件类型. 例子用法: gcc -x
其中hello文件小,还要运行时加载其他库,而引入关键字static进行静态编译的话,就会在链接时就把C库里要用到的东西都加载到可执行文件里了,所以产生的可执行文件大的多。
目标文件格式

目标文件格式ELF可执行格式文件
PE 主要在windows系统下 ELF在linux系统下
elf有三种格式的文件。
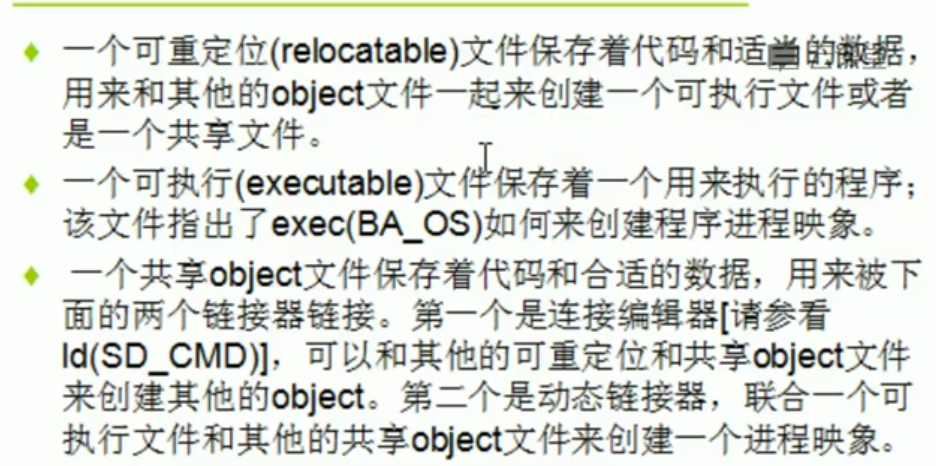
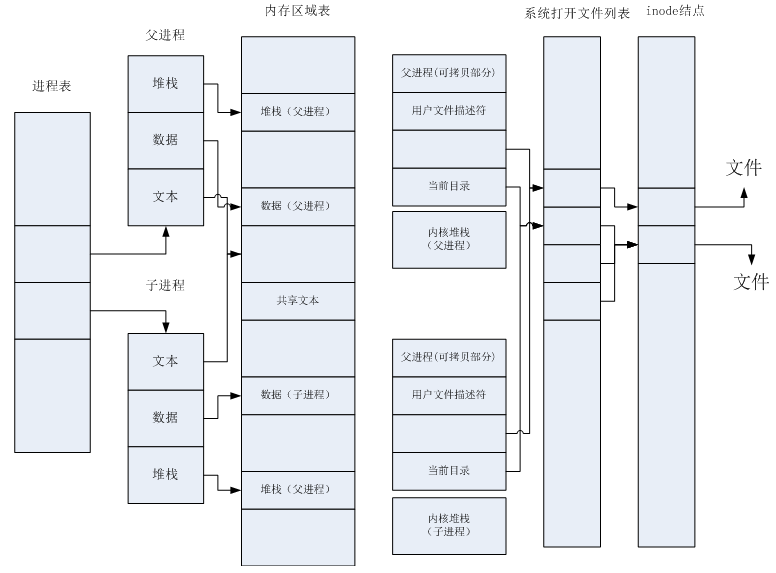
当创建或增加一个进程映像的时候,系统会在理论上拷贝一个文件的段到一个虚拟的内存段。比如把被拷贝部分的内容的数据段,代码段拷贝到指定的虚拟地址上。
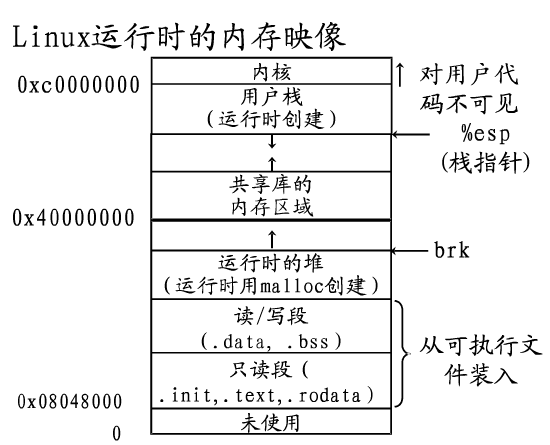
当sys_execve系统调用执行时候,操作系统会进行如下动作(图片来自互联网)
动态链接分为可执行程序装载时动态链接和运行时动态链接。
当以共享库和动态加载共享库的方式加载链接文件。
-
准备.so文件
shlibexample.h (1.3 KB) - Interface of Shared Lib Example
#ifndef _SH_LIB_EXAMPLE_H_
#define _SH_LIB_EXAMPLE_H_

#define SUCCESS 0
#define FAILURE (-1)

#ifdef __cplusplus
extern "C" {
#endif
/*
 * Shared Lib API Example
 * input    : none
 * output    : none
 * return    : SUCCESS(0)/FAILURE(-1)
 *
 */
int SharedLibApi();


#ifdef __cplusplus
}
#endif
#endif /* _SH_LIB_EXAMPLE_H_ */
shlibexample.c (1.2 KB) - Implement of Shared Lib Example
#include <stdio.h>
#include "shlibexample.h"

/*
 * Shared Lib API Example
 * input    : none
 * output    : none
 * return    : SUCCESS(0)/FAILURE(-1)
 *
 */
int SharedLibApi()
{
    printf("This is a shared libary!\n");
    return SUCCESS;
}
编译成libshlibexample.so文件
- $ gcc -shared shlibexample.c -o libshlibexample.so -m32
dllibexample.h (1.3 KB) - Interface of Dynamical Loading Lib Example
#ifndef _DL_LIB_EXAMPLE_H_
#define _DL_LIB_EXAMPLE_H_


#ifdef __cplusplus
extern "C" {
#endif
/*
 * Dynamical Loading Lib API Example
 * input    : none
 * output    : none
 * return    : SUCCESS(0)/FAILURE(-1)
 *
 */
int DynamicalLoadingLibApi();


#ifdef __cplusplus
}
#endif
#endif /* _DL_LIB_EXAMPLE_H_ */
dllibexample.c (1.3 KB) - Implement of Dynamical Loading Lib Example
#include <stdio.h>
#include "dllibexample.h"

#define SUCCESS 0
#define FAILURE (-1)

/*
 * Dynamical Loading Lib API Example
 * input    : none
 * output    : none
 * return    : SUCCESS(0)/FAILURE(-1)
 *
 */
int DynamicalLoadingLibApi()
{
    printf("This is a Dynamical Loading libary!\n");
    return SUCCESS;
}
编译成libdllibexample.so文件
- $ gcc -shared dllibexample.c -o libdllibexample.so -m32
-
分别以共享库和动态加载共享库的方式使用libshlibexample.so文件和libdllibexample.so文件
main.c (1.9 KB) - Main program
int main()
{
    printf("This is a Main program!\n");
    /* Use Shared Lib */
    printf("Calling SharedLibApi() function of libshlibexample.so!\n");
    SharedLibApi();
    /* Use Dynamical Loading Lib */
    void * handle = dlopen("libdllibexample.so",RTLD_NOW);
    if(handle == NULL)
    {
        printf("Open Lib libdllibexample.so Error:%s\n",dlerror());
        return   FAILURE;
    }
    int (*func)(void);
    char * error;
    func = dlsym(handle,"DynamicalLoadingLibApi");
    if((error = dlerror()) != NULL)
    {
        printf("DynamicalLoadingLibApi not found:%s\n",error);
        return   FAILURE;
    }
    printf("Calling DynamicalLoadingLibApi() function of libdllibexample.so!\n");
    func();
    dlclose(handle);
    return SUCCESS;
}
编译main,注意这里只提供shlibexample的-L(库对应的接口头文件所在目录)和-l(库名,如libshlibexample.so去掉lib和.so的部分),并没有提供dllibexample的相关信息,只是指明了-ldl
通过如下代码进行了展示。
$ gcc main.c -o main -L/path/to/your/dir -lshlibexample -ldl -m32
$ export LD_LIBRARY_PATH=$PWD #将当前目录加入默认路径,否则main找不到依赖的库文件,当然也可以将库文件copy到默认路径下。
$ ./main
This is a Main program!
Calling SharedLibApi() function of libshlibexample.so!
This is a shared libary!
Calling DynamicalLoadingLibApi() function of libdllibexample.so!
This is a Dynamical Loading libary!
下面更深入的来看下具体程序是如何加载执行的。
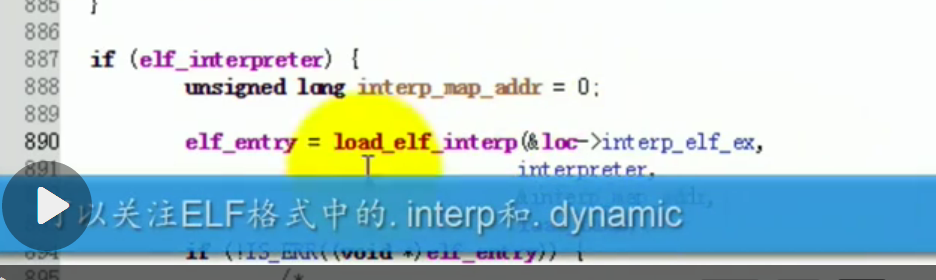
当一个eld是一个elf_interpreter ,需要动态的解析文件 。
加载,解析看加载进来的动态链接库还依赖那些哪些动态链接,继续解析,是一个树形的结构,最后可能行程一个图的结构。类似于图的广度遍历。
装载和执行之后ld将cpu的控制权交给可执行程序。
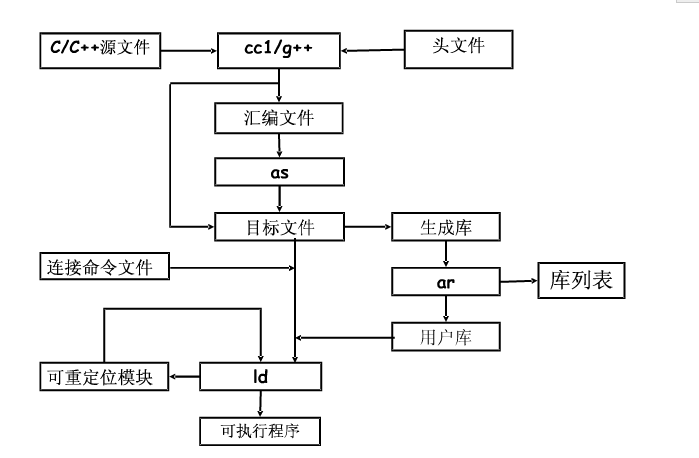
上图为C/C++源文件转变为可执行程序的过程。

函数说明:
execlp()会从PATH 环境变量所指的目录中查找符合参数file的文件名,找到后便执行该文件,然后将第二个以后的参数当做该文件的argv[0]、argv[1]……,最后一个参数必须用空指针(NULL)作结束。

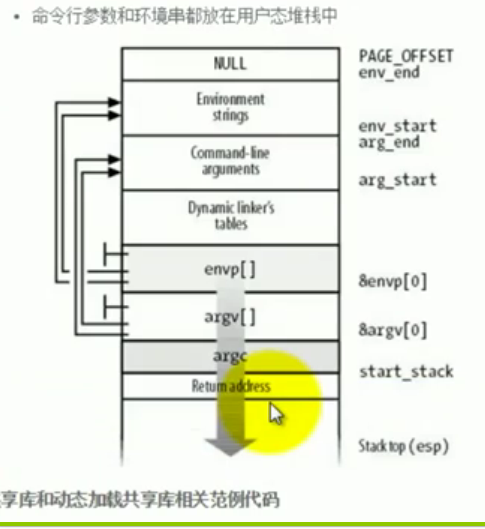
创建新的用户态堆栈的时候,实际上是把命令行参数的内容,环境变量的内容通过指针传递的方式传递到系统调用的内核处理函数Execve,然后该函数执行,创建新的用户态堆栈的时候会把这些参数拷贝到新的可执行程序执行的上下文环境。
先函数调用参数传递,再系统调用参数传递。
加载动态装载,需要dlopen + 路径 文件名。
本章内容比较多,也是写的比较杂比较乱,由于时间和精力有限,也没怎么深入研究,大多这是跟着课程视频学习了下,如果有错的地方,希望指出改正。
博客中一些内容参考转载自互联网。


 被折叠的 条评论
为什么被折叠?
被折叠的 条评论
为什么被折叠?
 到【灌水乐园】发言


