


写在前面:工作原因,使用的是oracle数据库。由于之前没有接触过,写一篇博客做点笔记。
如果要在springboot项目中连接oracle,首先肯定是要先加入依赖,但是好像在maven仓库里没有oracle驱动的jar,需要自己下载并安装到本地仓库。
1.安装jar到本地仓库,并在在项目中引入依赖。
mvn install:install-file -Dfile=<jar包路径> -DgroupId=<group-id> -DartifactId=<artifact-id> -Dversion=<version> -Dpackaging=<打包类型>
在pom.xml中
<dependency>
    <groupId>com.oracle</groupId>
    <artifactId>ojdbc6</artifactId>
    <version>11.2.0.1.0</version>
</dependency>
2.在application.yaml文件中添加配置(或properties文件),由于项目需要,我这里配置的是多数据源的情况。
spring:
  datasource:
    datasource1:
      driver-class-name: oracle.jdbc.driver.OracleDriver
     # 注:jdbc-url为配置多数据源时使用,单个数据源写url即可
      jdbc-url: jdbc:oracle:thin:@xxx:1521/xxxx
      username:
      password:

    datasource2:
      driver-class-name: oracle.jdbc.driver.OracleDriver
      jdbc-url: jdbc:oracle:thin:@xxx:1521/xxx
      username:
      password:
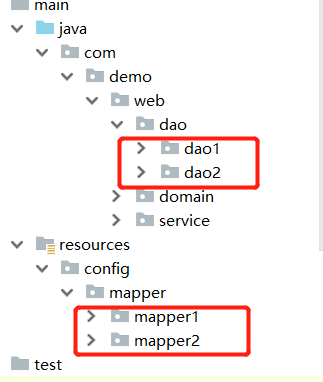
3.由于多数据源,所以我们的dao和mapper都要分不同的包创建。
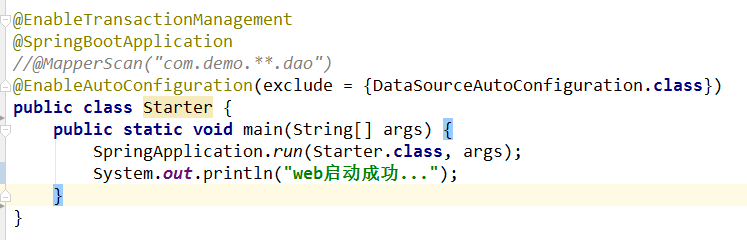
4.由于我们会写配置类来让spring找到datasourde,所以我们在boot启动文件中不必再加扫描包。
5.最后我们就可以编写配置类,以这种方式注册到spring容器中。当有多个数据源时,必须指定一个主数据源,并以@Primary注解区分。
注:本例中所有bean没有显式指定id,默认以方法名为id。
package com.demo.web.config.dataSource;

import org.apache.ibatis.session.SqlSessionFactory;
import org.mybatis.spring.SqlSessionFactoryBean;
import org.mybatis.spring.SqlSessionTemplate;
import org.mybatis.spring.annotation.MapperScan;
import org.springframework.beans.factory.annotation.Qualifier;
import org.springframework.boot.context.properties.ConfigurationProperties;
import org.springframework.boot.jdbc.DataSourceBuilder;
import org.springframework.context.annotation.Bean;
import org.springframework.context.annotation.Configuration;
import org.springframework.context.annotation.Primary;
import org.springframework.core.io.support.PathMatchingResourcePatternResolver;
import org.springframework.jdbc.datasource.DataSourceTransactionManager;

import javax.sql.DataSource;

/**
 * @Description: 主数据源配置类
 * @Author: 乔木
 * @Date: 2019/6/5 0005
 */
@Configuration
//basePackages 为dao所在的包
@MapperScan(basePackages = "com.demo.web.dao.dao1",sqlSessionFactoryRef = "sqlSessionFactory1")
public class DatasourceConfig1 {

    @Bean
    @ConfigurationProperties(prefix = "spring.datasource.datasource1")
//@Primary 必须要有,而且只能加在主数据源中,以下同。
    @Primary
    public DataSource dataSource1(){
        return DataSourceBuilder.create().build();
    }

    @Bean
    @Primary
    public SqlSessionFactory sqlSessionFactory1(@Qualifier("dataSource1") DataSource dataSource) throws Exception {
        SqlSessionFactoryBean bean = new SqlSessionFactoryBean();
        bean.setDataSource(dataSource);
        bean.setMapperLocations(new PathMatchingResourcePatternResolver().getResources("classpath*:/config/mapper/mapper1/*.xml"));
        return bean.getObject();
    }

    @Bean
    @Primary
    public DataSourceTransactionManager dataSourceTransactionManager1(@Qualifier("dataSource1") DataSource dataSource){
        return new DataSourceTransactionManager(dataSource);
    }

    @Bean
    @Primary
    public SqlSessionTemplate sqlSessionTemplate1(@Qualifier("sqlSessionFactory1") SqlSessionFactory sqlSessionFactory){
        return new SqlSessionTemplate(sqlSessionFactory);
    }
}
接下来我们配置第二个配置类
package com.demo.web.config.dataSource;

import org.apache.ibatis.session.SqlSessionFactory;
import org.mybatis.spring.SqlSessionFactoryBean;
import org.mybatis.spring.SqlSessionTemplate;
import org.mybatis.spring.annotation.MapperScan;
import org.springframework.beans.factory.annotation.Qualifier;
import org.springframework.boot.context.properties.ConfigurationProperties;
import org.springframework.boot.jdbc.DataSourceBuilder;
import org.springframework.context.annotation.Bean;
import org.springframework.context.annotation.Configuration;
import org.springframework.core.io.support.PathMatchingResourcePatternResolver;
import org.springframework.jdbc.datasource.DataSourceTransactionManager;

import javax.sql.DataSource;
/**
 * @Description: 次数据源配置类
 * @Author: 乔木
 * @Date: 2019/6/5 0005
 */
@Configuration
@MapperScan(basePackages = "com.demo.web.dao.dao2",sqlSessionFactoryRef = "sqlSessionFactory2")
public class DatasourceConfig2 {

    @Bean
    @ConfigurationProperties(prefix = "spring.datasource.datasource2")
    public DataSource dataSource2(){
        return DataSourceBuilder.create().build();
    }

    @Bean
    public SqlSessionFactory sqlSessionFactory2(@Qualifier("dataSource2") DataSource dataSource) throws Exception {
        SqlSessionFactoryBean bean = new SqlSessionFactoryBean();
        bean.setDataSource(dataSource);
        bean.setMapperLocations(new PathMatchingResourcePatternResolver().getResources("classpath*:/config/mapper/mapper2/*.xml"));
        return bean.getObject();
    }

    @Bean
    public DataSourceTransactionManager dataSourceTransactionManager2(@Qualifier("dataSource2") DataSource dataSource){
        return new DataSourceTransactionManager(dataSource);
    }

    @Bean
    public SqlSessionTemplate sqlSessionTemplate2(@Qualifier("sqlSessionFactory2") SqlSessionFactory sqlSessionFactory){
        return new SqlSessionTemplate(sqlSessionFactory);
    }
}
写在后面:至此,springboot+mybatis 使用oracle数据源就可以了。我们就可以根据业务需要,灵活操作不同的数据库啦。不过好像文中也没有提到mybatis 哈哈。这是我的第一篇博客,可能大家也看的出来,文采和技术显得粗糙。希望以后能养成写博客的习惯,快下班了,还要回去看函数极限和连续性,就到这了。


 被折叠的 条评论
为什么被折叠?
被折叠的 条评论
为什么被折叠?
 到【灌水乐园】发言


