 iOS城市选择器实现


 本文介绍了一个简单的iOS应用中城市选择器的实现方法。通过使用UITableView和UIPickerView,可以轻松实现省市级联选择功能。代码中详细展示了如何加载城市数据、设置选择器样式以及处理用户选择。
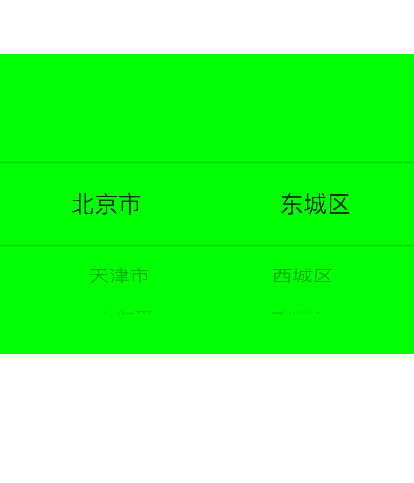
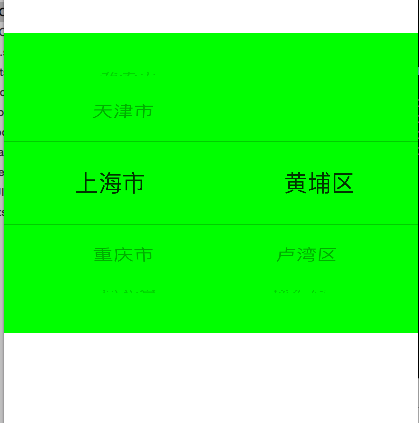
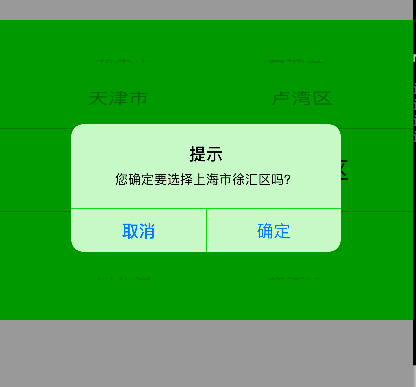
下面是一些效果图
下面是代码。有些枯燥 , 其实并不难 。
#import <UIKit/UIKit.h>

@interface ViewController : UIViewController<UIPickerViewDelegate,UIPickerViewDataSource>

@property(strong,nonatomic) UIPickerView *picker;
@property(strong,nonatomic) NSMutableArray *sheng;
@property(strong,nonatomic) NSMutableArray *shi;
@property(strong,nonatomic) NSArray *array;

@end
#import "ViewController.h"

@interface ViewController ()

@end

@implementation ViewController

- (void)viewDidLoad {
    [super viewDidLoad];
    self.sheng=[NSMutableArray array];
    self.shi=[NSMutableArray array];
    NSBundle *bundle=[NSBundle mainBundle];
    NSString *path=[bundle pathForResource:@"city.plist" ofType:nil];
    self.array=[NSArray arrayWithContentsOfFile:path];
    for (NSDictionary *ar1 in self.array) {
        NSArray *ar2=[ar1 objectForKey:@"Cities"];
        [self.sheng addObject:[ar1 objectForKey:@"State"]];
        for (NSDictionary *ar3 in ar2) {
//            NSLog(@"%@",[ar3 objectForKey:@"city"]);
        [self.shi addObject:[ar3 objectForKey:@"city"]];

        }


    }

    self.picker=[[UIPickerView alloc]initWithFrame:CGRectMake(0, 200, 414, 300)];
    self.picker.backgroundColor=[UIColor greenColor];

    [self.view addSubview: self.picker];
    self.picker.delegate=self;
    self.picker.dataSource=self;

}

#pragma mark -数据源  nubertOfComponentsInPickerView:
-(NSInteger)numberOfComponentsInPickerView:(UIPickerView *)pickerView
{
    return 2;
}

#pragma mark - 数据源 pickerView: attributedTitleForRow: forComponent:
-(NSInteger)pickerView:(UIPickerView *)pickerView numberOfRowsInComponent:(NSInteger)component{


    if (component==0) {
        return self.sheng.count;
    }
         return self.shi.count;
}


#pragma mark - 显示信息方法  delegate
-(NSString *)pickerView:(UIPickerView *)pickerView titleForRow:(NSInteger)row forComponent:(NSInteger)component
{
    if (component==0) {
        return self.sheng[row];

    }


         return self.shi[row];
}
#pragma mark -选中行的信息
-(void)pickerView:(UIPickerView *)pickerView didSelectRow:(NSInteger)row inComponent:(NSInteger)component
{
    if (component==0) {
        //清除上次选择地城市
        [self.shi removeAllObjects];
        NSDictionary *dic=[self.array objectAtIndex:row];
//          NSLog(@"%@",dic);
        NSArray *arr1=dic[@"Cities"];


        NSMutableArray * arr2 =[NSMutableArray array];
        for (NSDictionary * dic in arr1) {
            [arr2 addObject:dic[@"city"]];


        }
        self.shi=arr2;
        [self.picker selectRow:row inComponent:0 animated:YES];

        [self.picker reloadComponent:1];

        }
    else {
        NSInteger firstRow=[self.picker selectedRowInComponent: 0];
        NSInteger secondRow=[self.picker selectedRowInComponent:1];

        NSString *firstString=[self.sheng objectAtIndex:firstRow];
        NSString *secondString=[self.shi objectAtIndex:secondRow];


        NSString *message=[NSString stringWithFormat:@"您确定要选择%@%@吗?",firstString,secondString];
        UIAlertController *alertMessage=[UIAlertController alertControllerWithTitle:@"提示" message:message preferredStyle:UIAlertControllerStyleAlert];

        UIAlertAction *cancle=[UIAlertAction actionWithTitle:@"取消" style:UIAlertActionStyleCancel handler:nil];

        UIAlertAction *ok=[UIAlertAction actionWithTitle:@"确定" style:UIAlertActionStyleDefault handler:nil];

        [alertMessage addAction:cancle];
        [alertMessage addAction:ok];
        [self presentViewController:alertMessage animated:YES completion:nil];
        NSLog(@"%@%@",firstString,secondString);

    }


    }


#pragma mark - 行高
-(CGFloat)pickerView:(UIPickerView *)pickerView rowHeightForComponent:(NSInteger)component
{
    if (component==0) {
         return  80;
    }
    return 50;
}

- (void)didReceiveMemoryWarning {
    [super didReceiveMemoryWarning];
    // Dispose of any resources that can be recreated.
}

@end


 1029
1029

 被折叠的 条评论
为什么被折叠?
被折叠的 条评论
为什么被折叠?
 到【灌水乐园】发言


