


 本文详细介绍了iOS开发中线程的状态及其控制方法,包括线程的创建、启动、阻塞和退出等操作,并通过两个代码示例展示了如何使用NSThread进行线程控制。
iOS开发多线程篇—线程的状态
一、简单介绍
线程的创建:
self.thread=[[NSThread alloc]initWithTarget:self selector:@selector(test) object:nil];
说明:创建线程有多种方式,这里不做过多的介绍。

线程的开启:
[self.thread start];

线程的运行和阻塞:
(1)设置线程阻塞1,阻塞2秒
[NSThread sleepForTimeInterval:2.0];
(2)第二种设置线程阻塞2,以当前时间为基准阻塞4秒
NSDate *date=[NSDate dateWithTimeIntervalSinceNow:4.0];
[NSThread sleepUntilDate:date];
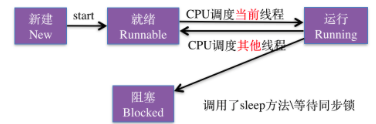
线程处理阻塞状态时在内存中的表现情况:(线程被移出可调度线程池,此时不可调度)

线程的死亡:
当线程的任务结束,发生异常,或者是强制退出这三种情况会导致线程的死亡。
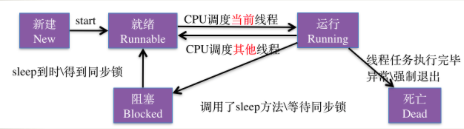
线程死亡后,线程对象从内存中移除。

二、代码示例
代码示例1:
//
//  YYViewController.m
//  04-NSThread02-线程的状态
//
//  Created by apple on 14-6-23.
//  Copyright (c) 2014年 itcase. All rights reserved.
//

#import "YYViewController.h"

@interface YYViewController ()
@property(nonatomic,strong)NSThread *thread;

@end

@implementation YYViewController

- (void)viewDidLoad
{
    [super viewDidLoad];

    //创建线程
    self.thread=[[NSThread alloc]initWithTarget:self selector:@selector(test) object:nil];
    //设置线程的名称
    [self.thread setName:@"线程A"];
}
//当手指按下的时候,开启线程
-(void)touchesBegan:(NSSet *)touches withEvent:(UIEvent *)event
{
    //开启线程
    [self.thread start];
}

-(void)test
{
    //获取线程
    NSThread *current=[NSThread currentThread];
    NSLog(@"test---打印线程---%@",self.thread.name);
    NSLog(@"test---线程开始---%@",current.name);

    //设置线程阻塞1,阻塞2秒
    NSLog(@"接下来,线程阻塞2秒");
    [NSThread sleepForTimeInterval:2.0];

    //第二种设置线程阻塞2,以当前时间为基准阻塞4秒
     NSLog(@"接下来,线程阻塞4秒");
    NSDate *date=[NSDate dateWithTimeIntervalSinceNow:4.0];
    [NSThread sleepUntilDate:date];
    for (int i=0; i<20; i++) {
        NSLog(@"线程--%d--%@",i,current.name);

    }
        NSLog(@"test---线程结束---%@",current.name);
}

@end
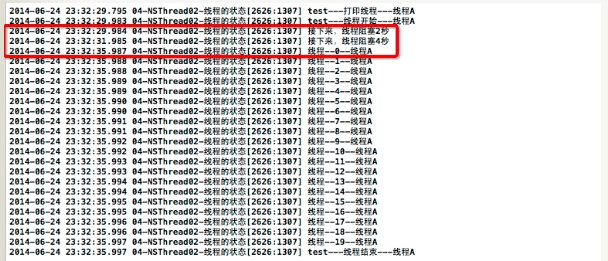
打印查看:
代码示例2(退出线程):
//
//  YYViewController.m
//  04-NSThread02-线程的状态
//
//  Created by apple on 14-6-23.
//  Copyright (c) 2014年 itcase. All rights reserved.
//

#import "YYViewController.h"

@interface YYViewController ()
@property(nonatomic,strong)NSThread *thread;

@end

@implementation YYViewController

- (void)viewDidLoad
{
    [super viewDidLoad];

    //创建线程
    self.thread=[[NSThread alloc]initWithTarget:self selector:@selector(test) object:nil];
    //设置线程的名称
    [self.thread setName:@"线程A"];
}
//当手指按下的时候,开启线程
-(void)touchesBegan:(NSSet *)touches withEvent:(UIEvent *)event
{
    //开启线程
    [self.thread start];
}

-(void)test
{
    //获取线程
    NSThread *current=[NSThread currentThread];
    NSLog(@"test---打印线程---%@",self.thread.name);
    NSLog(@"test---线程开始---%@",current.name);

    //设置线程阻塞1,阻塞2秒
    NSLog(@"接下来,线程阻塞2秒");
    [NSThread sleepForTimeInterval:2.0];

    //第二种设置线程阻塞2,以当前时间为基准阻塞4秒
     NSLog(@"接下来,线程阻塞4秒");
    NSDate *date=[NSDate dateWithTimeIntervalSinceNow:4.0];
    [NSThread sleepUntilDate:date];
    for (int i=0; i<20; i++) {
        NSLog(@"线程--%d--%@",i,current.name);
        if (5==i) {
            //结束线程
            [NSThread exit];
        }

    }
        NSLog(@"test---线程结束---%@",current.name);
}

@end
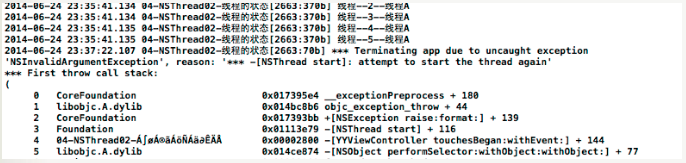
打印示例:

注意:人死不能复生,线程死了也不能复生(重新开启),如果在线程死亡之后,再次点击屏幕尝试重新开启线程,则程序会挂。


 被折叠的 条评论
为什么被折叠?
被折叠的 条评论
为什么被折叠?
 到【灌水乐园】发言


