


 本文详细介绍如何在CentOS 7上使用Apache HTTP服务器搭建个人网站。内容包括域名解析、Apache安装配置、创建测试页面等步骤,适用于初学者快速上手。
Apache搭建http网站服务器入门教程
准备工具
- 一台带有Linux系统的主机,这里使用CentOS 7.1 64位系统
- 一个备案过的域名,这里使用www.hellopage.cn
- 一台可以访问网络的pc,这里使用的Win7_pro_sp1
步骤
1.解析域名
在域名管理控制台添加对主机ip的解析,如下图


2.Apache安装
启动CentOS系统,安装httpd
# yum install httpd3.配置Apache环境
# vim /etc/httpd/conf/httpd.conf添加如下代码至文件末尾
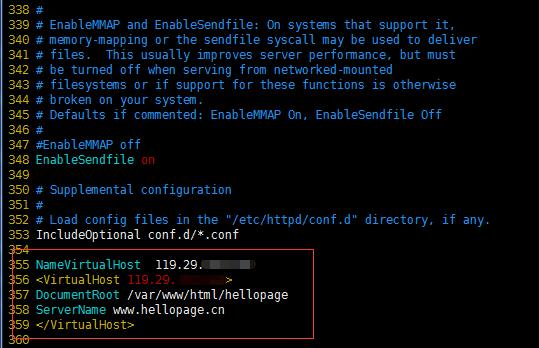
同时修改文件的以下部分,来修改默认的主目录
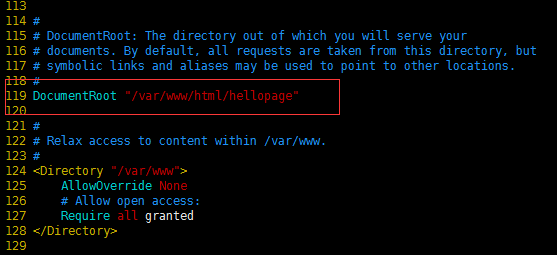
同时别忘了创建此目录,否则会报错
# cd /var/www/html
# mkdir hellopage
最后重新启动httpd
# /bin/systemctl start httpd.service4.测试
1.打开浏览器,输入www.hellopage.cn,若出现如下页面,则建立成功
    Testing 123..
    This page is used to test the proper operation of the Apache HTTP server after it has been installed. If you can read this page it means that this site is working properly. This server is powered by CentOS.
2.在刚刚创建的/var/www/html/hellopage/下创建html
# cd /var/www/html/hellopage/
# touch index.html
# vim index.html
添加如下代码
<!DOCTYPE html>
<html>
<head>
    <title>God Sacred</title>
</head>
<body>
    <p>hello world!</p>
</body>
</html>
3.重新登录网站www.hellopage.cn


 1069
1069

 被折叠的 条评论
为什么被折叠?
被折叠的 条评论
为什么被折叠?
 到【灌水乐园】发言


