


 本文介绍如何在Android应用中使用Fragment,包括定义布局文件、创建Fragment子类及在MainActivity中引用等步骤,并提供了Fragment1和Fragment2的具体实现代码。
本篇博客主要讲的是如何使用Fragment。
使用Fragment的步骤类似于自定义View的步骤:
- 定义Fragment的布局文件
- 实现扩展Fragment的子类
- 在扩展子类的onCreateView()方法中根据xml布局文件生成View。
- 在MainActivity的布局文件中引用Fragment的扩展子类。
-
这样运行程序就可以使用Fragment了
代码如下(注意使用的开发环境是android studio 1.2):
Fragmeng1的布局文件:
<?xml version="1.0" encoding="utf-8"?>
<LinearLayout xmlns:android="http://schemas.android.com/apk/res/android"
android:orientation="vertical" android:layout_width="match_parent"
android:layout_height="match_parent" android:background="#00FF00">
<TextView
android:layout_width="match_parent"
android:layout_height="wrap_content"
android:text="这是Fragment1"
android:textColor="#000000"
android:textSize="25sp"
/>
</LinearLayout>
Fragment1对应的java类:
package com.cm.myfragment;

import android.app.Fragment;
import android.os.Bundle;
import android.support.annotation.Nullable;
import android.view.LayoutInflater;
import android.view.View;
import android.view.ViewGroup;

/**
 * Created by Administrator on 2016/1/1.
 */
public class Fragment1 extends Fragment{

@Nullable
    @Override
public View onCreateView(LayoutInflater inflater, ViewGroup container, Bundle savedInstanceState) {
return inflater.inflate(R.layout.fragment1,container,false);

    }
}
Fragment2的布局文件:
<?xml version="1.0" encoding="utf-8"?>
<LinearLayout xmlns:android="http://schemas.android.com/apk/res/android"
android:orientation="vertical" android:layout_width="match_parent"
android:layout_height="match_parent" android:background="#FFFE00">
<TextView
android:layout_width="match_parent"
android:layout_height="wrap_content"
android:text="这是Fragment2"
android:textSize="25sp"
android:textColor="#000000"

/>
</LinearLayout>
Fragment2的java类:
package com.cm.myfragment;

import android.app.Fragment;
import android.os.Bundle;
import android.support.annotation.Nullable;
import android.view.LayoutInflater;
import android.view.View;
import android.view.ViewGroup;

/**
 * Created by Administrator on 2016/1/1.
 */
public class Fragment2 extends Fragment{
@Nullable
    @Override
public View onCreateView(LayoutInflater inflater, ViewGroup container, Bundle savedInstanceState) {
return inflater.inflate(R.layout.fragment2,container,false);
    }
}
MainActivity的布局文件:
<LinearLayout xmlns:android="http://schemas.android.com/apk/res/android"
xmlns:tools="http://schemas.android.com/tools" android:layout_width="match_parent"
android:layout_height="match_parent" >

    <fragment
android:name="com.cm.myfragment.Fragment1"
android:id="@+id/fragment1"
android:layout_width="0dp"
android:layout_weight="1"
android:layout_height="match_parent"/>

<fragment
android:name="com.cm.myfragment.Fragment2"
android:id="@+id/fragment2"
android:layout_width="0dp"
android:layout_weight="1"
android:layout_height="match_parent"/>


</LinearLayout>
MainActivity的java类:没有做任何改变。
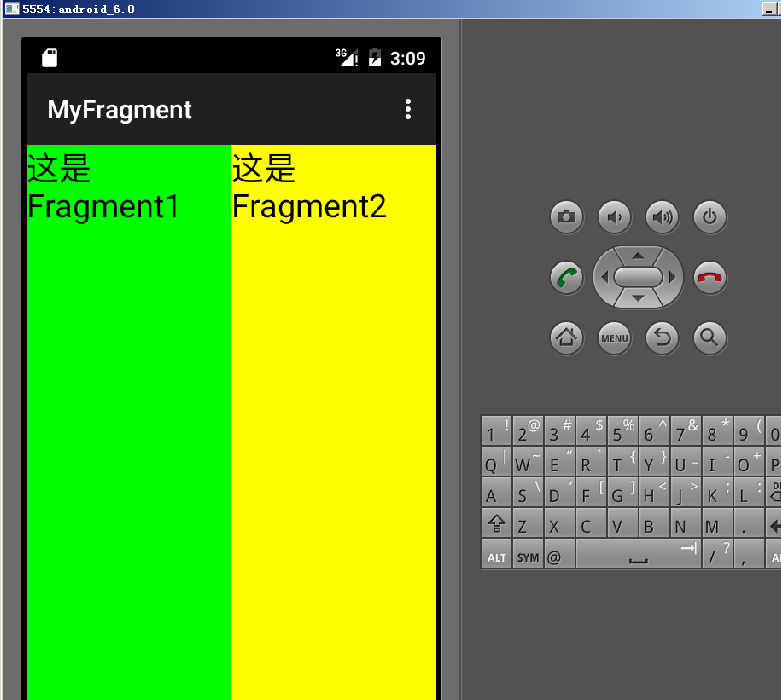
运行程序的截图:


 被折叠的 条评论
为什么被折叠?
被折叠的 条评论
为什么被折叠?
 到【灌水乐园】发言


