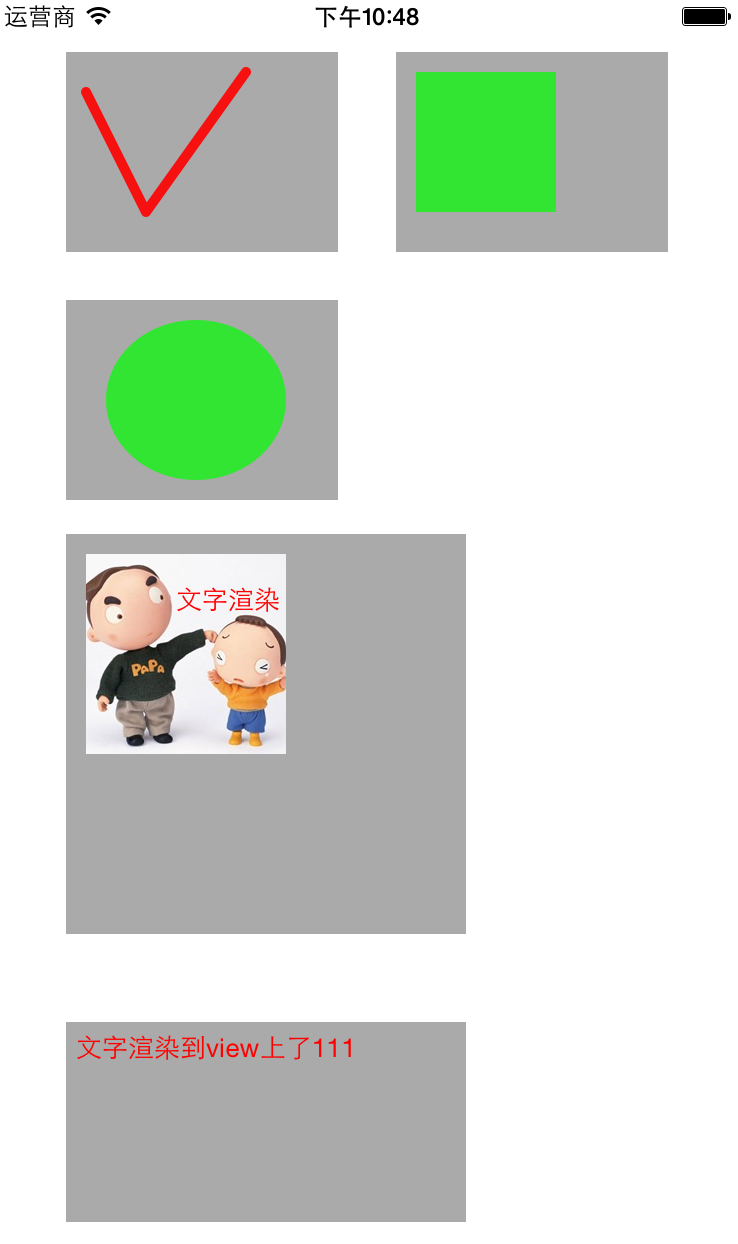
利用Quartz2D中提供的图层上下文 Layer Graphics Context,进行简单绘制线、矩形、弧、圆、文字、图片
在storyBoard中得拖入控制器,添加多个UIView控件,并把各个UIView的class修改为自定义的类.
如:

绘制线:
//
//  HJLineView.m
//  画线三角矩形圆
//
//  Created by HJiang on 15/1/2.
//  Copyright (c) 2015年 HJiang. All rights reserved.
//

#import "HJLineView.h"

/**
 *  画线
 */
@implementation HJLineView

/**
 * 此方法何时调用
 *  1.手动调用[self setNeedsDisplay]方法后会调用drawRect方法
 *  2.自定义View第一次呈现时会调用drawRect方法
    drawRect方法是在控制器的viewdidLoad方法后调用,也在sizeToFit方法后调用
 *  @param rect <#rect description#>
 */
- (void)drawRect:(CGRect)rect{

    // 获取上线文
    CGContextRef ctx = UIGraphicsGetCurrentContext();

    // 设置相应属性
    // 设置颜色
    CGContextSetRGBStrokeColor(ctx, 1.0, 0.0, 0.0, 0.9);

    // 设置线宽(默认一个为1)
    CGContextSetLineWidth(ctx, 5);

    // 设置线的头尾样式
    CGContextSetLineCap(ctx, kCGLineCapRound);

    // 设置线线的连接点样式
    CGContextSetLineJoin(ctx, kCGLineJoinRound);

    // 设置起始点
    CGContextMoveToPoint(ctx, 10, 20);

    // 设置连接点
    CGContextAddLineToPoint(ctx, 40, 80);

    // 第2根线
    // 设置连接点
    CGContextAddLineToPoint(ctx, 90, 10);

    // 绘制线
    CGContextStrokePath(ctx);
}

@end
绘制矩形:
//
//  HJRectangleView.m
//  画线三角矩形圆
//
//  Created by HJiang on 15/1/2.
//  Copyright (c) 2015年 HJiang. All rights reserved.
//

#import "HJRectangleView.h"

/**
 *  // 画矩形
 */
@implementation HJRectangleView


- (void)drawRect:(CGRect)rect{
    [self drawWay4];
}

/**
 *  绘制空心正方形
 */
- (void)drawWay1{
    CGContextRef ctx = UIGraphicsGetCurrentContext();

    CGContextSetLineWidth(ctx, 2);

//     设置空心线颜色CGContextRef context, CGFloat red:数字/255.0,CGFloat green:数字/255.0, CGFloat blue:数字/255.0, CGFloat alpha:透明度
    CGContextSetRGBStrokeColor(ctx, 0.0, 1.0, 0.0, 0.7);

    CGContextMoveToPoint(ctx, 10, 10);

    CGContextAddLineToPoint(ctx, 60, 10);

    CGContextAddLineToPoint(ctx, 60, 60);

    CGContextAddLineToPoint(ctx, 10, 60);

    // 方式1 连接起始点
    //    CGContextAddLineToPoint(ctx, 10, 10);
    // 方式2 闭合路径
    CGContextClosePath(ctx);

    // 绘制空心矩形
    CGContextStrokePath(ctx);
}

/**
 *  绘制空心正方形
 */
- (void)drawWay2{
    CGContextRef ctx = UIGraphicsGetCurrentContext();

    CGContextSetLineWidth(ctx, 2);

    //  设置空心线颜色
    CGContextSetRGBStrokeColor(ctx, 0.0, 1.0, 0.0, 0.7);

    // 设置起始点和大小
    CGContextAddRect(ctx, CGRectMake(10, 10, 70, 70));

    // 绘制空心矩形
    CGContextStrokePath(ctx);
}

/**
 *  绘制实心正方形
 */
- (void)drawWay3{
    CGContextRef ctx = UIGraphicsGetCurrentContext();

    CGContextSetLineWidth(ctx, 2);

    // 设置实心填充颜色
    CGContextSetRGBFillColor(ctx, 0.0, 1.0, 0.0, 0.7);

    CGContextMoveToPoint(ctx, 10, 10);

    CGContextAddLineToPoint(ctx, 60, 10);

    CGContextAddLineToPoint(ctx, 60, 60);

    CGContextAddLineToPoint(ctx, 10, 60);

    // 方式1 连接起始点
    //    CGContextAddLineToPoint(ctx, 10, 10);
    // 方式2 闭合路径
    CGContextClosePath(ctx);

    // 绘制实心矩形
    CGContextFillPath(ctx);
}

/**
 *  绘制实心正方形
 */
- (void)drawWay4{
    CGContextRef ctx = UIGraphicsGetCurrentContext();

    CGContextSetLineWidth(ctx, 2);

    // 设置实心填充颜色
    CGContextSetRGBFillColor(ctx, 0.0, 1.0, 0.0, 0.7);

    // 设置起始点和大小
    CGContextAddRect(ctx, CGRectMake(10, 10, 70, 70));

    // 绘制实心矩形
    CGContextFillPath(ctx);
}


@end
绘制圆:
//
//  HJCircleView.m
//  画线三角矩形圆
//
//  Created by HJiang on 15/1/2.
//  Copyright (c) 2015年 HJiang. All rights reserved.
//

#import "HJCircleView.h"

/**
 *  画圆
 */
@implementation HJCircleView

- (void)drawRect:(CGRect)rect{
//    [self drawArc];
//    [self drawSector];
    [self drawCircle];
}

/**
 *  画弧形
 *  x,y 圆心
 *  radius 半径
 *  startAngle 画弧的起始位置
 *  endAngel 画弧的结束位置
 *  clockwise 0 顺针 1 逆时针
 */
- (void)drawArc{

    CGContextRef ctx = UIGraphicsGetCurrentContext();

    /* Add an arc of a circle to the context's path, possibly preceded by a
     straight line segment. `(x, y)' is the center of the arc; `radius' is its
     radius; `startAngle' is the angle to the first endpoint of the arc;
     `endAngle' is the angle to the second endpoint of the arc; and
     `clockwise' is 1 if the arc is to be drawn clockwise, 0 otherwise.
     `startAngle' and `endAngle' are measured in radians. */
    // 画弧形
    CGContextAddArc(ctx, 60, 40, 40, -M_PI_4, M_PI, 0);

    // 绘制 渲染
    CGContextStrokePath(ctx);
}


 /**
 *画扇形
 *x,y 圆心
 *radius 半径
 *startAngle 画弧的起始位置
 *endAngel 画弧的结束位置
 * clockwise 0 顺针 1 逆时针
 */

- (void)drawSector{

    CGContextRef ctx = UIGraphicsGetCurrentContext();

    // 根据一个点->连接弧形起始点->再关闭路径

    CGContextMoveToPoint(ctx, 60, 40);

    /* Add an arc of a circle to the context's path, possibly preceded by a
     straight line segment. `(x, y)' is the center of the arc; `radius' is its
     radius; `startAngle' is the angle to the first endpoint of the arc;
     `endAngle' is the angle to the second endpoint of the arc; and
     `clockwise' is 1 if the arc is to be drawn clockwise, 0 otherwise.
     `startAngle' and `endAngle' are measured in radians. */

    // 画弧
    CGContextAddArc(ctx, 60, 40, 40, -M_PI_4, M_PI_4*5, 0);

    // 关闭路径
    CGContextClosePath(ctx);

    // 绘制 渲染
//    CGContextStrokePath(ctx); // 空心
    CGContextFillPath(ctx);

}


/**
 *  画圆
 */
- (void)drawCircle{

    CGContextRef ctx = UIGraphicsGetCurrentContext();

    // 设置颜色
//    CGContextSetRGBStrokeColor(ctx, 1.0, 0, 0, 0.7);
    CGContextSetRGBFillColor(ctx, 0, 1.0, 0, 0.7);

    // 设置空心圆线的大小
//    CGContextSetLineWidth(ctx, 3);

    // 画圆 根据Rect的大小画出的圆形可以是椭圆
    CGContextAddEllipseInRect(ctx, CGRectMake(20, 10, 90, 80));

    // 空心圆
//    CGContextStrokePath(ctx);
    // 实心圆
    CGContextFillPath(ctx);

}

@end
绘制文字:
//
//  HJWordView.m
//  画线三角矩形圆
//
//  Created by HJiang on 15/1/2.
//  Copyright (c) 2015年 HJiang. All rights reserved.
//

#import "HJWordView.h"

/**
 *  绘制文字到view中
 *
 */
@implementation HJWordView

- (void)drawRect:(CGRect)rect{

    CGFloat w = rect.size.width;
    CGFloat h = rect.size.height;

    // 画文字
    NSString *wordText = @"文字渲染到view上了111";
    NSDictionary *attrs = @{NSFontAttributeName:[UIFont systemFontOfSize:13],NSForegroundColorAttributeName:[UIColor redColor]};

    // 经测试2种方式都可以
//    [wordText drawAtPoint:CGPointMake(5, 5) withAttributes:nil];
    [wordText drawInRect:CGRectMake(5, 5, w, h) withAttributes:attrs];

}

@end
绘制图片:
//
//  HJImageView.m
//  画线三角矩形圆
//
//  Created by HJiang on 15/1/2.
//  Copyright (c) 2015年 HJiang. All rights reserved.
//

#import "HJImageView.h"

/**
 *  绘制图片
 *  注意:在此方法中绘制多个内容时有可能后面绘制的内容会覆盖前面的内容,主要看谁先谁后 并且区域有没有重叠
 */
@implementation HJImageView

- (void)drawRect:(CGRect)rect{

    CGFloat w = rect.size.width;
    CGFloat h = rect.size.height;

    // 绘制图片
    UIImage *image = [UIImage imageNamed:@"papa"];
    CGRect inRect = CGRectMake(10, 10, 100, 100);
    CGPoint point = CGPointMake(10, 40);
    // 方式1
//    [image drawAtPoint:point];
    // 方式2
    [image drawInRect:inRect];
    // 方式3 平铺效果
//    [image drawAsPatternInRect:inRect];
    // 方式4 混合效果
//    [image drawInRect:inRect blendMode:kCGBlendModeSoftLight alpha:1.0];
    // 方式5
//    [image drawAtPoint:point blendMode:kCGBlendModeSoftLight alpha:0.7];


    // 画文字
    NSString *wordText = @"文字渲染";
    NSDictionary *attrs = @{NSFontAttributeName:[UIFont systemFontOfSize:13],NSForegroundColorAttributeName:[UIColor redColor]};

    // 经测试2种方式都可以
    //    [wordText drawAtPoint:CGPointMake(5, 5) withAttributes:nil];
    [wordText drawInRect:CGRectMake(55, 25, w, h) withAttributes:attrs];
}


@end
效果图:


 本文介绍如何利用Quartz2D中的图层上下文进行简单绘制,包括线、矩形、弧、圆、文字和图片,并展示了如何在Storyboard中拖入控制器和自定义UIView控件的方法。


 2161
2161

 被折叠的 条评论
为什么被折叠?


