


 本文介绍如何在WPF中创建自定义圆形布局面板,包括测量和排列阶段的实现细节,通过示例代码展示了如何将UI元素均匀分布在一个圆周上。
声明:欢迎任何人和组织转载本blog中文章,但必须标记文章原始链接和作者信息。
本文链接:http://www.cnblogs.com/leezhm/archive/2011/07/06/2099083.html
开拓进取的小乌龟------->cnBlogs 点滴点点滴滴 Blog
在这篇文章里面记录下,学习Essential Windows Presentation Foundation一书中自定义布局面板的实例和我的理解。
在实际的项目中,可能遇到WPF已经提供的布局面板并不能满足我们要求的情况,比如我们需要把控件自动排列成一个圆圈,这个时候就可能需要自己来构建自定义布局满足项目需求。
构建自定义布局,肯定需要先理解布局系统的工作原理,然后才能去构建。布局面板需要经过两个阶段才能完成布局,分别是测量阶段和排列阶段。布局面板的基类Panel提供了MeasureOverride和ArrangeOverride两个方法,供子类继承实现特定的布局行为。
在测量布局阶段,会对面板中Children集合InternalChildren的每个子元素(child)进行计算,测量大小。此过程是通过调用child的Measure方法来完成。
在排列布局阶段,同样会对面板中Children集合InteralChildren的每个元素调用Arrange放来完成。
具体的过程,可以通过一个示例代码来理解:
1: using System;
2: using System.Collections.Generic;
3: using System.Linq;
4: using System.Text;
5:
6: // for Panel class
7: using System.Windows;
8: using System.Windows.Controls;
9: using System.Windows.Media;
10:
11: // Writen by Leezhm, 5th July, 2011.
12: // Copyright (c) Leezhm@126.com, All Right Reserved.
13: // Contact : Leezhm@126.com.
14: // Last modified by leezhm@126.com on 5th July, 2011.
15:
16:
17: namespace UserDefinedPanel
18: {
19: public class CirclePanel : Panel
20: {
21: public CirclePanel() : base()
22: {
23:
24: }
25:
26: /// <summary>
27: /// Must override this function for Measure
28: /// </summary>
29: /// <param name="availableSize"></param>
30: /// <returns></returns>
31: protected override Size MeasureOverride(Size availableSize)
32: {
33: double maxChildWidth = 0.0;
34: double maxChildHeight = 0.0;
35:
36: // 获得面板中所有元素的最大宽度和高度
37: foreach (UIElement child in InternalChildren)
38: {
39: //+ 对每个元素进行测量
40: child.Measure(availableSize);
41:
42: // 或者最大值,不但更新。
43: maxChildWidth = Math.Max(maxChildWidth, child.DesiredSize.Width);
44: maxChildHeight = Math.Max(maxChildHeight, child.DesiredSize.Height);
45: }
46:
47: // 计算出所有子元素排成一行所需要的宽度,也即是最大圆的周长
48: double maxCircumference = maxChildWidth * InternalChildren.Count;
49:
50: // 通过周长计算圆的半径,并加上每个元素高度,必须加上元素高度。
51: double minCircleRadius = maxChildHeight + maxCircumference / (2 * Math.PI);
52:
53: // 定义这个最大圆的外切正方形,也即2倍的半径。
54: Size idealRectangle = new Size(2 * minCircleRadius, 2 * minCircleRadius);
55: Size desireSize = idealRectangle;
56:
57: // 注意,元素希望的最大的尺寸,永远小于或者等于父元素分配给自己元素的尺寸。
58: // 当期望值大于父元素所能够提供的值的时候,设置期望值为可用的父元素所能够分配的值。
59:
60: // the desireSize must be smaller or equal to availableSize
61: if (!double.IsInfinity(availableSize.Width))
62: {
63: if (availableSize.Width < desireSize.Width)
64: {
65: desireSize.Width = availableSize.Width;
66: }
67: }
68:
69: // the desireSize must be smaller or equal to availableSize
70: if (!double.IsInfinity(availableSize.Height))
71: {
72: if (availableSize.Height < desireSize.Height)
73: {
74: desireSize.Height = availableSize.Height;
75: }
76: }
77:
78: // return the desireSize
79: return desireSize;
80: }
81:
82:
83: /// <summary>
84: /// Must override this function for Arrange
85: /// </summary>
86: /// <param name="finalSize"></param>
87: /// <returns></returns>
88: protected override Size ArrangeOverride(Size finalSize)
89: {
90: Rect layoutRect;
91:
92: // 面板为矩形,可能宽大于高,或者高大于宽。所以要获得矩形中的最大正方形的内切圆来做圆面板
93:
94: // get the layout, Please caution that we get the maximum inscribed circleou
95: if (finalSize.Width > finalSize.Height)
96: {
97: layoutRect = new Rect((finalSize.Width - finalSize.Height) / 2, 0,
98: finalSize.Height, finalSize.Height);
99: }
100: else
101: {
102: layoutRect = new Rect(0, (finalSize.Height - finalSize.Width) / 2,
103: finalSize.Width, finalSize.Width);
104: }
105:
106: // 得到每个元素占用的最大角度,也即把圆平分。
107: double angleInc = 360.0 / InternalChildren.Count;
108: double angle = 0.0;
109:
110: // Arrange每个元素
111: foreach (UIElement child in InternalChildren)
112: {
113: //+ (1)计算每个元素的位置,最开始的初始位置设置在面板的顶部中间
114: Point location = new Point(layoutRect.Left + (layoutRect.Width -
115: child.DesiredSize.Width) / 2, layoutRect.Top);
116:
117: //+ (2)对每个元素进行旋转,注意RotateTransform的旋转坐标系是基于
118: //+ 要旋转的元素,故应该是每个元素自己的坐标系,也即元素的左上角为原点
119: child.RenderTransform = new RotateTransform(angle, child.DesiredSize.Width / 2,
120: finalSize.Height / 2 - layoutRect.Top);
121:
122: //+ 注意加上每个元素旋转角度的增值
123: angle += angleInc;
124:
125: //+ 最终进行元素的布局
126: child.Arrange(new Rect(location, child.DesiredSize));
127: }
128:
129: return finalSize;
130: }
131: }
132: }
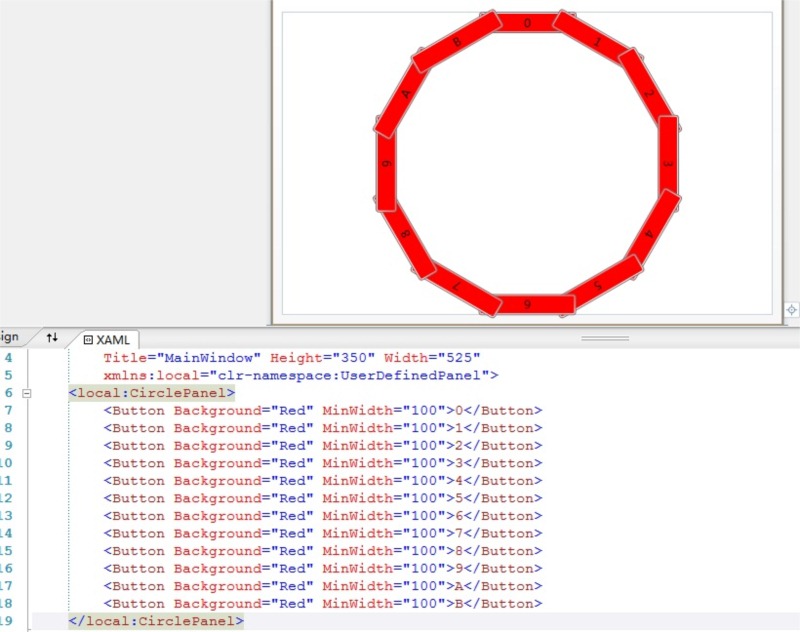
上面代码简单实现了一个元素布局为圆型的面板。可以根据注释理解每段代码,在这里要特别注意的是RotateTransform的基准坐标系,是被旋转元素的坐标系,以被旋转的元素的左上角为坐标原点。自定义面板的使用及效果如下截图:
其实观察上面的过程,可知自定义一个面板在WPF里面是很容易的事情,关键点是怎么去控制布局逻辑,而不是代码的逻辑。


 11
11

 被折叠的 条评论
为什么被折叠?
被折叠的 条评论
为什么被折叠?
 到【灌水乐园】发言


