


 本文详细介绍了AOP(面向切面编程)的基本概念,并通过具体示例演示了如何使用Spring AOP进行代码实现,包括前置通知、后置通知、环绕通知、异常通知及最终通知的使用。
1,AOP名词解释
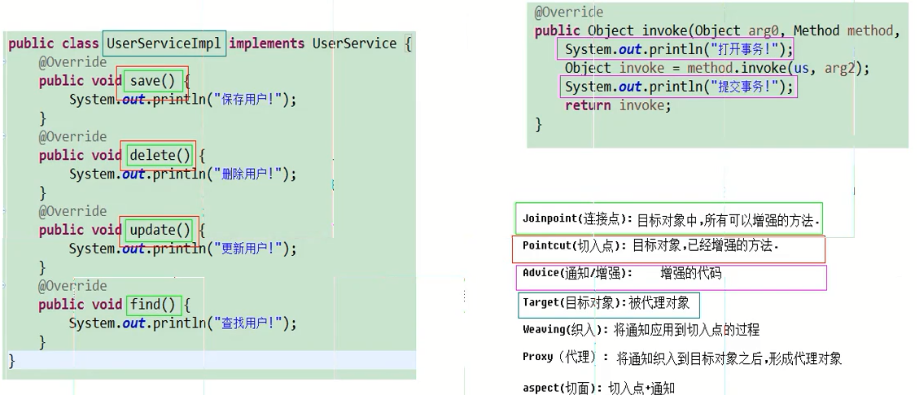
2,AOP演示
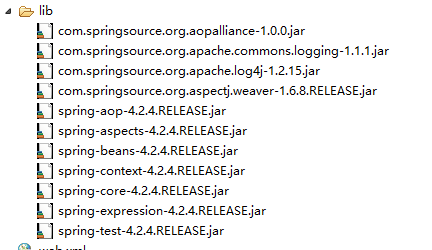
(1)导包:
(2)准备目标对象
package com.songyan.service;
import org.aspectj.lang.ProceedingJoinPoint;
import sun.net.www.content.text.plain;
/**
* 通知类
* @author sy
*
*/
public class MyAdvice {
//前置通知-->目标方法调用前调用
//后置通知(如果发生异常不在调用)-->目标方法调用后调用
//环绕通知-->目标方法调用前和后调用
//异常拦截通知-->出现异常调用
//后置通知(不论是否发生异常都会调用)-->目标方法调用后调用
/*-----------------------前置--------------------------*/
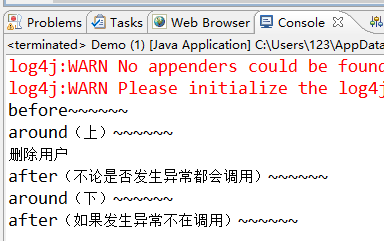
public void before()
{
System.out.println("before~~~~~~");
}
/*-----------------------后置(如果发生异常不在调用)--------------------------*/
public void after()
{
System.out.println("after(如果发生异常不在调用)~~~~~~");
}
/*-----------------------环绕--------------------------*/
public Object around(ProceedingJoinPoint joinPoint) throws Throwable
{
System.out.println("around(上)~~~~~~");
//调用目标代码
Object proceed=joinPoint.proceed();
System.out.println("around(下)~~~~~~");
return proceed;
}
/*-----------------------异常拦截--------------------------*/
public void afterException()
{
System.out.println("afterException~~~~~~");
}
/*-----------------------后置(不论是否发生异常都会调用)--------------------------*/
public void after_final()
{
System.out.println("after(不论是否发生异常都会调用)~~~~~~");
}
}
(3)准备通知(事物管理的代码)
S1:导入AOP命名空间
<beans xmlns:xsi="http://www.w3.org/2001/XMLSchema-instance"
    xmlns="http://www.springframework.org/schema/beans"
   xmlns:context="http://www.springframework.org/schema/context"
    xmlns:aop="http://www.springframework.org/schema/aop"
    xsi:schemaLocation="http://www.springframework.org/schema/beans
  http://www.springframework.org/schema/beans/spring-beans-4.2.xsd
  http://www.springframework.org/schema/context
  http://www.springframework.org/schema/context/spring-context-4.2.xsd
  http://www.springframework.org/schema/aop
  http://www.springframework.org/schema/aop/spring-aop-4.2.xsd ">


</beans>
S2:配置目标对象
    <!--配置目标对象 -->
    <bean name="userservice" class="com.songyan.service.UsrServiceImpl"></bean>
S3:配置通知对象
    <!--配置通知对象 -->
    <bean name="myadvice" class="com.songyan.service.MyAdvice"></bean>
S4:将通知织入目标对象
    <!--将通知对象织入目标对象 -->
    <aop:config>
        <!--设置切入点 -->
        <!--public void com.songyan.service.UsrServiceImpl.save()
       void com.songyan.service.UsrServiceImpl.save()
            * com.songyan.service.UsrServiceImpl.save()
       * com.songyan.service.UsrServiceImpl.*()
            * com.songyan.service.*ServiceImpl.*()
       * com.songyan.service.*ServiceImpl.*(..)
            * com.songyan.service..*ServiceImpl.*(..) -->
        <aop:pointcut expression="* com.songyan.service..*ServiceImpl.*(..)"
            id="pc" />
(4)配置进行织入(通知织入目标对象)
        <!--给通知 设置切面 -->
        <aop:aspect ref="myadvice">
            <aop:before method="before" pointcut-ref="pc" />
            <aop:after-returning method="after" pointcut-ref="pc" />
            <aop:around method="around" pointcut-ref="pc" />
            <aop:after-throwing method="afterException" pointcut-ref="pc" />
            <aop:after method="after_final" pointcut-ref="pc" />
        </aop:aspect>
    </aop:config>
</beans>
完整配置信息
<?xml version="1.0" encoding="UTF-8"?>
<beans xmlns:xsi="http://www.w3.org/2001/XMLSchema-instance"
    xmlns="http://www.springframework.org/schema/beans" xmlns:context="http://www.springframework.org/schema/context"
    xmlns:aop="http://www.springframework.org/schema/aop"
    xsi:schemaLocation="http://www.springframework.org/schema/beans http://www.springframework.org/schema/beans/spring-beans-4.2.xsd http://www.springframework.org/schema/context http://www.springframework.org/schema/context/spring-context-4.2.xsd http://www.springframework.org/schema/aop http://www.springframework.org/schema/aop/spring-aop-4.2.xsd ">
    <!--配置目标对象 -->
    <bean name="userservice" class="com.songyan.service.UsrServiceImpl"></bean>
    <!--配置通知对象 -->
    <bean name="myadvice" class="com.songyan.service.MyAdvice"></bean>
    <!--将通知对象织入目标对象 -->
    <aop:config>
        <!--设置切入点 -->
        <!--public void com.songyan.service.UsrServiceImpl.save() void com.songyan.service.UsrServiceImpl.save()
            * com.songyan.service.UsrServiceImpl.save() * com.songyan.service.UsrServiceImpl.*()
            * com.songyan.service.*ServiceImpl.*() * com.songyan.service.*ServiceImpl.*(..)
            * com.songyan.service..*ServiceImpl.*(..) -->
        <aop:pointcut expression="execution(* com.songyan.service.*ServiceImpl.*(..))" id="pc" />
        <!--给通知 设置切面 -->
        <aop:aspect ref="myadvice">
            <aop:before method="before" pointcut-ref="pc" />
            <aop:after-returning method="after" pointcut-ref="pc" />
            <aop:around method="around" pointcut-ref="pc" />
            <aop:after-throwing method="afterException" pointcut-ref="pc" />
            <aop:after method="after_final" pointcut-ref="pc" />
        </aop:aspect>
    </aop:config>
</beans>
(4)测试
package com.songyan.service;

import org.springframework.context.ApplicationContext;
import org.springframework.context.support.ClassPathXmlApplicationContext;

public class Demo {
public static void main(String[] args) {
    ApplicationContext applicationContext=new ClassPathXmlApplicationContext("com/songyan/service/beans1.xml");
    UserService userService=(UserService)applicationContext.getBean("userservice");
    userService.delete();
}
}
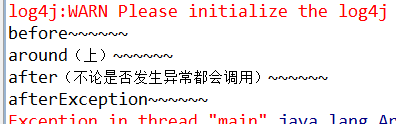
将delete里面的代码修改:
    public void before()
    {
        System.out.println("before~~~~~~");
    }
这样在运行的时候就会发生异常,
after-returning 定义的方法就不会运行
after-throwing 定义的方法就会运行
after 不管什么情况都会运行


 883
883

 被折叠的 条评论
为什么被折叠?
被折叠的 条评论
为什么被折叠?
 到【灌水乐园】发言


