


 本文详细介绍了如何在Java项目中整合MyBatis框架,包括创建工程、配置数据库、设置MyBatis环境、编写实体类、定义SQL映射文件、配置Log4j以及编写测试代码的全过程。
一、创建工程
1、创建Java项目,勾选Java EE,Next,修改名称,Finish

2、在WEB-INF下创建两个文件夹classes和lib,分别用作输出文件目录和库文件目录
3、File-Project Structure, Modules-Path中将Out path和Test Out path更改为classes
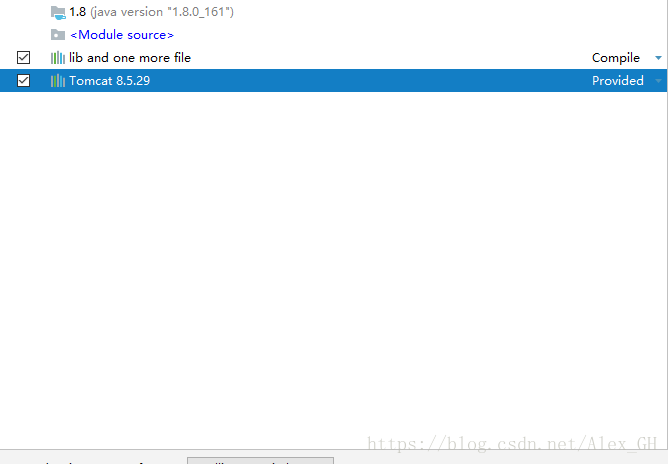
4、Module-Dependencies添加Jars or Directories选中lib文件夹,添加Library选中Tomcat
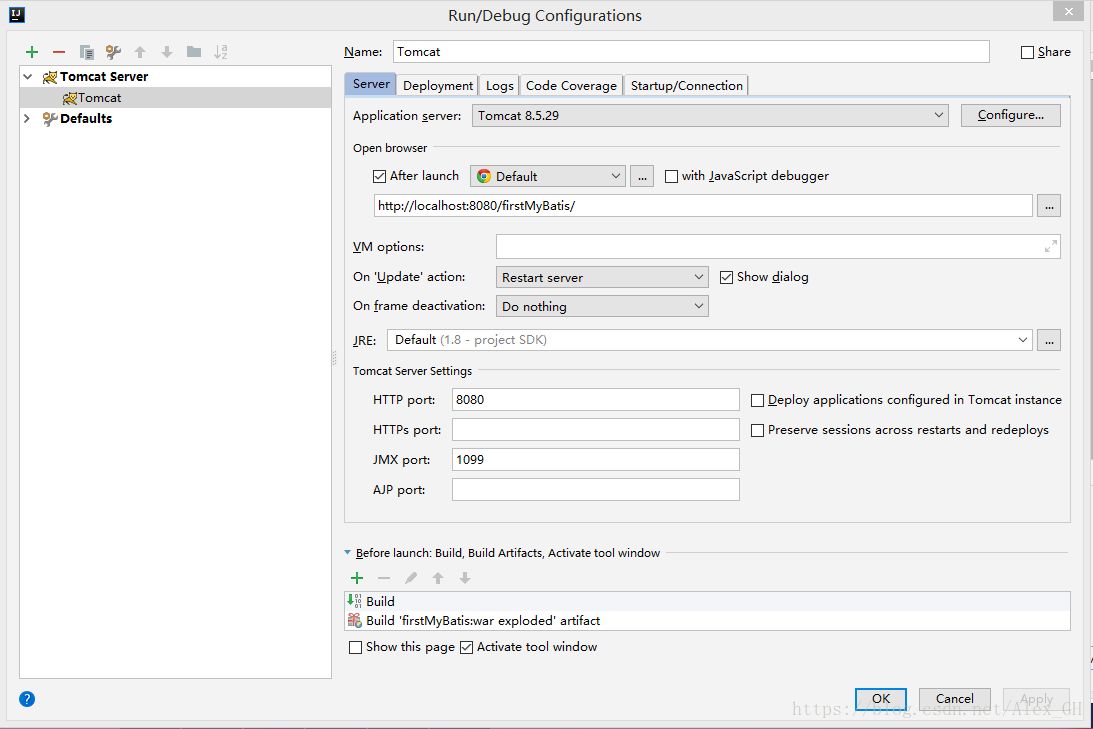
5、打开Edit Configuration,创建一个Tomcat Server

6、点击运行,能打开index.jsp,配置完成
二、准备数据库
1、创建数据库MyBatis
CREATE DATABASE mybatis DEFAULT CHARACTER SET utf8 COLLATE utf8_general_ci;
2、创建数据表
use mybatis;

CREATE TABLE IF NOT EXISTS country (
id int NOT NULL AUTO_INCREMENT,
countryname varchar(255) NULL,
countrycode varchar(255) NULL,
PRIMARY KEY (id));
insert country(countryname, countrycode)
values ('中国','CN'),('美国','US'),('俄罗斯','RU'),
('英国','GB'),('法国','FR');
三、配置MyBatis
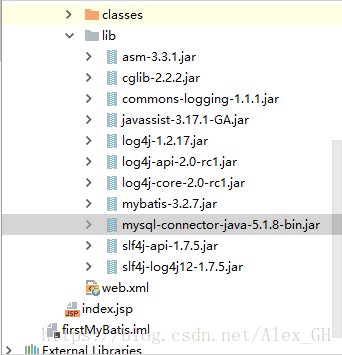
1、添加MySQL、MyBatis及其依赖库包至lib下,右键Add As Library
2、创建config目录,创建jdbc.properties文件,放置配置信息
jdbc.DriverClassName=com.mysql.jdbc.Driver
jdbc.url=jdbc:mysql://127.0.0.1:3306/mybatis
jdbc.username=root
jdbc.password=password
3、在config目录下,创建mybatis.xml文件
<?xml version="1.0" encoding="UTF-8" ?>
<!DOCTYPE configuration
PUBLIC "-//mybatis.org//DTD Config 3.0//EN"
"http://mybatis.org/dtd/mybatis-3-config.dtd">
<configuration>
<!--加载资源文件-->
<properties resource="jdbc.properties"></properties>
<!--settings配置LOG4J输出日志 -->
<settings>
<setting name="logImpl" value="LOG4J"/>
</settings>
<!--typeAliases配置包的别名-->
<!--<typeAliases>-->
<!--<package name=""-->
<!--</typeAliases>-->

<!--environments配置了数据库连接,配置了driver、url、username、password属性-->
<environments default="development">
<environment id="development">
<transactionManager type="JDBC">
<property name="" value="" />
</transactionManager>
<dataSource type="UNPOOLED">
<property name="driver" value="${jdbc.DriverClassName}" />
<property name="url" value="${jdbc.url}" />
<property name="username" value="${jdbc.username}" />
<property name="password" value="${jdbc.password}" />
</dataSource>
</environment>
</environments>
<!--配置一个SQL语句和映射的配置文件-->
<mappers>
<mapper resource="Country.xml" />
</mappers>
</configuration>
4、在src目录下创建实体类Country.java
package model;

public class Country {
private Long id;
private String countryname;
private String countrycode;

public String getCountryname() {
return countryname;
}

public void setCountryname(String countryname) {
this.countryname = countryname;
}

public String getCountrycode() {
return countrycode;
}

public void setCountrycode(String countrycode) {
this.countrycode = countrycode;
}

public Long getId() {
return id;
}

@Override
public String toString() {
return "Country{" +
"id=" + id +
", countryname='" + countryname + '\'' +
", countrycode='" + countrycode + '\'' +
'}';
}
}
5、在config下创建mapper文件Country.xml,存放SQL语句及其映射
<?xml version="1.0" encoding="UTF-8" ?>
<!DOCTYPE mapper
PUBLIC "-//mybatis.org//DTD Mapper 3.0//EN"
"http://mybatis.org/dtd/mybatis-3-mapper.dtd">
<!--mapper为根元素,namespace指定了命名空间-->
<mapper namespace="model.Country">
<!--定义一个SELECT查询-->
<select id="selectAll" resultType="model.Country">
SELECT * FROM country
</select>
</mapper>
6、配置Log4j(可选,若不配置,最后运行会报WARN)

# Configure logging for testing: optionally with log file
log4j.rootLogger=WARN, stdout
# log4j.rootLogger=WARN, stdout, logfile

log4j.appender.stdout=org.apache.log4j.ConsoleAppender
log4j.appender.stdout.layout=org.apache.log4j.PatternLayout
log4j.appender.stdout.layout.ConversionPattern=%d %p [%c] - %m%n

log4j.appender.logfile=org.apache.log4j.FileAppender
log4j.appender.logfile.File=target/spring.log
log4j.appender.logfile.layout=org.apache.log4j.PatternLayout
log4j.appender.logfile.layout.ConversionPattern=%d %p [%c] - %m%n
7、编写测试代码Demo1.java
package test;

import model.Country;
import org.apache.ibatis.io.Resources;
import org.apache.ibatis.session.SqlSession;
import org.apache.ibatis.session.SqlSessionFactory;
import org.apache.ibatis.session.SqlSessionFactoryBuilder;
import org.junit.BeforeClass;
import org.junit.Test;

import java.io.IOException;
import java.io.InputStream;
import java.util.List;

public class Demo1 {
private static SqlSessionFactory sqlSessionFactory;

//使用junit4
@BeforeClass
public static void init(){
try{
//将mybatis.xml读入InputStream
InputStream inputStream = Resources.getResourceAsStream("mybatis.xml");
//通过SqlSessionFactoryBuilder创建sqlSessionFactory
sqlSessionFactory = new SqlSessionFactoryBuilder().build(inputStream);
inputStream.close();
} catch (IOException e) {
e.printStackTrace();
}
}

//测试
@Test
public void testSelectAll(){
//打开会话
SqlSession sqlSession = sqlSessionFactory.openSession();
try {
List<Country> countryList = sqlSession.selectList("model.Country.selectAll");
printCountryList(countryList);
}finally {
//关闭会话
sqlSession.close();
}
}

private void printCountryList(List<Country>countryList){
for (Country country : countryList){
System.out.println(country);
}
}
}
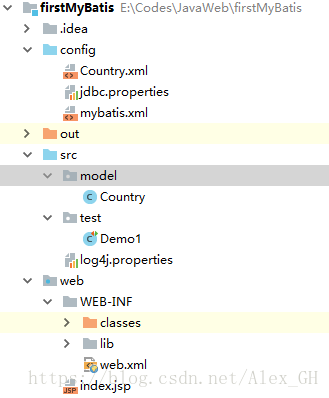
项目结构:
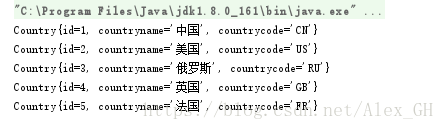
运行结果如下:


 1131
1131

 被折叠的 条评论
为什么被折叠?
被折叠的 条评论
为什么被折叠?
 到【灌水乐园】发言


