#include <ti/driverlib/m0p/dl_interrupt.h>
#include “ti_msp_dl_config.h”
#include “oled_hardware_i2c.h”
volatile uint32_t S2, S3;
volatile uint32_t S1,S4;
void TB662L_f(uint8_t a,uint8_t b){
if( a== 0&&b == 0){ DL_GPIO_clearPins(TB662L_PORT, TB662L_BIN2_PIN |TB662L_AIN2_PIN); DL_GPIO_setPins(TB662L_PORT, TB662L_BIN1_PIN |TB662L_AIN1_PIN); } if(a == 1&&b == 1) { DL_GPIO_setPins(TB662L_PORT, TB662L_BIN2_PIN |TB662L_AIN2_PIN); DL_GPIO_clearPins(TB662L_PORT, TB662L_BIN1_PIN |TB662L_AIN1_PIN); } if(a == 1&&b == 0) { DL_GPIO_setPins(TB662L_PORT, TB662L_BIN2_PIN |TB662L_AIN2_PIN); DL_GPIO_setPins(TB662L_PORT, TB662L_BIN1_PIN |TB662L_AIN1_PIN); }
}
void PWM(uint32_t h,uint32_t f){
DL_TimerA_setCaptureCompareValue(PWM_0_INST, h, DL_TIMER_CC_1_INDEX); DL_TimerA_setCaptureCompareValue(PWM_0_INST, f, DL_TIMER_CC_0_INDEX);
}
void Motor(){
if(((DL_GPIO_readPins(Tracking_S2_PORT,Tracking_S2_PIN) & Tracking_S2_PIN)? 1:0) ==0&((DL_GPIO_readPins(Tracking_S3_PORT,Tracking_S3_PIN) & Tracking_S3_PIN)? 1:0) == 0){ TB662L_f(1,0); while (1) { TB662L_f(1,1); PWM(0,150); if(((DL_GPIO_readPins(Tracking_S2_PORT,Tracking_S2_PIN) & Tracking_S2_PIN)? 1:0) == 1&&((DL_GPIO_readPins(Tracking_S3_PORT,Tracking_S3_PIN) & Tracking_S3_PIN)? 1:0) == 1) break; } TB662L_f(1,0); delay_cycles(32000000/500); TB662L_f(1,1); } if(((DL_GPIO_readPins(Tracking_S2_PORT,Tracking_S2_PIN) & Tracking_S2_PIN)? 1:0) == 0&&((DL_GPIO_readPins(Tracking_S3_PORT,Tracking_S3_PIN) & Tracking_S3_PIN)? 1:0) == 1){ PWM(400,300); } if(((DL_GPIO_readPins(Tracking_S2_PORT,Tracking_S2_PIN) & Tracking_S2_PIN)? 1:0) == 1&&((DL_GPIO_readPins(Tracking_S3_PORT,Tracking_S3_PIN) & Tracking_S3_PIN)? 1:0) == 0){ PWM(300,400); } if(((DL_GPIO_readPins(Tracking_S2_PORT,Tracking_S2_PIN) & Tracking_S2_PIN)? 1:0) == 1&&((DL_GPIO_readPins(Tracking_S3_PORT,Tracking_S3_PIN) & Tracking_S3_PIN)? 1:0) == 1){ PWM(250,250); } if(((DL_GPIO_readPins(Tracking_S1_PORT,Tracking_S1_PIN) & Tracking_S1_PIN)? 1:0) == 1&&((DL_GPIO_readPins(Tracking_S4_PORT,Tracking_S4_PIN) & Tracking_S4_PIN)? 1:0) == 0){ PWM(300,400); } if(((DL_GPIO_readPins(Tracking_S1_PORT,Tracking_S1_PIN) & Tracking_S1_PIN)? 1:0) == 0&&((DL_GPIO_readPins(Tracking_S4_PORT,Tracking_S4_PIN) & Tracking_S4_PIN)? 1:0) == 1){ PWM(400,300); }
}
void Key1(void){
while(((DL_GPIO_readPins(Key_PORT,Key_Key1_PIN) & Key_Key1_PIN )? 1:0)) { OLED_ShowString(40,0,(uint8_t *)“Motor1”,16); OLED_ShowString(0,2,(uint8_t *)“S2:”,16); OLED_ShowString(0,4,(uint8_t *)“S3:”,16); OLED_ShowNum(20,2,S3,1,16); OLED_ShowNum(20,4,S2,1,16); }
}
int main(void)
{
SYSCFG_DL_init(); //清除定时器中断标志 //使能定时器中断 NVIC_EnableIRQ(TIMER_0_INST_INT_IRQN); DL_TimerG_startCounter(PWM_0_INST); TB662L_f(1,1); OLED_Init(); DL_GPIO_setPins(LED_PORT , LED_PIN_0_PIN); Key1(); while (1) { S1 = ((DL_GPIO_readPins(Tracking_S1_PORT,Tracking_S1_PIN) & Tracking_S1_PIN)? 1:0); S2 = ((DL_GPIO_readPins(Tracking_S2_PORT,Tracking_S2_PIN) & Tracking_S2_PIN)? 1:0); S3 = ((DL_GPIO_readPins(Tracking_S3_PORT,Tracking_S3_PIN) & Tracking_S3_PIN)? 1:0); S4 = ((DL_GPIO_readPins(Tracking_S4_PORT,Tracking_S4_PIN) & Tracking_S4_PIN)? 1:0); Motor(); }
}
@c:\Users\33225\Desktop\empty_driverlib_src_LP_MSPM0G3507_nortos_ticlang/ 设计制作一个简易自行瞄准装置,该装置包括自动寻迹小车及瞄准模块两部
分。自动寻迹小车行驶必须采用TI MSPM0系列MCU(简称MSPM0)控制(包
括巡迹、电机控制);要求MSPM0
小车行驶轨迹外沿为 100cm×100cm 的正方形,边线为黑色,线宽
1.8cm±0.2cm。正方形四个外顶点为 A、B、C 和 D 点。小车可沿行驶轨迹自动
寻迹逆时针方向行驶。
二、 要求
基本要求
(1)小车可以沿行驶轨迹自动寻迹行驶,行驶圈数N可在1~5之间设定,
行驶时间t ≤20s。此时瞄准模块电源开关断开。请在原代码的基础上在ccs环境改写MSPM0G3507芯片的代码写出第一问代码,要求评委任意指定小车行驶圈数,小车行驶完指定圈数后停止在起点。基本要求(1)中,行驶圈数可设1-5通键盘设定来控制圈数。代码下发和下面原代码一致,请将新添加的引脚指出来并用sysconfig图形化工具配置,原代码的引脚配置不变,只写循迹小车部分完成基本要求(1),瞄准模块不用管。四路灰度传感器循迹就用原代码方式实现。只在原代码基础上改动完成第一问,写在empty.c里面,其中不可以在赛道做任何标记。若想增加一个按键就Key2,引脚为PA21


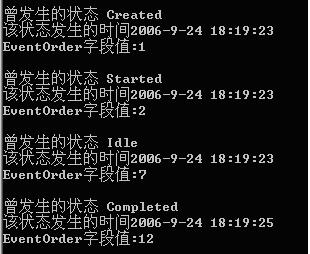
 本文介绍如何使用WorkflowTrackingRecord对象来获取工作流实例的状态信息,包括曾发生的状态及其时间,并提供了具体的查询示例。


 74
74

 被折叠的 条评论
为什么被折叠?
被折叠的 条评论
为什么被折叠?
 到【灌水乐园】发言


