


 本文详细介绍iptables的高级配置及实战应用,包括速率限制、多端口匹配等,并提供了多种场景下的配置示例。同时,文章还介绍了SELinux的基础概念、工作原理及其配置方法。
按包速率匹配 (
limit
)
-m limit --limit
匹配速率
[--burst
缓冲数量
]
用一定速率去匹配数据包
例如:
iptables -A FORWARD -d 192.168.0.1-m limit --limit 50/s -j ACCEPT
iptables -A FORWARD -d 192.168.0.1 -j DROP
注意:
limit
英语上看是限制的意思,但实际上只是按一定速率去匹配而已,50/s表示1秒中转发50个数据包,要想限制的话后面要再跟一条
DROP
多端口匹配 (
multiport
)
-m multiport<--sports|--dports|--ports>
端口
1[,
端口
2,..,
端口
n]
一次性匹配多个端口,可以区分源端口,目的端口或不指定端口
例如:
iptables -A INPUT -p tcp -mmultiport --dports 21,22,25,80,110 -jACCEPT
注意:
必须与
-p
参数一起使用
保存:/etc/init.d/iptables save
实战举例1
配置vsftp服务器主动模式iptables规则:
iptables配置FTP的主动和被动模式
FTP协议有两种工作方式:PORT方式和PASV方式,中文意思为主动式和被动式。
Port模式:ftp server:tcp 21<------client:dynamic ftp server:tcp 20 ------>client:dynamic
Pasv模式:ftp server:tcp 21<----client:dynamic ftp server:tcp dynamic <----client:dynamic
PORT(主动)方式的连接过程是:客户端向服务器的FTP端口(默认是21)发送连接请求,服务器接受连接,建立一条命令链路。当需要传送数据时,客户 端在命令链路上用PORT命令告诉服务器:“我打开了XXXX端口,你过来连接我”。于是服务器从20端口向客户端的XXXX端口发送连接请求,建立一条数据链路来传送数据。
PASV(被动)方式的连接过程是:客户端向服务器的FTP端口(默认是21)发送连接请求,服务器接受连接,建立一条命令链路。当需要传送数据时,服务 器在命令链路上用PASV命令告诉客户端:“我打开了XXXX端口,你过来连接我”。于是客户端向服务器的XXXX端口发送连接请求,建立一条数据链路来 传送数据。
1
、开放20、21端口:
# iptables -A INPUT -p tcp --dport 21 -j ACCEPT
# iptables -A INPUT -p tcp --dport 20 -j ACCEPT
# iptables -A INPUT -p tcp --dport 21 -j ACCEPT
# iptables -A INPUT -p tcp --dport 20 -j ACCEPT
- <p align="left"><span lang="EN-US" 微软雅黑","sans-serif";mso-bidi-font-family:="" arial;mso-font-kerning:0pt"="">[root@xuegod63 ~]# iptables -A INPUT -i lo -j
- ACCEPT #</span><span 微软雅黑","sans-serif";="" mso-bidi-font-family:arial;mso-font-kerning:0pt"="">默认情况一般服务与本机通讯以<span lang="EN-US">127.0.0.1</span>来通讯的。<span lang="EN-US"><o:p></o:p></span></span></p>
- <p align="left"><span lang="EN-US" 微软雅黑","sans-serif";mso-bidi-font-family:="" arial;mso-font-kerning:0pt"="">[root@xuegod63 ~]# iptables -A INPUT -p tcp -m
- multiport --dports 21,22,80 -j ACCEPT <o:p></o:p></span></p>
- <p align="left"><span lang="EN-US" 微软雅黑","sans-serif";mso-bidi-font-family:="" arial;mso-font-kerning:0pt"="">[root@xuegod63 ~]# iptables -A INPUT -m state
- --state RELATED,ESTABLISHED -j ACCEPT <o:p></o:p></span></p>
- <p align="left"><span lang="EN-US" 微软雅黑","sans-serif";mso-bidi-font-family:="" arial;mso-font-kerning:0pt"="">[root@xuegod63 ~]# iptables -A INPUT -p
- icmp -j ACCEPT #</span><span 微软雅黑","sans-serif";mso-bidi-font-family:="" arial;mso-font-kerning:0pt"="">允许其他机器<span lang="EN-US"> ping </span>本机</span></p>
被动模式 connect_from_port_20=NO
Iptables 指南 1.1.19
https://www.frozentux.net/iptables-tutorial/cn/iptables-tutorial-cn-1.1.19.html#STATEMACHINEINTRODUCTION
如果不行:
3
、上面还不行的话,再加载FTP额外模块:
modprobe ip_nat_ftp (我做实验只加载这一块就ok了)
modprobe ip_conntrack
modprobe ip_conntrack_ftp
modprobe ip_nat_ftp (我做实验只加载这一块就ok了)
modprobe ip_conntrack
modprobe ip_conntrack_ftp

常用规则:
*filter
:INPUT ACCEPT [0:0]
:FORWARD ACCEPT [0:0]
:OUTPUT ACCEPT [0:0]
-A INPUT -m state --stateESTABLISHED,RELATED -j ACCEPT
-A INPUT -p icmp -j ACCEPT
-A INPUT -i lo -j ACCEPT
-A INPUT -m state --state NEW -m tcp-p tcp --dport 22 -j ACCEPT
实战举例2
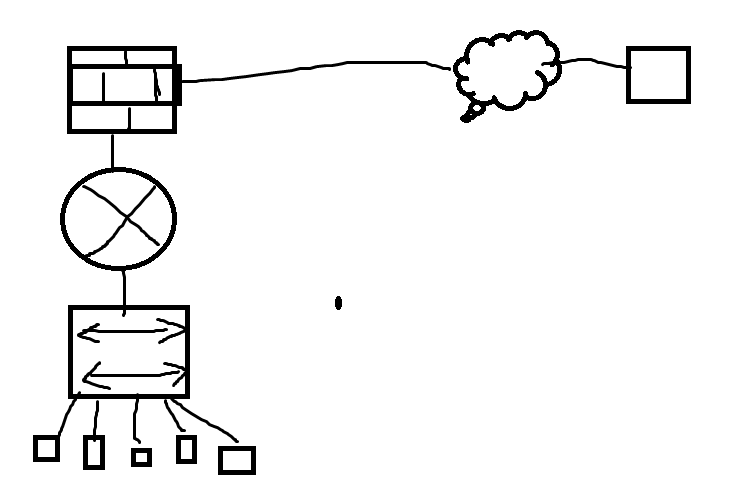
例1:使用iptables防火墙保护公司web服务器。
分析:这允许单服务器的防护。
弄清对外服务对象
书写规则
网络接口lo 的处理
协议
+
端口的处理
状态监测的处理
具体配置如下:
web
服务器端:xuegod63
客户端: xuegod64
如果有硬件防火墙:拓扑图:
配置web服务器xuegod63防火墙:
配置之前,清空下已有的规则,防止规则冲突不生效
[root@xuegod63 ~]# iptables -A INPUT -i lo-j ACCEPT #
放行环回口所有数据
[root@xuegod63 ~]# iptables -A INPUT -ptcp -m multiport --dports 22,80 -j ACCEPT
或:
[root@localhost~]# iptables -A INPUT -p tcp --dport 22 -j ACCEPT
[root@localhost~]# iptables -A INPUT -p tcp --dport 80 -j ACCEPT
[root@xuegod63 ~]# iptables -A INPUT -mstate --state RELATED,ESTABLISHED -j ACCEPT
#允许已经建立tcp连接的包以及该连接相关的包通过。状态防火墙能识别TCP或者UDP会话。非状态防火墙只能根据端口识别,不能识别会话
[root@xuegod63 ~]# iptables -P INPUT DROP
注:一般iptables,OUTPUT出口一般都放行,不需要在出口上做限制。这样允许服务器主动访问外网所有数据。
启动web服务器:
[root@xuegod63 ~]# service httpd start
Starting httpd: [ OK ]
测试:在xuegod63上安装一个vsftpd服务器,看看是否会禁止用户访问
[root@xuegod63 ~]# yum install vsftpd -y #
安装ftp服务器并开起
[root@xuegod63 ~]# service vsftpd start
Starting vsftpd for vsftpd: [ OK ]
xuegod64安装:
[root@xuegod64 ~]# yum install elinks -y
测试web访问
[root@xuegod64 ~]# elinks 192.168.1.63
在windows 测试访问http://192.168.1.63可以访问; 测试FTP无法访问
测试vsftpd:拒绝访问
[root@xuegod64 ~]# rpm -ivh/mnt/Packages/lftp-4.0.9-1.el6.x86_64.rpm
[root@xuegod64 ~]# lftp 192.168.1.63
lftp 192.168.1.63:~> ls #可以看到连接并断开了
`ls' at 0 [Connecting...]
查看配置结果:
查看配置结果:
[root@xuegod63~]# iptables -L -n #对比 加参数-n和不加-n参数区别
ChainINPUT (policy DROP)
target prot opt source destination
ACCEPT all -- 0.0.0.0/0 0.0.0.0/0
ACCEPT tcp -- 0.0.0.0/0 0.0.0.0/0 multiport dports 22,80
ACCEPT tcp -- 0.0.0.0/0 0.0.0.0/0 tcp dpt:22
ACCEPT tcp -- 0.0.0.0/0 0.0.0.0/0 tcp dpt:80
ACCEPT all -- 0.0.0.0/0 0.0.0.0/0 state RELATED,ESTABLISHED
ChainFORWARD (policy ACCEPT)
target prot opt source destination
ChainOUTPUT (policy ACCEPT)
target prot opt source destination
[root@xuegod63~]# iptables -L
ChainINPUT (policy DROP)
target prot opt source destination
ACCEPT all -- anywhere anywhere
ACCEPT tcp -- anywhere anywhere multiport dports ssh,http
ACCEPT tcp -- anywhere anywhere tcp dpt:ssh
ACCEPT tcp -- anywhere anywhere tcp dpt:http
ACCEPT all -- anywhere anywhere state RELATED,ESTABLISHED
例2:使用iptables搭建路由器,通过SNAT功能,使内网PC机,可以上网。
£ 弄清网络拓扑
扩展
,IP地址命名技巧:方法一:以两个设备名称定义相邻的网段。适用于做多个网段的实验

方法二: 从左到右,依次命名。地址1给核心设备 如下:
实验环境:
xuegod63
做路由器,xuegod64做客户端

需求: 使xuegod64可以通过xuegod63上网。
配置:xuegod63
添加两个网卡,配置eth0为桥接,eth1为vmnet4模式。
配置eth1的IP地址为:192.168.2.1 /24
启用内核路由转发功能:临时生效
[root@xuegod63 ~]#echo"1" > /proc/sys/net/ipv4/ip_forward
永久生效:
[root@xuegod63 ~]#vim /etc/sysctl.conf
改:#net.ipv4.ip_forward =0
为: net.ipv4.ip_forward =1
改完使配置生效:
[root@xuegod63 ~]# sysctl -p
配置之前,把前面的规则去除了,否认会达不到一定的效果
iptables -P INPUT ACCEPT
iptables -F
配置SNAT:
[root@xuegod63 ~]#iptables-t nat -A POSTROUTING -s 192.168.2.0/24 -j SNAT --to 192.168.1.63
或:
[root@xuegod63 ~]#iptables -t nat -APOSTROUTING -s 192.168.2.0/24 -oeth0 -j MASQUERADE
配置客户端xuegod64:
修改xuegod64 eth0网卡模式为vmnet4
可以通过setup来配置eth0 IP,网关,DNS:
[root@xuegod64 ~]#cat /etc/sysconfig/network-scripts/ifcfg-eth0
DEVICE=eth0
NM_CONTROLLED=yes
IPADDR=192.168.2.2
NETMASK=255.255.255.0
GATEWAY=192.168.2.1 ##
网关指向xuegod63的eth1地址
DNS1=8.8.8.8
ONBOOT=yes
TYPE=Ethernet
。。。
NAME="eth0"
HWADDR=00:0C:29:12:EC:1E
[root@xuegod64 ~]#service network restart
测试:
ping 192.168.1.1
ping baidu.com
例3:
拒绝访问服务器本身和拒绝通过服务器访问别的机器
。 主要是考大家是否明白iptables每个链的作用
£ 过滤位置filer 表FORWARD 链
£ 匹配条件-s -d -p --s/dport
£ 处理动作ACCEPT DROP
实例3:
拒绝访问服务器本身和拒绝通过服务器访问别的机器:
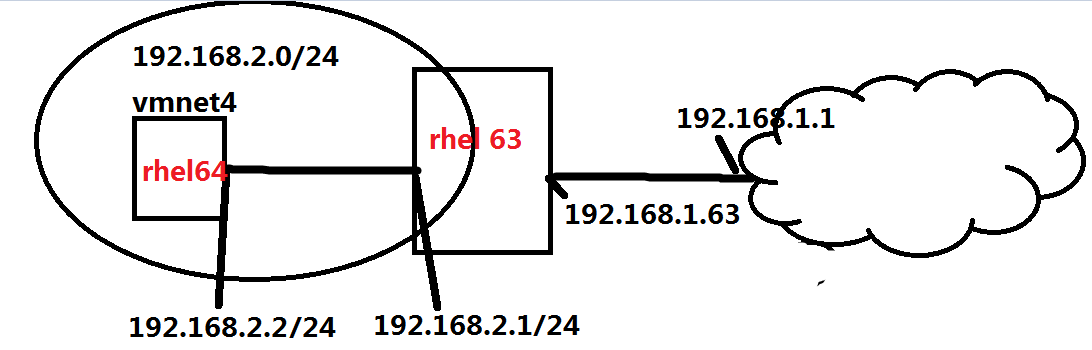
实验环境:
配置好网络和对应的IP地址:
RHEL64
:IP:192.168.2.2 网卡属于:Vmnet4
RHEL63
:eth1 : IP:192.168.2.1 网卡属于:Vmnet4
RHEL63
:eth0 : IP:192.168.1.63
网络拓扑图如下:

限制前测试网络连通性:
xuegod64
上执行
ping 192.168.2.1
ping 192.168.1.1
都可以ping通。
xuegod63
启用内核路由转发功能:
永久生效:
[root@xuegod63 ~]#vim /etc/sysctl.conf
改:#net.ipv4.ip_forward =0
为: net.ipv4.ip_forward =1
改完使配置生效:
[root@xuegod63 ~]# sysctl -p
添加防火墙规则:禁止xuegod64通过xuegod63 访问192.168.2.1 。即不允许访问服务器本身。
互动:
这时应该在FORWARD链上添加规则还是应该在INPUT链上添加规则?
添加
防火墙规则:
iptables -A INPUT -s 192.168.2.2 -j DROP
测试:
ping
不通
192.168.2.1
互动:
为什么在FORWARD链上添加了就没有拒绝成功?
查看数据包,匹配流程图:
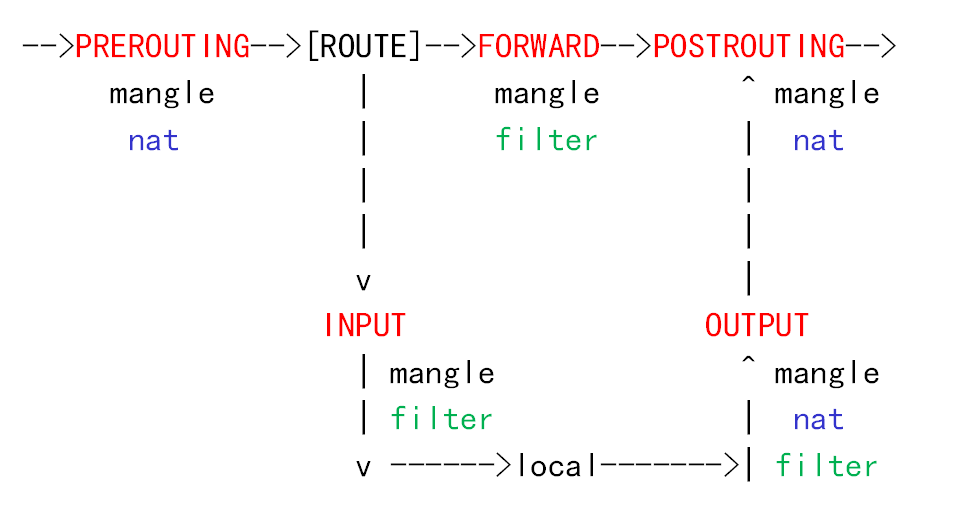
注:直接ping服务器本身,数据流是不经过FORWARD链的。所以规则要添加在INPUT链上。
禁止源MAC地址为00:0C:29:12:EC:28,访问防火墙本身,要在INPUT链上加操作:
[root@localhost ~]# iptables -A INPUT -m mac--mac-source 00:0C:29:48:80:95 -j DROP
禁止通过防火墙访问IP地址为:
123.22.22.22
的
游戏服务器,要在FORWARD链中操作:
[root@xuegod63 ~]#iptables -A FORWARD -d 123.22.22.22 -j DROP
禁止192.168.2.2这台机器通过服务器上网
iptables -A FORWARD -s 192.168.2.2 -j DROP
互动:
这两种写法,哪个更好?
总结:
添加规则,要添加在最靠近数据流源的链上,减少服务器不必要的资源开销。
例4:使用DNAT 功能,把内网web服务器端口映射到路由器外网
实验环境:
RHEL64
:IP:192.168.2.2 网卡属于:Vmnet4
RHEL63
:eth1 : IP:192.168.2.1 网卡属于:Vmnet4
需求:把64的80端口映射到63的80端口,客户端访问192.168.1.63:80 即可访问192.168.2.2:80的内容
xuegod64
,开启动httpd服务,首页内容为: 192.168.2.2
xuegod64
:
[root@localhost ~]# yum install httpd -y
[root@localhost ~]# /etc/init.d/httpdstart
[root@localhost ~]# echo 192.168.2.2 >/var/www/html/index.html
测试:
RHEL63
通过elinks 访问192.168.2.2正常
你物理机(IP:192.168.1.224)通过浏览器访问192.168.2.2不正常。因为192.168.1.224无法访问到内网服务器192.168.2.2。
做DNAT端口映射:
xuegod63
:
[root@xuegod63 ~]# iptables -t nat -A PREROUTING -i eth0 -p tcp--dport 80 -j DNAT --to 192.168.2.2:80
或:
[root@localhost ~]# iptables -t nat -APREROUTING -d 192.168.1.63 -p tcp --dport 80 -j DNAT --to 192.168.2.2:80
查看两者区别:
[root@xuegod63 ~]#
iptables -t nat -L -n
Chain PREROUTING (policy ACCEPT)
target prot opt source destination
DNAT tcp -- 0.0.0.0/0
0.0.0.0/0
tcp dpt:80 to:192.168.2.2:80
DNAT tcp -- 0.0.0.0/0
192.168.1.63
tcp dpt:80 to:192.168.2.2:80
测试:宿主机浏览器访问:192.168.0.63:80即可访问到64的内容
如果是ADSL则为:
iptables -t nat -APREROUTING -i ppp0 -p tcp --dport 81 -jDNAT --to 192.168.0.2:80
iptables
命令使用总则总结:
£ 所有链名必须大写
INPUT/OUTPUT/FORWARD/PREROUTING/POSTROUTING
£ 所有表名必须小写
filter/nat/mangle
£ 所有动作必须大写
ACCEPT/DROP/SNAT/DNAT/MASQUERADE
£ 所有匹配必须小写
-s/-d/-m <module_name>/-p
关于SNAT和DNAT的区别:
http://www.cnblogs.com/iceocean/articles/1616305.html
selinux
概述
我们生产当中很少用到selinux,几乎80以上的都关闭,开启会影响业务服务正常运行,限制你服务
SELinux(Security Enhanced Linux 安全性增强的Linux),由美国国家安全局NSA(National Security Agency)开发,构建与Kernel之上,拥有灵活的强制性访问控制结构,主要用在提高Linux的安全性,提供强健的安全保证,可以防御未知攻击,据称相当于B1级的军事安全性能(信息安全评估标准)!
信息安全评估标准:4类(D,C,B,A),7个级别:D,C1,C2,B1,B2,B3,A
Selinux已经整合到了2.6的Kernel以上的版本中 uname -r
传统的Linux在没有Selinux保护的时候,倘若运行于之上的服务器被骇客攻陷,其服务器最高权限就可能随之丧失,但是倘若有了SElinux的保护,入侵的也只有服务本身,整个服务器的最高权限依然还健在!
一句话熟悉Selinux的作用:增强Linux系统安全性,一个例子:那么是我运行的Apache服务器被入侵,也只是入侵到了我httpd这个服务,可以把它禁锢到这里(相当于整个服务器运行了httpd,入侵了httpd而已),而系统的整个权限依然正常!
Selinux
特点
1
:MAC(Mandator Access Control) 对访问控制彻底化,对所有的文件,目录,端口的访问,都是基于策略设定的,这些策略都是由管理员设定的,一般用户无权限管理和更改
2
:RBAC(Role Base Access Control) 对用户只赋予最小权限,对于用户来说,被划分一些role,即使是root用户,你要是不在sysadm_r里,也不能实行sysadm_t的管理操作
3
:TE(Type Enforcement) 对进程只赋予最小运行权限,TE的概念在SElinux中非常重要,其特点是对文件赋予一个叫type的标签类型,对进程赋予一个叫domain的标签,可以规定某个标签进程只能执行某类文件,例如:
进程vim,只可以读标签为T1的文件
a.txt T1 b.txt T2
selinux
的执行模式
enforcing 强制模式,只要selinux不允许,就无法执行;
permissive 警告模式,你可以执行,但你所做事件全部记录;
disabled 关闭selinux
Selinux工作原理
Selinux工作原理
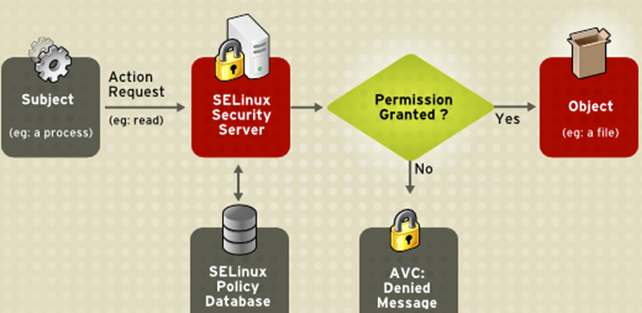
Subject进程你要干嘛,你得问selinux, 那selinux去读一下数据库,按规则你不能执行或能执行。
[root@XueGod63 ~]# rpm -qa | grep selinux #selinux
相关软件包,默认已经安装
libselinux-utils-2.0.94-5.3.el6_4.1.x86_64
libselinux-devel-2.0.94-5.3.el6_4.1.x86_64
selinux-policy-3.7.19-231.el6.noarch
libselinux-python-2.0.94-5.3.el6_4.1.x86_64
selinux-policy-targeted-3.7.19-231.el6.noarch
libselinux-2.0.94-5.3.el6_4.1.x86_64
[root@XueGod63 ~]# ls/etc/sysconfig/selinux //
配置文件位置
[root@XueGod63 ~]# getenforce //
查看当前selinux的运行状态
[root@XueGod63 ~]#
vim /etc/sysconfig/selinux
//
编辑selinux配置文件,启用selinux
SELINUX=enforcing #
启用selinux,启用了Selinux需要重启系统,初次开启,需要更新文件标签,时间较久
Selinux
状态切换
[root@XueGod63 ~]# setenforce 0 #enforcing
切换为permissive状态
[
root@XueGod63 ~]# getenforce
Permissive
[root@XueGod63 ~]# setenforce 1 #permissive
切换为 enforcing
[
root@XueGod63 ~]# getenforce
Enforcing
内核参数控制Selinux
关闭Selinux可以通过内核传递参数来控制
[root@XueGod63 ~]# vim/boot/grub/grub.conf
……
kernel /vmlinuz-2.6.32-431.el6.x86_64ro root=UUID=31f87693-32fa-4811-b5d4-7a5d35586f44rd_NO_LUKS rd_NO_LVM LANG=en_US.UTF-8rd_NO_MD SYSFONT=latarcyrheb-sun16crashkernel=128M KEYBOARDTYPE=pc KEYTABLE=usrd_NO_DM rhgb quiet selinux=0 #
末尾添加selinux=0关闭selinux
……
或者在开机时编辑grub界面,给内核传递一个参数selinux=0 方法和进入单用户方式一样,不过是一次有效Subject进程你要干嘛,你得问selinux, 那selinux去读一下数据库,按规则你不能执行或能执行。
[root@XueGod63 ~]# rpm -qa | grep selinux #selinux
相关软件包,默认已经安装
libselinux-utils-2.0.94-5.3.el6_4.1.x86_64
libselinux-devel-2.0.94-5.3.el6_4.1.x86_64
selinux-policy-3.7.19-231.el6.noarch
libselinux-python-2.0.94-5.3.el6_4.1.x86_64
selinux-policy-targeted-3.7.19-231.el6.noarch
libselinux-2.0.94-5.3.el6_4.1.x86_64
[root@XueGod63 ~]# ls/etc/sysconfig/selinux //
配置文件位置
[root@XueGod63 ~]# getenforce //
查看当前selinux的运行状态
[root@XueGod63 ~]#
vim /etc/sysconfig/selinux
//
编辑selinux配置文件,启用selinux
SELINUX=enforcing #
启用selinux,启用了Selinux需要重启系统,初次开启,需要更新文件标签,时间较久
Selinux
状态切换
[root@XueGod63 ~]# setenforce 0 #enforcing
切换为permissive状态
[
root@XueGod63 ~]# getenforce
Permissive
[root@XueGod63 ~]# setenforce 1 #permissive
切换为 enforcing
[
root@XueGod63 ~]# getenforce
Enforcing
kernel /vmlinuz-2.6.32-431.el6.x86_64ro root=UUID=31f87693-32fa-4811-b5d4-7a5d35586f44rd_NO_LUKS rd_NO_LVM LANG=en_US.UTF-8rd_NO_MD SYSFONT=latarcyrheb-sun16crashkernel=128M KEYBOARDTYPE=pc KEYTABLE=usrd_NO_DM rhgb quiet selinux=0 #
末尾添加selinux=0关闭selinux
……
或者在开机时编辑grub界面,给内核传递一个参数selinux=0 方法和进入单用户方式一样,不过是一次有效
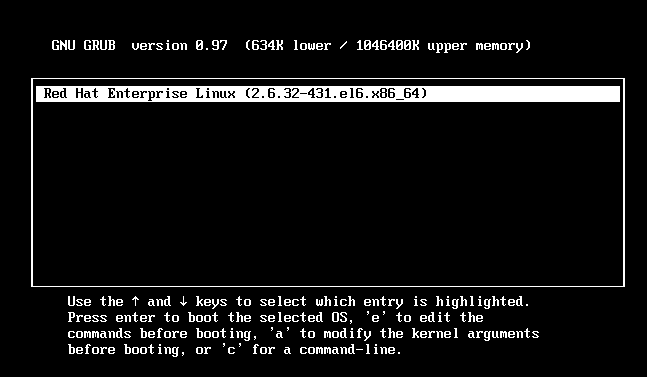
上图,按E键,进入单用户模式
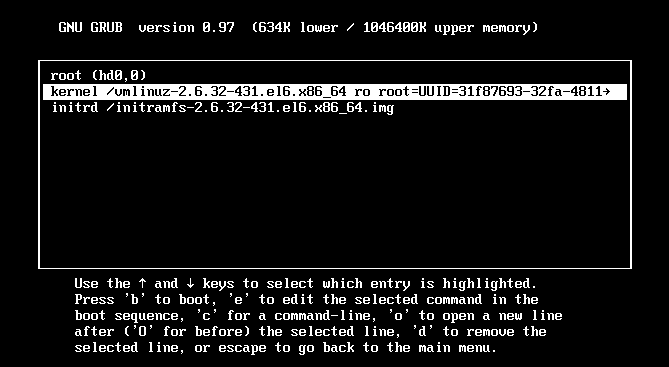
上图按E键,添加内核参数selinux=0

回车,按B键启动操作系统
[
root@XueGod63 ~]# getenforce
Disabled
[root@XueGod63 ~]# vim/etc/sysconfig/selinux
……
SELINUX=enforcing #
配置文件还是启用的,所以内核控制生效,如果在grub.conf配置文件,永久生效,启动单用户模式配置,当次有效,重启selinux将启用
……
[root@XueGod63~]# reboot //
重启会更新标签,是个”漫长”的过程


 1111
1111

 被折叠的 条评论
为什么被折叠?
被折叠的 条评论
为什么被折叠?
 到【灌水乐园】发言


